5/30/09

How to create a 'Clickable EMAIL Link' on your Blog or Website using HTML Codes: Google Blogging Tip # 44

There can be some downsides to Creating a Clickable EMAIL Link:
The foremost and common problem encountered by visitors (users) of your Blog or Website is if the 'Clickable Email Link' doesn't work you won't know it, and they will just move on.
This problem is generally caused by the Visitor to your Blog or Web Page. In order for this to work for ANY Visitor they must have their Pop Email Server Set-up. So if your visitor hasn't set up their email server then this LINK wont work.
Email Pop Servers such as Out Look Express for Windows (all versions) generally wont allow FREE Email Links.
Example: If someone uses a Yahoo FREE Email Account as their email address, then pop servers probably wont work.
However, if they use their Internet Provider, such as Verizon or Comcast as their email provider then the 'Clickable Email Link' you have on your Blog or Web Page will work on Windows Computers.

I advise putting the following along with your clickable EMAIL Link, see example on Testing Google Blogs.

If the Clickable LINK doesn't work, please copy and paste the following email address:
alternate4craigslist@yahoo.com

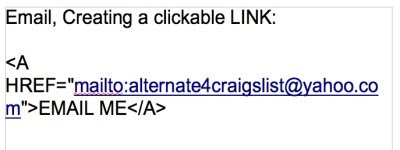
The picture below gives you the HTML Code for creating a Link from your Blog or Website to Your EMAIL Account using a mouse.
Steps:
1) Type in any email address you want to receive the message.
2) Create ANYTHING you want it to say, most used phrase is – 'EMAIL ME', as shown in the example picture, but you can call it anything you want.
IMPORTANT: Some email providers BLOCK these types of emails. To be safe, and get your email, use either an email provided from your Internet Provider -or- a .com email address.
Yahoo was used an an example only. Yahoo may block your mail if you are using a FREE account.


To see Two Types of Examples of:
Creating a Clickable EMAIL LINK for your Blog
-First, using Google Blog Posting
-Second, using Google Blog Gadgets, HTML/JavaScript
please visit TESTING GOOGLE BLOGS


http://www.testinggoogleblogs.blogspot.com/


Important:
1) Look at the code carefully and make sure you have it copied exactly including the characters and symbols.
These codes can be used either in your Posting TEXT portion; or in the Sidebar using the JavaScript Gadget.
2) This HTML Code only works on email addresses.

I will be posting HTML Codes every few days.
Check back often.
If you need a specific code, please email me.
The HTML Codes will include some JavaScript.
Not all JavaScript or HTML Codes will work on Google Blogs.

Have a Good Weekend, and Happy Blogging.
To be followed you must follow others.
5/28/09

How to create a 'MARQUEE - Scrolling Text' on your Blog or Website using HTML Codes: Google Blogging Tip # 43

Instructions:
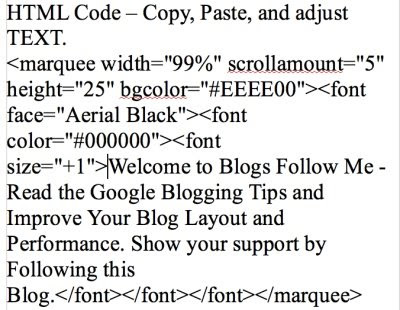
1 - TEXT: Find this text in the HTML Code below: Welcome to Blogs Follow Me - Read the Google Blogging Tips and Improve Your Blog Layout and Performance. Show your support by Following this Blog.

--->Replace the TEXT with whatever you want it to say.

Helpful Hint: Keep the TEXT reasonable short, don't make it too long or no one will read it.

2 - Marguee Size: Find this HTML Code below: marquee width="99%" scrollamount="5" height="25"
adjust the code as desired.

Note: If your using a Google Blog I recommend width-99% and height remain at 25
If you are using a Web Page I recommend the width=95% or less depending on the location.

3 - Marquee Colors: Adjust these to whatever is desired. To get a complete list of HTML Color Code Attributes, go to my BLOG Page: HTML Color Chart for Blogs.
Please Click on the LINK -
http://www.colorchart4html.blogspot.com/

Helpful Hint: When in doubt, use Black for TEXT (font color) #000000 and White for Background (bgcolor) #FFFFFF
Play around with it till you get something you like that fits your overall Blog or Web Page Background.

4 - Changing Font Styles and Size: Aerial Black works well so does font size 1.
Helpful Hint: Later, I will be adding a Google Blogging Tip on how to use HTML Codes that you can use for changing Font Size and Types (styles).

5 - Remember, ALL characters and symbols must be in the correct position, so if you try this and it doesn't work, generally thats where the ERROR is!


For an example of how this works-
Click on the URL LINK ....
'Testing Google Blogs'
http://www.testinggoogleblogs.blogspot.com/
I have included two examples:
1) inside the 'Posting Text' - this one I changed the TEXT, color background, color of the text, and the width.
2) On the 'Sidebar (column)' - this one I changed the TEXT, color background, and color of the text.

Happy Blogging.
Please recommend this BLOG to others.
Please support this Blog, Follow me or LINK to me.
Next Google Blogging Tip for HTML Codes will be posted Saturday.

5/27/09

Blog Update and Changes:

NOW - anyone can recommend your Blog be added to BLOGS FOLLOW ME.
I will add them to all three categories and if time permits send the NEW added Blog a comment to inform them.

Also, I plan to go back through all the LINKS and add them to the Blog Roll List. I will do these in batches by alphabetical order.
If the BLOG gets to full (lengthy) I will add the Blog Rolls to my second Blog - Blogs Follow Me 2.

If you have a comment or question please post it for others to see or email me at:
alternate4craigslist@yahoo.com

YES - I do follow websites (web pages). I ask that you place a LINK on your site back to me, and I encourage you to get a FREE Google Blog, even if you just use it to 'Redirect' your Blog to your Website.

Thanks for all the support.
Please take the survey on....
Testing Google Blogs - - Tell me how I am doing....
Click on the LINK, the survey is on the sidebar:
http://www.testinggoogleblogs.blogspot.com/

5/26/09

How to create a 'Clickable LINK' on your Blog or Website using HTML Codes: Google Blogging Tip # 42

The picture below gives you the HTML Codes for the two methods of creating a Link from your Blog or Website to another Blog or Website (webpage) using a mouse.
Method 1 - This will display on your Blog as a 'Complete URL Address' that can be clicked with a mouse to take someone to another destination.
Method 2 - This display on you Blog is a Title (name) that you chose that can be clicked with a mouse to take someone to another destination.
Either one of these methods is acceptable and are solely how you want your Blog or Webpage to look.


For an example of how this works-
Click on the URL LINK ....
This is Method 1 -
http://www.testinggoogleblogs.blogspot.com/
This LINK will take you to 'Testing Google Blogs', there on the sidebar (column) you can See Methods 1 and 2.

Important:
1) Look at the code carefully and make sure you have it copied exactly correct including the characters and symbols.
These codes can be used either in your Posting TEXT portion; or in the Sidebar using the JavaScript Gadget.
2) This HTML Code does NOT work on email addresses. That code is coming in a future Google Tip.

I will be posting HTML Codes every few days.
Check back often.
If you need a specific code, please email me.
The HTML Codes will include some JavaScript.
Not all JavaScript or HTML Codes will work on Google Blogs.

Happy Blogging.
Remember to add your BLOG using a complete URL Address to Google, Yahoo, and MSN.
Also follow others to be followed.

5/24/09

Question about Google Blogging Issues:

Q-1) I am still somewhat confused over this Search Engine thing and Blogs. How do Blogs relate to websites, getting listed, etc.? What about page rankings?
Number of Emails: 17
A-1) Blogs are not websites and search engines treat them differently. However, in getting listed Search Engines look for common factors which are:
Submittal to individual search engine, Yahoo, Google, and MSN all have methods of doing this. Once listed with all three of these you will be picked up by other search engines using a method called 'robots.' The time frame varies because search engines constantly change their criteria for listings. Google is especially famous for this.
The type of page or blog that search engines look for the most are registered domain name websites. The top domain is a .com
Some search engines such as Google have categories they place websites, web ages, and blogs.
Page rankings is another story, these only apply after you have been listed with a particular search engine, and page rankings vary from one search engine to another, and may even vary within that search engine from locale to locale and country to country.
Search Engines use many methods to find new sources for listing. Direct Submittal by the owner and robots are the two most common methods.
This is why a blog such as – BLOGS FOLLOW ME – is so important. Your Blog is listed and grouped by category, a known method to robot searching. In other words when your Blog is found on – BLOGS FOLLOW ME – it will also be found individually, thus making a multiple robot hit. You then become more desirable to a search engine for listing. This also has a factor in page ranking.


Q-2) If followers help on getting my Google Blog noticed how many to I have to have?
Number of Emails: 29
A-2) It is important to know and understand that Google changes its criteria on a constant basis. But since the inception Google Blogs use LINKS as a major criteria for listings. Followers is a unique thing to Google. Many are confused about 'Followers' and think if someone follows me I am golden with Google. This is wrong. What Google is looking for is a complete exchange of followers. So if you have 50 people following you and you are not following anyone else the effect is almost zero. That is why exchanging followers is so important and you should make every effort to constantly expand your follower base.
Google keeps its listing and ranking criteria extremely confidential, but currently it appears the number of followers that make you important for Google to look at is – 300. The exception is you offer something unique and totally different on the Internet, and that is really hard to do in today's Online world. But Google claims they are getting a NEW follower every second. That means every second of every day somewhere in the world a blogger such as yourself is following someone else on their Google Blog.

Q-3) I am confused as to Links versus Blog Rolls, please explain.
Number of Emails: 6
A-3) Links are a common element used by ALL Search Engines including Google as an acceptable method of listing and ranking a site or blog.
Links work like followers to some extent. If you Link to someone this is very helpful but the real criteria is when they link back to you.
Blog Rolls is a gadget and is something for Google Bloggers. Other search engines don't know they are or just ignore them.


Got a question about your Google Blog, email me at:
alternate4craigslist@yahoo.com

Happy Holidays, and Good Blogging - Remember to Follow Others to be Followed.
Google Blog Tips - HTML Codes on Google Blogs will resume on Tuesday.

5/20/09

How to CHANGE HTML Color Attribute Codes on your Blog or Website: Google Blogging Tip # 41

This starts the first in a series of postings on using HTML Codes (coding) on your Blog or Website.

The FIRST thing we will cover is Colors.
I have created another Google Blog just for HTML Color Codes.


Please Click on the LINK -
Color Chart for HTML
http://www.colorchart4html.blogspot.com/


Happy Blogging, Blog Often, Follow Others.
Next: More Google Blog Tips - HTML Codes on Google Blogs.

5/18/09

How to ADD Animation Files to your Blog: Google Blogging Tip # 40

Adding Animation Files (Animated Picture Images) to your blog can be frustration for many seeking how to do it.

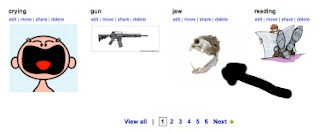
1) Animated Files (.gif format) cannot be uploaded through the normal add a 'Picture Image', which most people have found out.
2) Animated Files (.gif format images) must have a designation or URL Address to be uploaded to a Google Blog.
3) So you will have to some pre-work before adding any animated file images to your Google Blog.

Here is what you need to do to get started:
1 - Find a few animated .gif file images you want to use, copy them to your picture file folder or to your desktop.
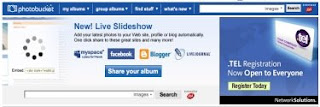
Helpful Hint: There are plenty of FREE online websites that provide a variety of animated (.gif File Images) for you to use. Photobucket is one of them.
2 - Create a NEW Account using anyone of several online FREE photo storage sites. I chose 'Photobucket.' So for this instructional we will use Photobucket as a method, but all these programs will work pretty much the same. Avoid using FREE services offered by your ISP Internet Provider. Use an online FREE service for this.
3 - Upload your photo .gif images to your host online FREE photo storage account, in this case, 'Photobucket.'
4 - Make sure the image uploaded is working.
5 - Select the image you desire to place on your Blog.
6 - Determine where your animated picture image is to appear on your Blog: In the main Text as a POST; or on your side bar (column).
7 - Copy the .gif animated picture image embed code and paste it to your Blog's desired location.
8 - View the Blog and make sure it is working.

Create a NEW Account using 'Photobucket.'
URL: http://photobucket.com/
Note: You can chose to either have your animated pictures public or private, I chose the option for 'Private.'
See Picture:


Select the Animated Picture Image you want to appear on your Blog.
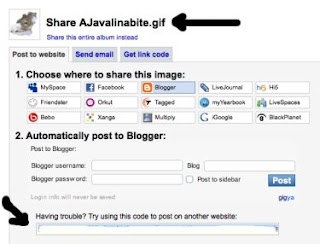
Click on 'Share'
See Picture:


In 'Photobucket' this will take you to a NEW Window.
Here you have several options.
I would NOT use any online service that ask for your Blog Password and Sign-in Name. Photobucket does this in the first part. But it also gives you the option to copy the 'Embed Code' yourself and paste it directly to your Blog. I recommend using this, I did.
To POST it to your Google Blog is just like posting a YouTube Embed Code. It works the same.
If you want the animated .gif file image to appear in the main part of your Blog, use 'Posting.' Copy and Paste into the TEXT part.
If you want the animation to appear on your side bar (column) then go to Layout, Gadgets, JavaScript. Copy and Paste.
I have given you examples of both so you can see how they work.
More about Using Animated Below.
See Picture:


Ok, here is some more on ADDING Animated Picture Images to your Blog:
- You can also use a host Website where an animated file appears. If you have your own website then it's all right. If you use the HTML Code from someone else webpage (unless it is a FREE Animated Service) you run the risk of copyright infringement or the animated file could be removed by the host, which means your URL source is not active and the image on your Blog will disappear.
- Generally using an 'Embed Code' allows you the option of resizing your animated picture (more on this in HTML Coding Hints, coming soon).
One of the things I do NOT like about 'Photobucket' is you cannot change the HTML Embed Code. To re-size the image to fit nicely in your side bar (column) you have to allow 'Photobucket' to re-size the image for you.
If your animation, however, comes from another online image source or a website you can re-size the image yourself.
- You can also ADD an animated image to your side bar (column) by using the Google Gadget 'Picture.' To do this you would NOT use the embed code but select the 'HTML Source Code' and enter in into the 'Link Field.' I prefer using the embed code, it works better and is more reliable, in my opinion.
- To see some examples of an ANIMATED .gif images on a Google Blog (as a 'Post', and as a 'Side Bar / Column' entry) click on the Link to:
TESTING GOOGLE BLOGS
http://www.testinggoogleblogs.blogspot.com/


Blog On, Blog Often, Follow Others.
Next: Google Blog Tip - Using HTML Codes on Google Blogs.

5/16/09

Google Blogging Tip # 39: Adding Your BLOG to Yahoo Search Engine

To ADD your Blog to Yahoo Search Engine-
Follow these easy Steps:

1) You will need a Yahoo Email Account (preferably, the name should be the same as your Blog Title, but it doesn't have to be).
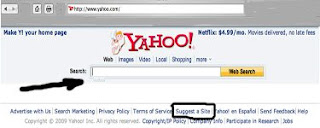
2) Open Yahoo Search Engine
URL Address: www.yahoo.com
3) In the 'Search' Line - type in your complete URL Blog Address
Example: http://www.blogsfollowme.blogspot.com/
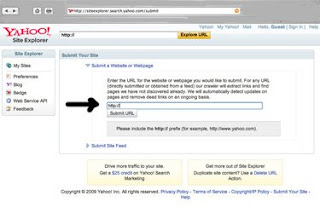
4) If your Blog Appears on the next page, your Blog Site is listed. If it does not appear and you get a message site not found, go to the bottom of the Yahoo Page and click on 'Suggest a Site.'
See Picture Below:


You will get another page.
Type or Paste your Blog's complete URL Address.
Click on, 'Submit URL'
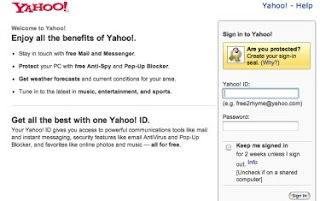
See Picture Below:


This will take you to a third page (sign into your Yahoo Email Account.
Simply sign-in.
Your Blog or Website has been submitted to Yahoo Search Engine.
It will take approximately 10 to 30 days.
To check on status, simply repeat STEP 3 above (type in your complete Blog URL Address in Yahoo Search Line).
See Picture Below:


Happy Blogging.
To be followed you must follow others, start with everyone on the LINKS list of this Blog page. Don't forget to add this Blog, 'Blogs Follow Me.'

Note: I did not finish all the Google Gadgets. I will return to the few I left out.

Next week, Google Blog Tips, will start HTML Codes.

5/15/09

Latest Email Question related to Google Blogging:

Q) Do you know of any FREE 'Photoshop' download for a computer?
Email Inquiries (29)
A) YES - Here is one for iMac (Apple) and one for Windows....

For iMac (Apple, Tiger and Leopard Software) :
Name: SEASHORE
Click on the Link:
http://seashore.sourceforge.net/download.php

Note: I use this myself often and I have Adobe Photo Elements for MAC.
SEASHORE is quicker to use, is not a RAM Hog and loads fast and runs easily in the background. It has limited features but for simple sizing, resizing, cut and paste photo image pictures it's great. For anything more then I use Photoshop.

//////// \\\\\\\\

For Windows XP and Vista :
Name: GIMP
Click on the Link:
http://files.uberdownloads.com/apps/gimp/index.php

Notice: I tried this myself for about 15-minutes on a Windows Vista Laptop. It is similar to Photoshop.
All I did was size or resize a few photo images (pictures) and change the file extension to see how it worked.
Important: When downloading this software there are a lot of options for all kinds of additional software, do NOT add these, select 'Decline' where asked.

Never download a windows software onto an iMac or vice versa!
//////// \\\\\\\\
Have a great weekend and happy blogging.
I will return to posting Google Blog Tips tomorrow.

5/10/09

Google Blogging Tip # 38: Setting Up Your Google Blog Gadgets, Part 16

Continuing 'Gadgets.'
This is NOT about what you should add / do - it's about what you should not remove / do!

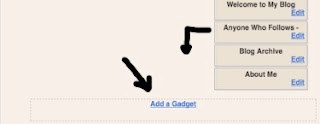
On most Google Templates, these appear at the bottom of the 19 Gadgets Google offers when you clik on 'Gadgets.'
See Picture Below:


'Profile' - this is your personal profile on Google and where your Icon picture is placed that allows followers to follow your Blog and you follow theirs.
Don't remove it. If you wish to change your Profile, then go to 'Edit Profile.'
'Blog Archive' - This is your archives of all the post you made. If you remove it, it is gone forever.
Don't remove this!
The only case I can think of for removing your Blog's archives is that you want to keep your Blog but NOT for the subject you are currently using it for. By removing the Archives you will have a usable Blog for future purposes.
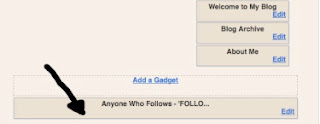
See Picture Below:


Notice: I am traveling starting tomorrow. I probably will not be able to post anything for a few days.

Please remember to report any down LINKS or Removed Blogs.
Also, to get Followed you need to follow others, start here (Blogs Follow Me), follow everyone on the LINKS list.
Happy Blogging - remember, you cannot have too many Blogs or too many Blog Followers.

5/9/09

Google Blogging Tip # 37: Setting Up Your Google Blog Gadgets, Part 15

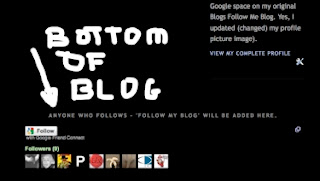
Adding a 'Gadget' to the 'Bottom' of your Blog:
The primary purpose of this Gadget feature is for you to add any Gadget you like to the very bottom of your Blog.
I simply moved 'Followers' to the bottom Gadget by dragging and dropping.
You can see a sample and view it at:
Testing Google Blogs.
Click on the LINK below.

IMPORTANT: I noticed that not all Templates have this feature. Google is working to correct this. But this is just another reason to make sure you select the Template that works best for you, discussed in another one of my Google Tips.

Note: The downside to using this 'Gadget Feature' on the Bottom of the Blog is most people read only the current (most recent) topics on a Blog. The upside, it will cause a percentage of Google Blog Users to try and find your 'Followers.'


Steps:
1. Sign-in to your Blog.
2. Select 'Layouts.'
3. Select 'Gadgets on Bottom of Blog.'
4. Select the Gadget Item by clicking on 'Gadget' or drag and drop from the current list.
5. Save, View Blog, make changes as desired.


Select 'Layout'
Click on 'Gadgets on Bottom of Blog'
You get the normal Google pop-up window of Gadgets.
Either select from the Google List, Drag and Drop from your all ready existing Gadget List, or use a third party to install the Gadget you desire.
See Picture Below:


As stated above, instead of selecting an item from the Google Gadget List or a Third Party, I used a Gadget all ready installed on my sidebar by simply drag and drop to the bottom of the Blog.
See Picture Below:


Here is what 'Followers' Gadget looks like at the bottom of a Blog.
See Picture Below:


To see how the 'Gadget on the Bottom of the Blog' actually appears.
Click on the Link:

TESTING GOOGLE BLOGS
http://www.testinggoogleblogs.blogspot.com/

Remember, please participate in the Google Tip Blog SURVEY, your input will help.

Happy Blogging.
Tid-bits: Some people may not publish Monday because Google is performing routine maintenance. Older Bloggers had problems during this period and some became accustomed to not posting during Google Outages fro at least 24-hours.

Remember, to be followed you must follow others, so start with this Blog (Blogs Follow Me) and everyone in the Link List.

Important Notice: Sorry, I will be traveling next week, it came up all the sudden today. So posting my Google Tips may be difficult. I will make every effort to get some done.

5/8/09

Google Blogging Tip # 36: Setting Up Your Google Blog Gadgets, Part 14

Adding a 'Newsreel' to your Sidebar (column):
The primary purpose of this Gadget feature is for you to add current NEWS topics of your choice as a snippet.
Tested: I tested this using different news source topics and they all seem to work.
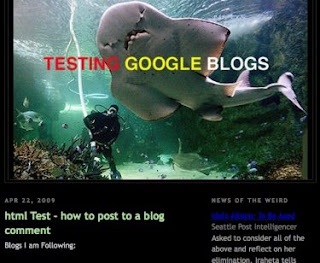
I finally decided on News of the Weird. You can see a sample and view it at:
Testing Google Blogs.
Click on the LINK below.

Note: Again, this type of Widget just clutters your Blog. If people want NEWS there are plenty of sources they don't need to find news on your Blog.

Steps:
1. Sign-in to your Blog.
2. Select 'Layouts.'
3. Select 'Gadgets.'
4. Select 'Newsreel.'
5. Complete all the required items.
6. View Blog, make changes as desired.


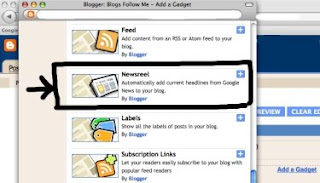
Select 'Layout'
Click on 'Gadgets'
Select 'Newsreel'
See Picture Below:


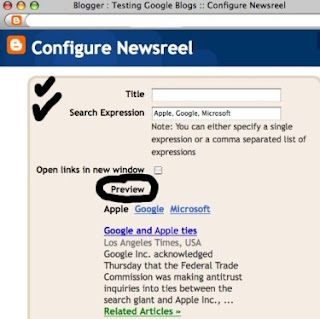
You get a new pop-up window, 'Configure Newsreel.'
See Picture Below:


First determine what type of news or sports you want in your 'Newsreel' snippet.
You can test various thing by typing them in 'Search Expressions.'
What you type in will immediately display in 'Preview.'
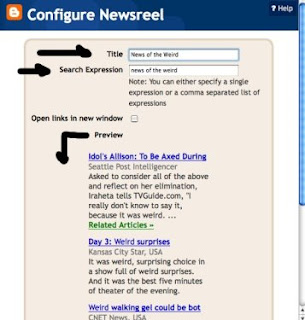
Once you are happy with what you have selected, then give your 'Newsreel' a 'Title.'
I chose News of the Weird.
I also used the same news source as the title.
Leave the 'Open links in new window' box Unchecked.
'Save' and go view the Blog, make any changes you need.
See Picture Below:


This is how the snippet 'Newsreel' appears on your Blog.
See Picture Below:


To see how the 'NEWSREEL' actually appears on your Blog.
Click on the Link:

TESTING GOOGLE BLOGS
http://www.testinggoogleblogs.blogspot.com/

Remember, please participate in the SURVEY, your input will help.

Have a good weekend, and Happy Blogging.
We are close to completing all the Google Gadget Tips.

Remember, to be followed you must follow others, so start with this Blog (Blogs Follow Me) and everyone in the Link List.

5/7/09

Google Blogging Tip # 35: Setting Up Your Google Blog Gadgets, Part 13

Adding a 'Feed' to your Sidebar (column):
The primary purpose of this Gadget feature is for you to add your Website; Webpage; or another Blog as a snippet.
Note: I tested this on a friends Website, and it works. I also tried it on several Blogs with different templates and they work. But when I tried it on my Twitter Page it did not work.
Make sure if you choose to do this it functions properly.
I don't have a website domain, so I used one of the followers here on this Blog, 'Funny Daily Jokes', as a sample for you to view at:
Testing Google Blogs.
Click on the LINK below.


Steps:
1. Sign-in to your Blog.
2. Select 'Layouts.'
3. Select 'Gadgets.'
4. Select 'Feed.'
5. Complete all the required items.
6. View Blog, make changes as desired.


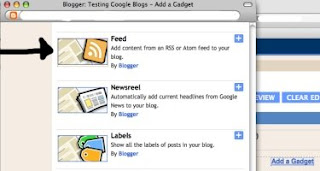
Select 'Layout'
Click on 'Gadgets'
Select 'Feed'
See Picture Below:


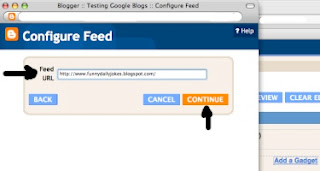
You get a NEW pop-up window, 'Configure Feed'.
On the line, Feed URL, enter the complete URL Address you want to display.
Example: http://www.blogsfollowme.blogspot.com/
Next - click on 'Continue.'
See Picture Below:


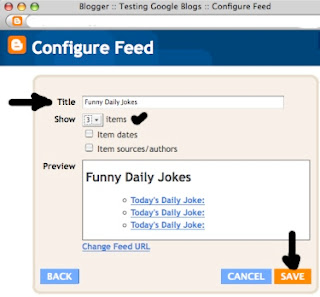
You get another New pop-up window.
Add a 'Title' - I used, Funny Daily Jokes.
Next - select the number of items you want displayed on your Blog, 1 through 5. I chose 3.
Leave the Next two fields blank.
Finally - 'Save' and view your Blog, make any changes you desire.
See Picture Below:


This is how it appears on the Blog.
Note: The Blog user I choose 'Funny Daily Jokes' is using the same title everyday for their post, otherwise the snippet would be different. It shows the last snippet (entries) made as a Google default.
See Picture Below:


To see how a 'FEED' actually appears on your Blog.
Click on the Link:

TESTING GOOGLE BLOGS
http://www.testinggoogleblogs.blogspot.com/

Remember, please participate in the SURVEY, your input will help.

Keep on Blogging.
There are more Google Gadget Tips coming.

Blog Update:

I just added an INDEX of all Postings, reverse order (latest post appears first), of all the Blogging Tips and Email Questions I have added so far.
They appear on the sidebar (right column) of this Blog at the bottom.
Hope this helps.
More Google Blogging Tips coming today.

5/6/09

Google Blogging Tip # 34: Setting Up Your Google Blog Gadgets, Part 12

Adding a 'Slideshow' to your Sidebar (column):
The primary purpose of this Gadget feature is for you to add your own slide show pictures. Google does have a default slide show you can post, which is what I am using as an example.
I have added a sample for you to view at:
Testing Google Blogs.
Click on the LINK below.


Steps:
1. Sign-in to your Blog.
2. Select 'Layouts.'
3. Select 'Gadgets.'
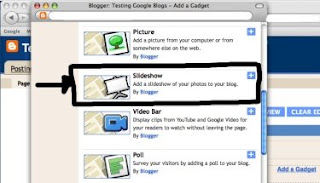
4. Select 'Slideshow.'
5. Complete all the required items.
6. View Blog, make changes as desired.


Select 'Layout'
Click on 'Gadgets'
Select 'Slideshow'
See Picture Below:


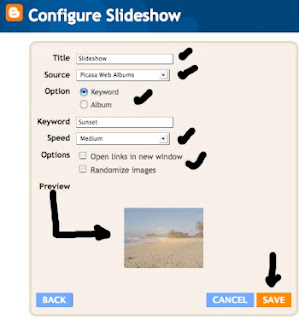
You get a NEW pop-up window, 'Configure Slideshow.'
If you want to use Google's slide show feature, just use the default Settings.
Click 'Save.'
See Picture Below:


If you want to ADD your own 'Slideshow' you have to prepare it first.
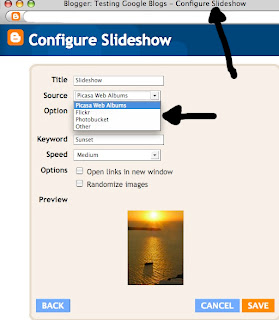
This means using Picasa Web Album, Photobucket, Flickr, or other (other is your won slide show source). Photobucket is pretty easy to use. I would recommend trying that.
Once your album is developed, create a slide show using Google.
Leave the other default settings in place.
Under 'Options' do NOT select 'Open links in a new window.'
If you want the pictures to run the same all the time (in the same slide show sequence) leave the option 'Randomize images' blank.
See Picture Below:


As I said for this Gadget I elected to use the Google Default Setting including Google Photos.
See Picture Below:


To see how a 'Slideshow' actually appears on your Blog.
Click on the Link:

TESTING GOOGLE BLOGS
http://www.testinggoogleblogs.blogspot.com/
While you're there don't for participate in the SURVEY we prepared yesterday, your input will help.

Blogging the modern socializing methodology.
Yes, more Google Gadget Tips coming.

5/5/09

Google Blogging Tip # 33: Setting Up Your Google Blog Gadgets, Part 11

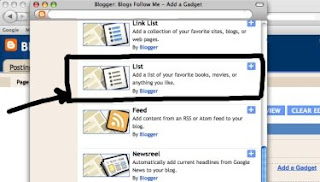
Adding a 'LIST' (This is where you add a List of your favorite books, movies, or anything else you like) to your Sidebar (column):
Personal Note: This basically is a duplicate of information that should be on your Profile. This is just another item that clutters up your Blog. I did notice one Blog was using the 'List' for types indoor flowers they like.
I have added a sample for you to view at: Testing Google Blogs.
Click on the LINK below.


Steps:
1. Sign-in to your Blog.
2. Select 'Layouts.'
3. Select 'Gadgets.'
4. Select 'List.'
5. Complete all the required items.
6. View Blog, make changes as desired.


Select 'Layout'
Click on 'Gadgets'
Select 'List'
See Picture Below:


You get a New pop-up window called 'Configure List.'
First - Fill in the 'Title' I used: STUFF I LIKE
Next - 'Number of Items to show in list', use the Google Default Setting, leave this BLANK.
Next - 'Sorting' I selected 'Don't Sort' this allows you to use the up and down arrows and sort the items the way you want them to appear.
Next - 'Add List Item' put in what you want: Favorite Movie, TV Show, Book, Flower, Food, etc.
Now sort them using the arrows.
Finally - 'Save', view the Blog.
See Picture Below:


Here you can see I added my favorite Movies and TV Shows, used the up / down arrows to sort them the way I wanted.
See Picture Below:


This is how it appears on the Blog.
See Picture Below:


To see how a 'LIST' actually appears on your Blog.
Click on the Link:

TESTING GOOGLE BLOGS
http://www.testinggoogleblogs.blogspot.com/
While you're there don't for participate in the SURVEY we prepared yesterday, your input will help.

Keep On Blogging.
Yes, more Google Gadget Tips coming.
Please report all down Links or Blogs Removed.

Remember, to be Followed you have to Follow others.
Start by following this BLOG and everyone listed here!

5/4/09

Google Blogging Tip # 32: Setting Up Your Google Blog Gadgets, Part 10

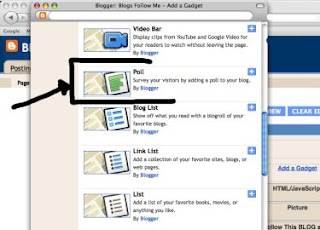
Adding a 'Poll' (Survey) to your Sidebar (column):

Steps:
1. Sign-in to your Blog.
2. Select 'Layouts.'
3. Select 'Gadgets.'
4. Select 'Poll.'
5. Complete all the required items.
6. View Blog, make changes as desired.


Select 'Layout'
Click on 'Gadgets'
Select 'Poll'
See Picture Below:


Important Note Before Starting: Apparently, this does NOT work well on all Google Blog Templates because you cannot change the color background. Google needs to work on this issue.
But for the most part the 'Poll' (survey) works pretty well.
If this is a problem you will have to use a third party Blog Poll.

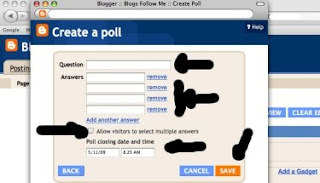
Note: Fill in ALL the Fields, don't leave any blank.
First - Determine the 'Question' you want to ask. Then fill it in on 'Question' line.
Next - 'Answers" each line gets a different answer, such as Line 1 = Yes; Line 2 = No; Line 3 = No Opinion.
Next - If you need to ADD more lines for your answer, click on 'Add another answer.'
Next - Google offers a good feature, you can check the box 'Allow visitors to check multiple answers.' In some types of 'Polls (surveys)' this is appropriate.
Next - Fill in the Poll closing date and time, for example if you want the poll to run for 3 months, then the closing date from today would be August 5, 2009. Also select a time, I recommend 11:00pm local time.
Last - 'Save' and View the Blog, make any changes desired.
See Picture Below:


To see how a 'Poll (survey)' actually works.
Click on the Link:

TESTING GOOGLE BLOGS
http://www.testinggoogleblogs.blogspot.com/

Happy Blogging.
More Google Gadget Tips coming.
Please report all down Links or Blogs Removed.

Remember, to be Followed you have to Follow others.
Start by following this BLOG and everyone listed here!

5/3/09

Latest Email Questions about Google Blogging Issues:

Q1) What's the difference between a Link List and a Blog List (Blog Roll) they appear to be the same?
Email Inquiries (26)
A1) In many ways they are the same, and often times people like the Blog Roll List better than the Link List. However, it is important to understand that a Blog Roll is something Google came up with for their Blog users. Links are something that robots search the Internet looking for. Links are one of three major ways that Websites and Blogs get listed and rated by Search Engines.


Q2) You put up a step by step method to get my Blog listed with Google and MSN. Are you going to do this for other Search Engines such as Yahoo?
Email Inquiries (9)
A2) Yes, I plan on a Google Tip for instructions to get your Blog listed with Yahoo soon as I finish the Gadgets section. Make sure you have a Yahoo Email Account, preferably one that matches your Blog Title.


Q3) A lot of Blogs seem to have all kinds of features, are you going cover these as well?
Email Inquiries (17)
A3) I am not sure which features you are referring to but as a general answer, I plan to include some third party features that can be added to your Google Blog. I cannot cover all of these. Google estimates there are now about 2,000 Gadgets available that can be added to your Blog.


Q4) I noticed you you have added several other Blogs and one is Blogs By Twitter, why is that?
Email Inquiries (3)
A4) Twitter a social networking Blog, similar to FaceBook and MySpace, which has an agreement with Google because it was founded by former Google employees. Many people have more than one Blog and often times they have them on other Blog Forums such as Twitter. This gives Twitter Users a place to LINK their Twitter Page on the Internet and make it accessible to people other than just Twitter users. I did add a section for FaceBook and MySpace as well. If you have one of these accounts just send me your LINK (complete URL) and I add it to:
http://www.blogsbytwitter.blogspot.com/


Q5) Many of the things you are covering in your Google Tips I all ready know how to do. I would like help with some HTML Coding applications, specifically to add animations, are you going to cover these with your Google Tips and when?
Email Inquiries (31)
A5) I combined several email topics all about HTML in this one answer. Yes I am going cover basic HTML that applies to applications for Google Blogs, one of these will be how to add animations. I know a lot of people all ready know how to do many of the Google Tips I have covered, but when I started this Blog and the Google Tips, I did say, I will take this step by step as though you are setting up a new Blog, which many people are. It is estimated that a new Google Blog is created every minute and a New Follower is added every second. Even if you have had a Google Blog for a while, you might want to read the Google Tips anyway. Google changes how their Blogs function. There have all ready been several generations of Google Blogs and Google has another one in the works. Also NEW features are being added all the time by Google so it would behoove everyone to review their Blog layout for optimum performance.


Q6) You put a lot of emphasis on 'Followers' why is that?
Email Inquiries (22)
A6) Who follows your Blog or Website if you have one is another one of the three main ways Robots look for sites to add to their Search Engines. So, you should follow every Blog following me here.


Q7) I noticed that Google has expanded their maximum number of followers it permits, did you notice this?
Email Inquiries (1)
A7) Yes, it appears it has changed the total maximum allowed to 300. I wish they would take a hint from Twitter, which has no limitation on the number of followers you are permitted.

Got a question about your Google Blog, email me at:
alternate4craigslist@yahoo.com

5/2/09

Google Blogging Tip # 31: Setting Up Your Google Blog Gadgets, Part 9

Adding a 'Link List' (Blog or Website Links) to your Sidebar (column):
Important Note: If you understand the basics of how most Search Engines work, this is very important to ADD to your Blog.

Steps:
1. Sign-in to your Blog.
2. Select 'Layouts.'
3. Select 'Gadgets.'
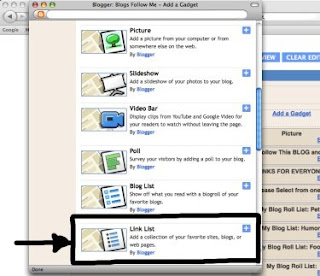
4. Select 'Link List.'
5. Complete all the required items.
6. View Blog, make changes as desired.


Select 'Layout'
Click on 'Gadgets'
Select 'Link List'
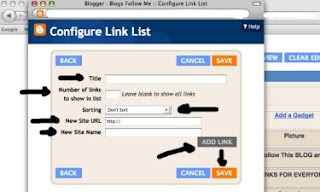
See Picture Below:


Fill in the 'Title' field. This will appear above your 'LINK List.'
Next - 'Leave the Number of Links to Show in List' - Use Google default setting, leave this BLANK.
Next - Select type of sorting method for your 'Link List.' If you have a short list and want them in a specific order, just add the ones you want, then use the up/down arrows for the position you wish them to appear. However, if you have a long 'Link List' Select, Alphabetical Sorting.
Next - ADD the Websites or Blogs you wish to appear in your 'Link List.' The complete URL Address must appear.
...Example:
http://www.blogsfollowme.blogspot.com/
Next - Put in whatever 'New Site Name' you want.
Next - Click on 'Add Link.'
Finally - 'Save'
Now Go View the Blog, make changes as desired.
See Picture Below:


Have a good weekend, and happy blogging.
Tomorrow I will answer the latest 'Email Questions' received.

Remember, to get Followed you must Follow others.
Start by supporting this Blog, and all who appear in the Link List.

5/1/09

Google Blogging Tip # 30: Setting Up Your Google Blog Gadgets, Part 8

Adding a 'Video Bar' (YouTube Videos) to your Sidebar (column):
Personal Note: I don't recommend these types of add-ons for Blogs or Websites for the simple reason they distract visitors from your site (Blog), this is especially true if your Blog is for business. In fact, a Video Bar benefits Google not you.

Steps:
1. Sign-in to your Blog.
2. Select 'Layouts.'
3. Select 'Gadgets.'
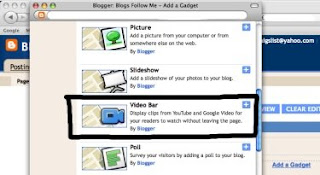
4. Select 'Video Bar.'
5. Complete all the required items.
6. View Blog, make changes as desired.


Select 'Layout'
Click on 'Gadgets'
Select 'Video Bar'
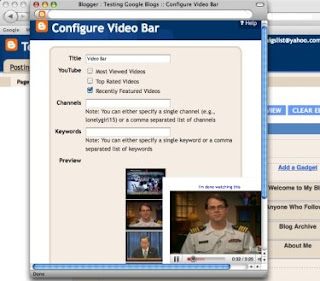
See Picture Below:


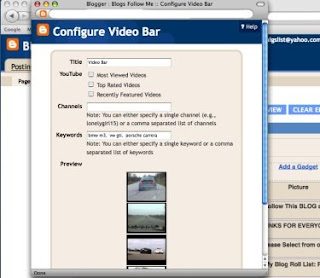
You get a NEW Pop-up Window.
This window contains 'Options.'
Read and select the options carefully.
See Picture Below:


As you can see, I selected 'Recently Featured Videos.'
I blank out the other fields of choice.
Automatically Google found the current featured videos on YouTube at that moment.
I then TESTED the 'VideoBar' by clicking on second video on the pop-up list created by Google.
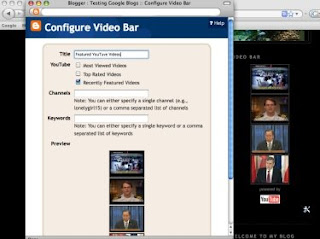
See Picture Below:


After making sure the 'VideoBar' worked, I went to the 'Title' and inserted the Title I wanted on my Blog.
I SAVED the changes and posted it to my Blog.
See Picture Below:


I 'Viewed My Blog' to see if the Video bar appeared correctly and worked.
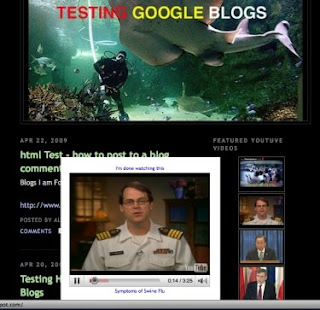
Once published, any visitor who clicks on one of the Videos you have contained within your 'VideoBar' will get a small video window open next to the 'VideoBar' and the YouTube Video will play.
See Picture Below:


To see the Video Bar actually work shown in the picture above.
Click on the Link:

TESTING GOOGLE BLOGS
http://www.testinggoogleblogs.blogspot.com/

Happy Blogging everyone please have a good weekend.
More Google Gadget Tips coming.

Remember, to be Followed you have to Follow others.

About 10 broken Links have been reported. I have removed these. If your Blog was removed and now is operating again, please send me an email:
alternate4craigslist@yahoo.com