Effective: December 9, 2010
Please use whatever information is posted.
3/2/10
Blogging Tips -Auto Blogging (update)
At this time I can only get-
http://www.bloggerautofollow.com/
one of two different Blogs I tried to partially work.
It is supposed to be a FREE Service.
Attempt # 1 has been going on over a week now and I cannot even get the Password to accept, even though I am registered and I changed the password as an attempt to fix the problem.
URGENT NOTICE to my Google Friend Connect Followers:
==>Attempt # 2 today on a different Blog the password worked, and it appears that the 'Keywords' partially respond, this is probably more of a Google Search Engine thing.
As for the 'Unfollow Blog' portion, this REMOVED ALL of My Blog Followers.
That's a real problem.
Now I have to ADD back all my Followers, so if you see I stopped Following you, it was not on purpose, and I will re-add those who are currently following me - please be patient, this will take awhile.
At this moment, the answer is Do Not Use Auto-Blogging.
They have an online chat but its never working so I will try tomorrow to resolve these issues.
Stand By -
Important Note to My Readers and Followers:
I test everything before I recommend use by my readers, So If I am having a problem or the Widget fails so NOT use it.
2/25/10
Google Blogging Tip # 102: Adding a Rating System Gadget to Your Blog (This Replaces Tip # 93).
Originally on Tip # 93, Adding a Rating System Gadget to Your Blog or Website.
Found at: http://blogsfollowme.blogspot.com/2009/12/google-blogging-tip-93-adding-rating.html
I suggested using Blogorator. For awhile this worked well. Then several people last week complained it failed to work and Blogorator lost their files. This also happened on my Blog, Blogs I am Following, and Blogorator failed to fix the issue after 5-days even though I notified them.
Note: It is important to remember that these 'Widgets' may not keep up with the latest technology by Blogs such as Google, Wordpress, etc. They are Third Party Program Designs.
Originally I selected this Rating System because it worked on both Blogs and Websites and rated the over all page (Blog or Site) versus the individual posting.
I am no longer endorsing Blogorator.
Website Users, Designers, Programmers, Administrators, and Blog Owners should avoid installing the Widget from Blogorator.
Click on the LINK:
Adding a Rating System to Your Blog
//// ~ \\\\
Before Starting please note that this Widget does not work on Websites / Web Pages.
If after registering the Widget and you are unable to go to 'Setting's to remove the 'Recommendations' remove the Widget from your Blog, sign-out and try installing the Widget later on.
//// ~ \\\\
Follow these step by step instructions.
Note - Pay close attention, don't miss any steps.
Open the following and leave open till finished:
- Your email account for your Blog.
- Open Outbrain Website.
- When Outbrain loads your Blog, leave that open as well.
Step # 1:
You are at the 'Outbrain' Homepage. In the upper right corner, click on 'Register.'
See Picture Below:

Step # 2:
Once you click on register 'Outbrain' you will get a new window. Fill in the required information.
See Picture Below:

Step # 3:
Sign-in to your Blog Account, shown here is Google...
See Picture Below:

Step # 4:
After signing into your Blog, you will see this....
See Picture Below:

Step # 5:
Here all I did was 'Change' the title, I recommend you do this, but it is not necessary.
Leave the other settings alone, just click on 'Add Widget.'
See Picture Below:

Step # 6:
If you have a Google Blog (blogspot) 'Outbrain' set-up will take you to this location in Layouts. If you have a different type of Blog such as Wordpress it should take you to something similar. Just simply ignore this, and go to your Blog's main display page.
See Picture Below:

Step # 7:
Initial installation produces this. The following steps will remove all the links beneath your Blog Rating. If you want these here, Stop, do not proceed any further. I recommend, you not have these on your Blog Postings, and continue with the complete set-up of the 'Outbrain Rating System.'
Note: I have blacked out those that appeared on my Blog.
See Picture Below:

Step # 8:
Respond to Outbrain in your email and verify your 'outbrain' account....
See Picture Below:

Step # 9:
In this step you will see a message that looks like this...
See Picture Below:

Step # 10:
In this step you should get a message that Outbrain has verified your email. Click on the setting, 'Manage Blogs', to the upper left to continue....
See Picture Below:

Step # 11:
In this step you should see your Blog's URL Address.
Next to the URL you should see, 'Settings' click on it.
See Picture Below:

Step # 12:
Change the 'Settings' exactly as shown.
See Picture Below:

Step # 13:
When the Widget has been installed, and the setting changed, the 'Rating' should now look like this...
See Picture Below:

Step # 14:
After you have completed installing the widget go back to your email, and there should be an explanation of how the Rating System works, part will look like this...
See Picture Below:

Step # 15:
Now sign out of-
Outbrain.
Your Blog.
Your Email Account.
View your Blog without signing in.
Test the Rating System.
Refresh your page, look and see if the rating worked on your Blog.
Step # 16:
To See this work on my Blog, Click on the LINK:
Testing Google Blogs
Step # 17:
If you have multiple Blogs under on email account, you can sign back into 'Outbrain' and select the ones that you want added to have a Rating applied. Remember, this Rating Widget (gadget) rates each individual Posting, not the entire Blog.
= = = = = = = =
Most Recent Google Blog Award Winner:
The Google Blog Award Winner for Week Ending (w/e) February 20, 2010, for the best Blog or Website was...
Click on the LINK below to see the Award Winner
Unique Car Productions
Don't forget to vote for your favorite Blog or Site for the Google Blog Award, you can vote for yourself. Voting closes every Saturday at 11:00pm Eastern Standard Time, USA.
Thanks for visiting Blogs Follow Me (blogsfollowme), prsented by: The Blog Guy.
Please support my efforts, Follow this Blog and I will Follow You.
As previously mentioned, I have created a FaceBook Page, here is the Link:
The Blog Guy's Facebook Page
I also created a Blog for my FaceBook Page Friends to get a Link by joining my page, here is the Link to my new Google Blog:
Blogs by Facebook
Coming next, Auto-Blogging
IMPORTANT: Many have ask me about Auto-Blogging.
This will be posted Tuesday, March 02, 2010.
2/14/10
Google Blogging Tip # 101: How to Add a Picture Frame Border to Your Blog or Website Pictures
Q) - I would like to make my site photos more interesting, any suggestions?
A) - Yes, one way is to add borders to your picture. Follow the LINK to The Blog Guy's Web Page and see how to install these on your Blog or Website.
Email Inquiries - 7
Click on the LINK:
to get the HTML Code from The Blog Guy for your Blog or Web Page:
How to Add a Picture Frame Border to Your Blog or Website Pictures (Photo Images)
===> IMPORTANT: Many have ask me about Auto-Blogging.
I am evaluating this now including how to use an auto-blogger program, and the pros and cons of using one.
This will be the next Blog and Website Tip I post, look for it soon.
Most Recent Google Blog Award Winner:
The Google Blog Award Winner for Week Ending (w/e) February 13, 2010, for the best Blog or Website was...
Click on the LINK below to see the Award Winner
Cartoon Daily
Don't forget to vote for your favorite Blog or Site for the Google Blog Award, you can vote for yourself. Voting closes every Saturday at 11:00pm Eastern Standard Time, USA.
Thanks for visiting.
Please support my efforts, Follow this Blog and I will Follow You.
I have created a FaceBook Page, here is the Link:
The Blog Guy's Facebook Page
I also created a Blog for my FaceBook Page Friends to get a Link by joining my page, here is the Link to my new Google Blog:
Blogs by Facebook
Coming soon is the next Posting Tip, Trick, Hint, HTML Codes, JavaScript, and Cool Fun Stuff.
2/8/10
Google Blogging Tip # 100: Google Blogs, Substituting a Picture for the Title on a Post
Q) I have tried repeatedly to add an HTML Code within the 'Title' bar of Google blogspot Blog 'New Post' and cannot get it to work. I want to substitute a Picture for the Title on my Post. I have seen this done on other blogs.
How do you do this?
A) Google blocks the use of HTML and JavaScript within its Title Block for Posts. To avoid using the Layout, and 'Edit HTML' function, there is a simple way to accomplish this. Just don't use the 'Title Bar' at all. Also, do not use the Link Bar if you have it enabled.
Place your picture at the top of the empty block where you would add any text, pictures, or video. I believe this will accomplish what you are trying to do. I recommend the picture image be 375 pixels wide x 55 pixels high.
Email Inquiries - 11
See the picture below:
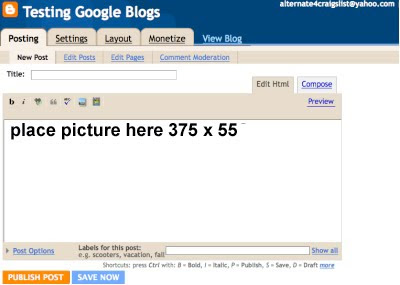
See the sample of how it's done and should look like.
Click on the Link:
Testing Google Blogs
Most Recent Google Blog Award Winner:
The Google Blog Award Winner for Week Ending (w/e) February 06, 2010, for the best Blog or Website was...
Click on the LINK below to see the Award Winner
Condom Facts
Don't forget to vote for your favorite Blog or Site for the Google Blog Award, you can vote for yourself. Voting closes every Saturday at 11:00 PM Eastern Standard Time, USA.
Thanks for visiting.
Please support my efforts, Follow this Blog, and I will Follow you.
The next Posting Tip, Trick, Hint, HTML Codes, JavaScript, and Cool Fun Stuff is coming very soon.
I am current on all my Followers. If I missed anyone I apologize leave me a comment and I will add you.
Thanks,
The Blog Guy
1/28/10
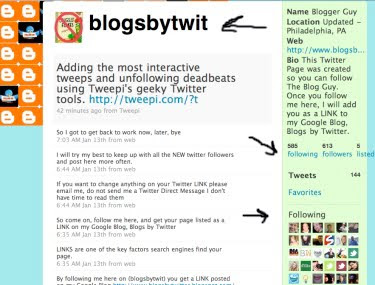
Google Blogging Tip # 99: How to Perform Maintenance on Your Twitter Page
Q) My Twitter Page is a mess. I am Following more people than are Following Me. How can I clean up my Twitter Page and get rid of all the dead beats to make room for legitimate Followers I want to add?
A) Twitter makes this quite hard for their users. First at the moment as a Twitter Page user you are only allowed to have 2,001 Tweets you can follow. However, there is no limit to the number of people who can follow you.
Fortunately, there are some third party software providers that can clean up your Twitter Page account. I experimented with two. One didn't work for me at all.
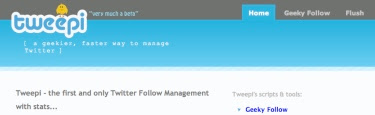
I found that using Tweepi is the best approach.
Email Inquiries: 24
Just click on the Link and it will take you to the Tweepi Page.
First I have laid out a step by step illustration to walk you through how to use Tweepi and what each step will look like till you're finished.
If you have a high number of people you are following on your Twitter Page, say between 1,500 to 2,000 this process may take about an hour to complete. So allow enough time.
Link:
Tweepi Home Page
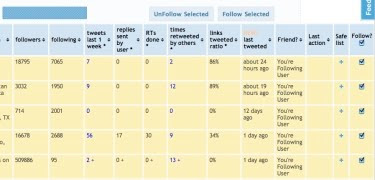
First sign-in to your Twitter Page and see how many people your are Following and how many people are Following you.
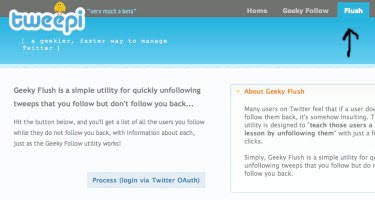
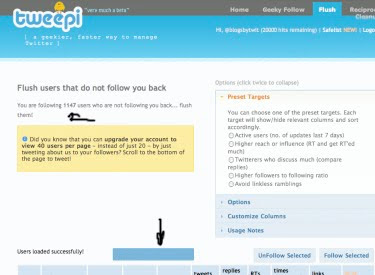
This is Tweepi main page. Slect 'FLUSH.'
Note: Once in do not use any of the option or settings other than what is shown in the pictures below.
This will take you to the Tweepi Flush Page.
You will get this next widow...
From here you must sign-in to your Twitter Account.
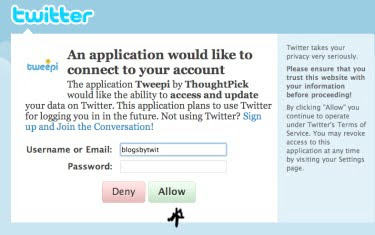
You are now connected to Tweepi Clean-up and your Twitter Page.
When getting started with Tweepi clean-up, which they call Flush, make sure you allow the blue bar to load all the way.
Just above the Blur Bar you will see the number of Followers you need to get rid of. Then the column to the far right, under 'Friend' you will see 'You're Following User.' At the top far right column, check the box 'Follow' all the boxes under 'Follow' should have a check mark. Next simply go to the bottom of the page and click on 'UNFOLLOW.' At this point, by default you will be loading 20 Followers at a time. If you click on the bottom box 'Tweet This' Tweepi will load 40 Followers at a time. It will put a tweet on your Twitter Page automatically but it saves a lot of time.
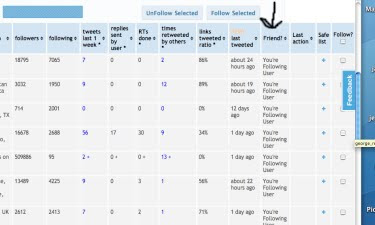
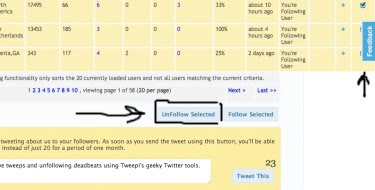
Here Tweepi is processing getting rid of the pages you no longer want to follow. Do NOT interrupt the process.
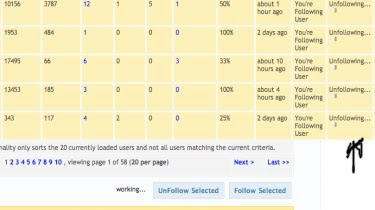
Tweepi has 'Unfollowed' those unwanted Tweets. Remember this has to be done repeatedly of 40 Twitter Followers per Tweepi page until completed. Use the 'Next' page function and Tweepi loads it automatically. Again wait for the Blue Bar to load all the way, and check Follow on ALL. Then UNFOLLOW to get rid of them. Just keep doing this until Tweepi has cleaned up your Twitter Page.
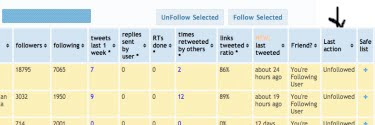
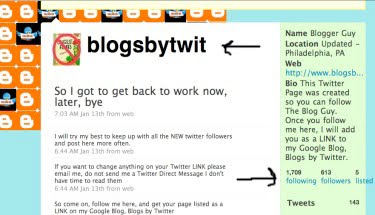
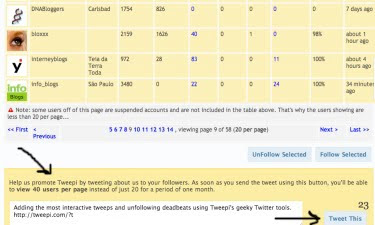
How your Twitter Page should look when you are done cleaning it up with Tweepi.
Important Note:
I suggest running Tweepi once per month to clean up your Twitter Page.
Most Recent Google Blog Award Winner:
The Google Blog Award Winner for Week Ending (w/e) January 23, 2010, for the best Blog or Website was...
Click on the LINK below to see the Award Winner
Impeach President Obama
Don't forget to vote for your favorite Blog / Site for the Google Blog Award, you can vote for yourself. Voting closes every Saturday at 11:00pm Eastern Standard Time, USA.
Thanks for visiting. Please Follow this Blog.
The next Posting Tip, Trick, Hint, HTML Codes, JavaScript, and Cool Fun Stuff is coming soon.
Sunday, January 31, 2010 - I am caught up on all my Followers. If I missed anyone I apologize leave me a comment and I will add you.
A) Twitter makes this quite hard for their users. First at the moment as a Twitter Page user you are only allowed to have 2,001 Tweets you can follow. However, there is no limit to the number of people who can follow you.
Fortunately, there are some third party software providers that can clean up your Twitter Page account. I experimented with two. One didn't work for me at all.
I found that using Tweepi is the best approach.
Email Inquiries: 24
Just click on the Link and it will take you to the Tweepi Page.
First I have laid out a step by step illustration to walk you through how to use Tweepi and what each step will look like till you're finished.
If you have a high number of people you are following on your Twitter Page, say between 1,500 to 2,000 this process may take about an hour to complete. So allow enough time.
Link:
Tweepi Home Page
First sign-in to your Twitter Page and see how many people your are Following and how many people are Following you.

This is Tweepi main page. Slect 'FLUSH.'

Note: Once in do not use any of the option or settings other than what is shown in the pictures below.
This will take you to the Tweepi Flush Page.

You will get this next widow...
From here you must sign-in to your Twitter Account.

You are now connected to Tweepi Clean-up and your Twitter Page.
When getting started with Tweepi clean-up, which they call Flush, make sure you allow the blue bar to load all the way.
Just above the Blur Bar you will see the number of Followers you need to get rid of. Then the column to the far right, under 'Friend' you will see 'You're Following User.' At the top far right column, check the box 'Follow' all the boxes under 'Follow' should have a check mark. Next simply go to the bottom of the page and click on 'UNFOLLOW.' At this point, by default you will be loading 20 Followers at a time. If you click on the bottom box 'Tweet This' Tweepi will load 40 Followers at a time. It will put a tweet on your Twitter Page automatically but it saves a lot of time.


Here Tweepi is processing getting rid of the pages you no longer want to follow. Do NOT interrupt the process.

Tweepi has 'Unfollowed' those unwanted Tweets. Remember this has to be done repeatedly of 40 Twitter Followers per Tweepi page until completed. Use the 'Next' page function and Tweepi loads it automatically. Again wait for the Blue Bar to load all the way, and check Follow on ALL. Then UNFOLLOW to get rid of them. Just keep doing this until Tweepi has cleaned up your Twitter Page.

How your Twitter Page should look when you are done cleaning it up with Tweepi.

Important Note:
I suggest running Tweepi once per month to clean up your Twitter Page.
Most Recent Google Blog Award Winner:
The Google Blog Award Winner for Week Ending (w/e) January 23, 2010, for the best Blog or Website was...
Click on the LINK below to see the Award Winner
Impeach President Obama
Don't forget to vote for your favorite Blog / Site for the Google Blog Award, you can vote for yourself. Voting closes every Saturday at 11:00pm Eastern Standard Time, USA.
Thanks for visiting. Please Follow this Blog.
The next Posting Tip, Trick, Hint, HTML Codes, JavaScript, and Cool Fun Stuff is coming soon.
Sunday, January 31, 2010 - I am caught up on all my Followers. If I missed anyone I apologize leave me a comment and I will add you.
1/18/10
Google Blogging Tip # 98: How to Create a Google Only Blog Profile
Q) Can you tell me how to create a Google 'Profile' without creating a Google Blog?
A) To create a Google 'Profile' simply follow the steps below.
The Google 'Profile' can be used for several reasons:
1) To reserve a name. The Blog can be added later.
2) So you can Follow someone who all ready has a Google Blog using Google Friends Connect.
Email Inquiries: 19
To create a Google only 'PROFILE' please follow these steps:
1/ - If you do not all ready have an email account create one. You will need an email address. If you don't have an email address or want a separate email just for your 'Google Profile' then Gmail or Yahoo are probably the best options but there are others such as myway; msn; live; and hotmail.
2/ - Write down the name you want to use for your Profile, example: blogsfollowme. I would recommend using this for the Blog Title as well.
3/ - Go to the following Google Link-
Create A Blog
See Picture Below:

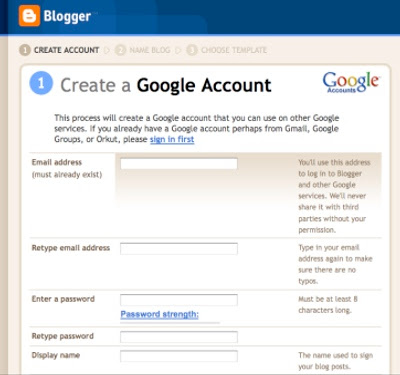
4/ - The following window appears, see picture below:
Fill in all the required information.
When finished click on 'Continue.'
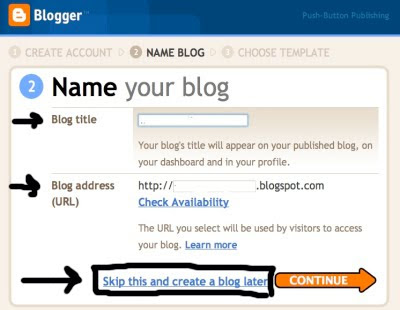
5/ - You will get another page. This is the page that you will create a 'Profile Only.'
Fill in the two required items, then click on 'skip this and create a blog later.'
See Picture Below:
6/ - This will take you to the final page.
If you want you can click on Edit Profile, Add a Profile Picture or just sign out.
Then open your email account. Google will have a confirmation email, click on it, sign back into your Profile, then sign out.
You are done.
How to use your PROFILE:
Anytime you wish to Follow someone, like me, The Blog Guy, just click on the 'follow' button just above 'Followers. Sign in with your email account and password and follow that Blog or Google Friends Connect on a website.
See Picture Below:

Most Recent Google Blog Award Winners:
The Google Blog Award Winner for Week Ending (w/e) January 16, 2010, for the best Blog or Website was...
Click on the LINK below to see the Award Winner
Uses for Duck Tape
The Google Blog Award Winner for Week Ending (w/e) January 09, 2010, for the best Blog or Website was...
Click on the LINK below to see the Award Winner
War Stories
Don't for get to vote for your favorite Blog / Site for the Google Blog Award, you can vote for yourself.
Thanks for visiting. Please Follow this Blog.
Coming soon, the next Posting Tip, Trick, Hint, HTML Codes, JavaScript, and Cool Fun Stuff.
A) To create a Google 'Profile' simply follow the steps below.
The Google 'Profile' can be used for several reasons:
1) To reserve a name. The Blog can be added later.
2) So you can Follow someone who all ready has a Google Blog using Google Friends Connect.
Email Inquiries: 19
To create a Google only 'PROFILE' please follow these steps:
1/ - If you do not all ready have an email account create one. You will need an email address. If you don't have an email address or want a separate email just for your 'Google Profile' then Gmail or Yahoo are probably the best options but there are others such as myway; msn; live; and hotmail.
2/ - Write down the name you want to use for your Profile, example: blogsfollowme. I would recommend using this for the Blog Title as well.
3/ - Go to the following Google Link-
Create A Blog
See Picture Below:

4/ - The following window appears, see picture below:
Fill in all the required information.
When finished click on 'Continue.'

5/ - You will get another page. This is the page that you will create a 'Profile Only.'
Fill in the two required items, then click on 'skip this and create a blog later.'
See Picture Below:

6/ - This will take you to the final page.
If you want you can click on Edit Profile, Add a Profile Picture or just sign out.
Then open your email account. Google will have a confirmation email, click on it, sign back into your Profile, then sign out.
You are done.
How to use your PROFILE:
Anytime you wish to Follow someone, like me, The Blog Guy, just click on the 'follow' button just above 'Followers. Sign in with your email account and password and follow that Blog or Google Friends Connect on a website.
See Picture Below:

Most Recent Google Blog Award Winners:
The Google Blog Award Winner for Week Ending (w/e) January 16, 2010, for the best Blog or Website was...
Click on the LINK below to see the Award Winner
Uses for Duck Tape
The Google Blog Award Winner for Week Ending (w/e) January 09, 2010, for the best Blog or Website was...
Click on the LINK below to see the Award Winner
War Stories
Don't for get to vote for your favorite Blog / Site for the Google Blog Award, you can vote for yourself.
Thanks for visiting. Please Follow this Blog.
Coming soon, the next Posting Tip, Trick, Hint, HTML Codes, JavaScript, and Cool Fun Stuff.
1/6/10
Google Blogging Tip # 97: Adding a Horizontal Menu Bar to Your Website or Blog
Q/ - I want to add a Menu Bar to my Blog and Website, can you tell me how to do this?
A/ - Yes, Here is a 'Horizontal Menu Bar' that works on both Blogs and Web Pages.
Email Inquiries: 30
Link:
Horizontal Menu Bar
The instructions for installing the 'Horizontal Menu Bar' provided by The Blog Guy are on my web page. There is also an example of how it looks and works on both a Blog and Web Page, visit first before installing.
I am still catching up with all my Twitter Followers, Twitter Pages.
You can expect lots more Free Blog and Website Tips, Tricks, Hints, Fun Stuff, HTML Codes, and JavaScripts for your Blog and Website.
Support my efforts to bring you FREE stuff, please Follow my Google Blog.
Don't forget to follow me on Twitter.
I noticed not many people are voting for the Google Blog Award issued each week. Check it out, vote today, voting for this weeks winner closes at 11:00pm Saturday East Coast, USA, time. Vote for yourself, or vote for your favorite Blog or Site. If you don't vote you cannot win.
Stop over at :
Blogs I am Following, to see many questions people ask on all sorts of subjects about Blogging, Websites, How to get Free Downloads, and more ...
There is a new posting January 5, 2010-
Click on the LINK:
Blogs I am Following
Thanks for visiting.
Next Posting Tip, Trick, Hint, HTML Codes, JavaScript, and Cool Fun Stuff coming soon.
1/2/10
Google Blogging Tip # 96: Updating How to Use Your Google Blog
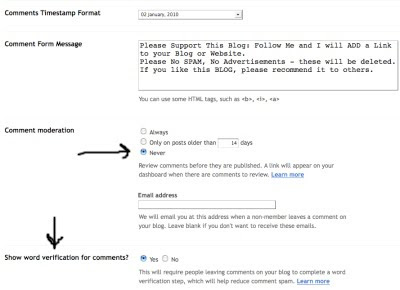
Q/ - I am getting a lot of SPAM in my Google blogspot Blog Comments. How do I stop this?
A/ - I got many emails recently on this subject. One follower here said he got nearly 100 spam adult sites on his Blog.
Spammers are getting smarter. They are using automated robots to search Google Blogs that have open comment settings.
See the reference below:
Reference: Google Blogging Tip # 14 from The Blog Guy,
Link:
Google Blogging Tip # 14
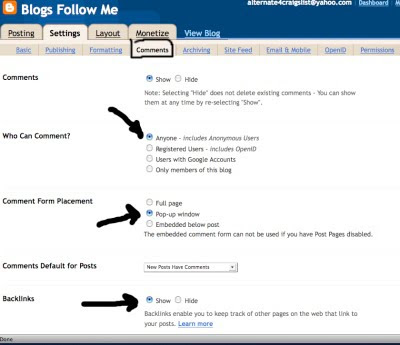
As a result you should change your settings to use :
Show Word Verification on Comments.
This will stop automated spam.
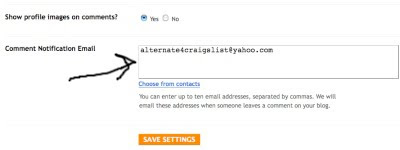
See the pictures below for NEW recommended settings on your Settings, Comments - from The Blog Guy.
I still do not recommend anyone using 'Comment Moderation.'
Email Inquiries: 14
Optimum Settings Update for your Google Blog:
Sign into your Blog, you should be at the Dashboard.
Select 'Settings.'
Select 'Comments.'
I have broken this page down into 3 parts.
On this page, set each of your settings as follows for optimum performance-
Make sure the settings are set as follows:
Hello, Happy New Year, and yes I am back.
Took some private time off.
I will be catching up with all my Followers, Twitter Pages, and posting many new Blog and Website Tips, Tricks, Hints, Fun Stuff, HTML Codes, and JavaScripts.
Lots of Free New things coming for use on your Blog and Website.
Support my efforts to bring you FREE stuff, please Follow my Google Blog.
Don't forget to follow me on Twitter.
I noticed not many people are voting for the Google Blog Award this week. Check it out, vote today, voting for this weeks winner closes at 11:00pm tonight East Coast, USA, time. Vote for yourself, or vote for your favorite Blog or Site. If you don't vote you cannot win.
Stop over at :
Blogs I am Following, to see many questions people ask on all sorts of subjects about Blogging, Websites, How to get Free Downloads, and more ...
There is a new posting today-
Click on the LINK:
Blogs I am Following
The Google Blog Award Winner for Week Ending (w/e) January 02, 2010, for the best Blog or Website was...
Click on the LINK below to see the Award Winner
We Wont Take It Anymore
The Google Blog Award Winner for Week Ending (w/e) December 26, 2009, for the best Blog or Website was...
Click on the LINK below to see the Award Winner
Political Voodoo Doll
Thanks for visiting.
Next Posting Tip, Trick, Hint, HTML Codes, JavaScript, and Cool Fun Stuff will be posted on: Wednesday January 06, 2010.
A/ - I got many emails recently on this subject. One follower here said he got nearly 100 spam adult sites on his Blog.
Spammers are getting smarter. They are using automated robots to search Google Blogs that have open comment settings.
See the reference below:
Reference: Google Blogging Tip # 14 from The Blog Guy,
Link:
Google Blogging Tip # 14
As a result you should change your settings to use :
Show Word Verification on Comments.
This will stop automated spam.
See the pictures below for NEW recommended settings on your Settings, Comments - from The Blog Guy.
I still do not recommend anyone using 'Comment Moderation.'
Email Inquiries: 14
Optimum Settings Update for your Google Blog:
Sign into your Blog, you should be at the Dashboard.
Select 'Settings.'
Select 'Comments.'
I have broken this page down into 3 parts.
On this page, set each of your settings as follows for optimum performance-
Make sure the settings are set as follows:


Hello, Happy New Year, and yes I am back.
Took some private time off.
I will be catching up with all my Followers, Twitter Pages, and posting many new Blog and Website Tips, Tricks, Hints, Fun Stuff, HTML Codes, and JavaScripts.
Lots of Free New things coming for use on your Blog and Website.
Support my efforts to bring you FREE stuff, please Follow my Google Blog.
Don't forget to follow me on Twitter.
I noticed not many people are voting for the Google Blog Award this week. Check it out, vote today, voting for this weeks winner closes at 11:00pm tonight East Coast, USA, time. Vote for yourself, or vote for your favorite Blog or Site. If you don't vote you cannot win.
Stop over at :
Blogs I am Following, to see many questions people ask on all sorts of subjects about Blogging, Websites, How to get Free Downloads, and more ...
There is a new posting today-
Click on the LINK:
Blogs I am Following
The Google Blog Award Winner for Week Ending (w/e) January 02, 2010, for the best Blog or Website was...
Click on the LINK below to see the Award Winner
We Wont Take It Anymore
The Google Blog Award Winner for Week Ending (w/e) December 26, 2009, for the best Blog or Website was...
Click on the LINK below to see the Award Winner
Political Voodoo Doll
Thanks for visiting.
Next Posting Tip, Trick, Hint, HTML Codes, JavaScript, and Cool Fun Stuff will be posted on: Wednesday January 06, 2010.
Subscribe to:
Posts (Atom)


