Adding
FLASH Files (.swf / .flv format) to your blog can be frustration for many seeking how to do it.
1) FLASH Files (.swf / .flv format) cannot be uploaded through the normal add a 'Picture Image' -or- add a 'Movie', which most people have found out.
2) FLASH Files (.swf / .flv format) must have a designation or URL Address to be uploaded to a Google Blog.
3) So you will have to do some pre-work before adding any FLASH File to your Google Blog.
Here is what you need to do to get started:
1) - Identify the Flash (.swf / .flv format) file you want to use, copy them to your desktop.
Helpful Hint: There are FREE online websites that provide a variety of Flash Files (.swf / .flv format) for your use.
2) - You will need a 'Source' for your Flash File to work. Like animated files, you will need a complete URL Address for your Flash File to work as a JavaScript on Google blogspot Blogs.
Note: I searched the Internet and couldn't come up with a FREE service that allows Flash Files to be used and stored. Photobucket, which I use for my animation file storage, wants you to upgrade to a pay service to store and use 'Flash Files.'
Therefore, I created a Website, that I will allow FREE uploads for Flash Files in .swf file format only, maximum size 500 Kb. To see more on this FREE feature offered by me (blogsfollowme) see below.
If you have your own website or know someone who does, you can upload your Flash Files there. But you must have a 'Source' for Flash to work on Google Blogs.
3) - Upload your Flash Files (.swf format) to your host online website storage account, in this case, 'www.blogsfollowme.com.'
4) - Make sure the Flash File uploaded is working.
5) - Select the Flash File you desire to place on your Blog.
6) - Determine where your Flash File is to appear on your Blog: In the main Text as a POST; or on your side bar (column).
7) - Copy the .swf Flash embed code and paste it into one of the JavaScript Codes below.
8) - Now Copy and Paste the entire JavaScript / HTML Code to your Blog's desired location.
9) - View the Blog and make sure it is working.
Important: Your Flash File should be tested in at least two different browsers, like Firefox and Windows Internet Explorer.
This is a picture Image only, so you will have to carefully copy the entire HTML Code.
I recommend using a word type program like Word Pad, NeoOffice, Microsoft Word, etc.
After you copy the entire code, save it.
Now find your 'Source' for your Flash File. Remember, this must be a complete URL Address, see the
'BOLD' area in the picture. This is where you insert your URL and Flash File Name.
This 'Image' example is for a Flash File to be posted using your 'Posting' Feature on your Google Blog.
The size of the Flash File, also in
'BOLD' will fit any Google Blog Template. I recommend using this size format.
See an example of Flash as a 'Post' at:
Turn on your sound.
Click on the LINK-
Blogs by Google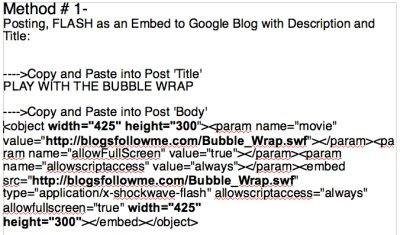
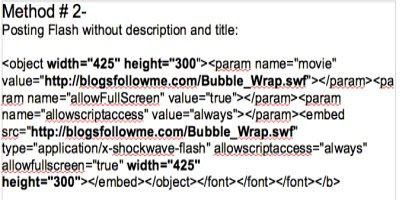
This is also a picture Image only, so you will have to carefully copy the entire HTML Code.
This is the same method as the one above but without a 'Title.'
These work well on Google's open format template, but I still recommend a 'Title.'
This is also a picture Image only, so you will have to carefully copy the entire HTML Code.
This 'Method' is for adding a Flash File to your Sidebar (column) on your Google Blog.
Note: The size of the Flash File has been reduced and should fit all Google templates. Adjust if necessary. Don't forget, the size has two locations in the embed code.
See an example of Flash on a 'Sidebar' at:
Turn on your sound.
Click on the LINK-
Blogs by Google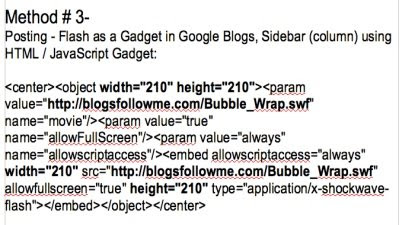
If you are going to use my FREE Flash Storage Service, this is the address you need to use.
Just change the Flash File Name shown in RED for your Flash File.
To get the name, go to the website page, find the picture of your Flash File, and use the name and code.
Allow up to 72-hours from submittal before your Flash File is available.
See the Website for Complete Instructions and Rules.
 This is where you can upload your FREE Flash Files to my NEW Website (Click on the Link):FREE Flash File Uploads
Happy Blogging.
Please report all down or broken Links.
Remember, to be Followed - You have to Follow others!
Got a question about Google Blogs, HTML Codes, or JavaScripts for Blogs...
-or-
Want to send me a Flash File for upload to my website (www.blogsfollowme.com), read the instructions and rules first...
email me at:
alternate4craigslist@yahoo.com


