4/30/09

Google Blogging Tip # 29: Setting Up Your Google Blog Gadgets, Part 7

Adding 'Blog List' (which is often referred to as a Blog Roll) to your Sidebar (column):

Steps:
1. Sign-in to your Blog.
2. Select 'Layouts.'
3. Select 'Gadgets.'
4. Select 'Blog List.'
5. Complete all the required items.
6. Using a different Browser, open the Blog or Website you want to List and copy the complete URL Address.
7. Paste the URL Address where indicated.
8. View Blog, make changes as desired.


Select 'Layout'
Click on 'Gadgets'
Select 'Blog List'
See Picture Below:
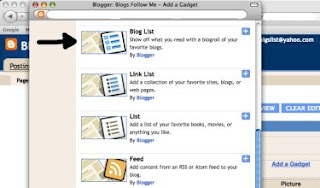


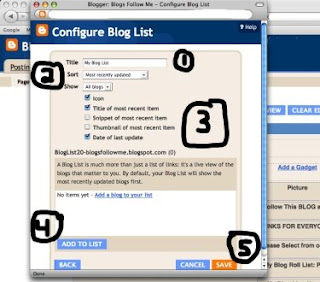
You get a New Pop-up Window.
These Blog List (Blog Rolls) appear on your sidebar.
Make sure you give it a 'Title.'
Next, select what order you want it to appear on the sidebar, the best method is 'Most Recently Updated.'
Next select how you want it to actually appear. I select all the options unless it is adult material, then I use the Google default setting shown.
You can get some ideas how the Blog Roll List works by viewing the sidebar on this Blog, Blogs Follow Me.
Next 'Add' the Blog or Website you wish to appear under your Blog Roll List. You will need to use the complete URL Address.
Finally, 'Save' and go View the Blog.
See Picture Below:


Happy Blogging to one and all.
Yes, more on Google Gadget Tips coming.

Remember, follow as many BLOGS as you can, start with everyone here.

Please report broken or down Links including Blogs that have been removed or the name has changed. Please email me at:
alternate4craigslist@yahoo.com
4/29/09

Google Blogging Tip # 28: Setting Up Your Google Blog Gadgets, Part 6

Adding 'AdSense' (paid advertisement) to your BLOG:

Steps:
1. Have a verifiable address and email account, and real name ready.
2. Sign-in to your Blog.
3. Select 'Layouts.'
4. Select 'Gadgets.'
5. Select 'AdSense.'
6. Follow the steps.
7. Wait for Google to reply.


Select 'Layout'
Click on 'Gadgets'
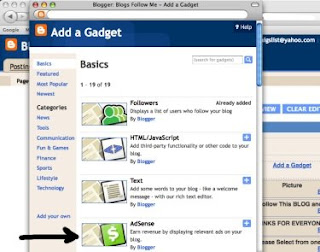
Select 'AdSense'
See Picture Below:


You will get a New Pop-up window.
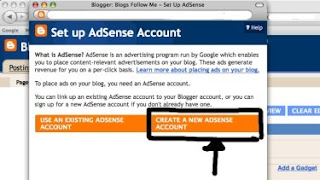
If you do NOT all ready have a Google AdSense Account, Select (click on) 'Create A New AdSense Account.'
See Picture Below:


You will get a New Pop-up window.
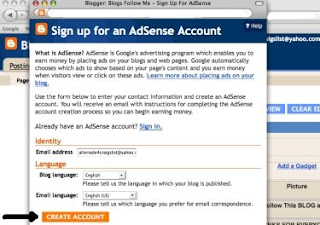
Verify your email address.
Click 'Create Account.'
Log out of your Blog.
Log into your Email Address.
You should have an email from Google.
Click on the Google Link inside the email, follow the instructions for signing up a NEW 'Google AdSense Account'.
Wait for Google to reply.
See Picture Below:

4/27/09

Google Blogging Tip # 27: Setting Up Your Google Blog Gadgets, Part 5

Adding 'HTML / JavaScript' to your sidebar (column):

Steps:
1. Recommend you find the HTML / JavaScript Code you want, copy and paste it into a word type file, or create it first in your word file.
2. Sign-in to your Blog.
3. Select 'Layout.'
4. Select 'Gadgets.'
5. Select 'HTML / JavaScript.'
6. 'Copy and Paste' your HTML Code.
7. Give your HTML Code a 'Title' - This will appear on your Blog in the sidebar (column) above the coded item you paste.
8. 'Save' your work (file).
9. 'View the Blog.'


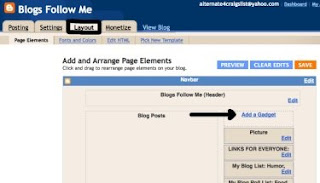
Select 'Layout'
Click on 'Gadgets'
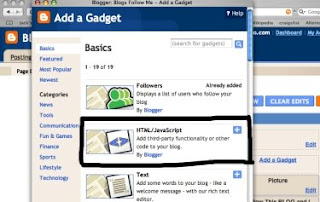
Select 'HTML / JavaScript'
See Picture Below:


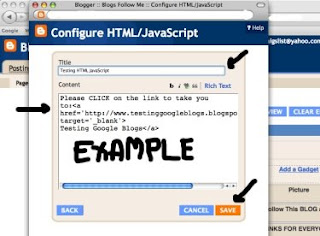
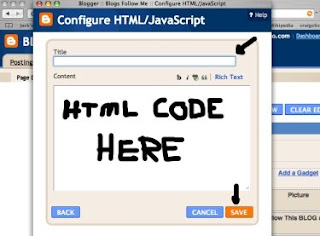
You get a new pop-up window.
See Picture Below:


Give your work a title (recommended for most items).
Copy the 'HTML / JavaScript' from your word program and paste it into the text block.
Save your work.
View the Blog to see if the HTML Coding is working properly.
Note: A common error in HTML / JavaScript Programming is to assume the code works.
Always check it.
See Picture Below:


Happy Blogging to one and all.
Yes, more on Google Gadget Tips are coming.

In response to many emails, I will be covering some HTML / JavaScript Programing Features for Blogs.
Please be patient, we will get to most everything.

Remember, please report broken or down Links including Blogs that have been removed or the name has changed. Please email me at:
alternate4craigslist@yahoo.com
4/26/09

Google Blogging Tip # 26: Setting Up Your Google Blog Gadgets, Part 4

Adding a 'Picture' to your sidebar (column):

Steps:
1. Find the picture you want.
2. If you have a some type of photoshop program such as Adobe, Paint, Seashore, etc. import the picture and resize it to 155 pixels (use whichever is larger width or height for the 155 pixel setting).
Note: The 155 pixel setting will work on all Google Templates. Some templates will take larger picture pixel sizes. You will have to play with it, otherwise just use the suggested size.
If you don't have a program that resizes your picture image, just see the instructions below.
3. Move the picture image to your desktop.
4. Sign-in to your Blog.
5. Select 'Layout.'
6. Select 'Gadgets.'
7. Select 'Picture.'
8. 'Save' your work.
9. 'View the Blog.'


Select 'Layout'
Click on 'Gadgets'
See Picture Below:


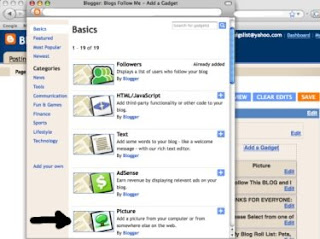
When you click on Gadgets, you get a pop-up window.
Click on 'Picture.'
See Picture Below:


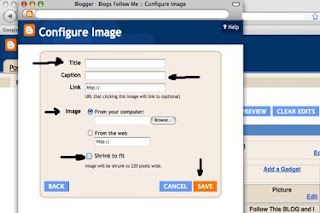
You now get a new pop-up window.
This is where you add your Picture to your Side Bar (column).
Fill in the 'Title' - This will appear above the picture.
Fill in the 'Caption' - This will appear below the picture.
Note: These fields are NOT required.
'Select Image' - this will prompt you to select the picture you have on your desktop, click on it.
Note: You can browse your computer files to get the image, I use the Desktop feature because it's easier; or you can browse the Internet and pull one from any webpage.
NOTE: If you have all ready sized your picture then uncheck the box 'Shrink to Fit.'
If your picture image has not been resized, leave the that box 'Checked.'
Google will resize the picture for you. Sometimes some of the picture is lost when Google shrinks it to fit, that is why it's best to size it yourself.
'SAVE' your image.
'View the Blog' make changes as needed.
See Picture Below:

4/23/09

Google Blogging Tip # 25: Setting Up Your Google Blog Gadgets, Part 3

Adding 'TEXT' to your Sidebar Columns.

Steps:
1. Sign into your Blog.
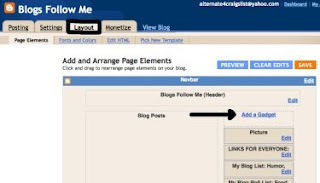
2. Select Layout.
3. Select ADD Gadget.
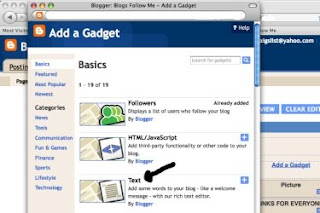
4. From the LIST, Select 'Text.'
5. When your done, Save your work, exit to View Blog.
See Picture Below:


You get this Pop-up Window.
Either Click on the Picture or the Plus sign for ADD Text.
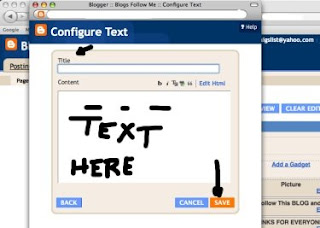
See Picture Below:


Now you get another pop-up window.
Simply ADD whatever TITLE you want.
Note: A Title should be added.
Now in the body, type whatever TEXT is desired. Type just like you would on a word processor.
Note: You can use the functions to change Text Color, Text Size, etc.
When done, remember to SAVE your work.
Look at this Blog Column, you can see where I added the following Title:
Please Select from one of the following Blog Roll Categories for your Blog:
You can also see how I use the color for selected parts of the Text I added.
To add color only to a selected part of the text, use your mouse, highlight the desired text portion and click on the color you want.
See Picture Below:


Happy Blogging one and all.
More on Google Gadgets Tips coming.

4/21/09

Google Blogging Tip # 24: Setting Up Your Google Blog Gadgets, Part 2

Moving your Google Blog 'Gadgets' around, changing position, is very easy.

Steps:
1. Sign into your Blog.
2. Select Layout.
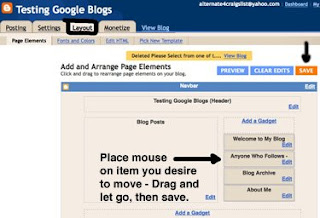
3. Place your 'Mouse' over the Gadget item you want to move.
4. Hold down your left mouse button and drag the 'Gadget' item to the new location you want it to be. Let go of the mouse button.
5. Save the move by clicking on the 'Save' item upper right corner.
It's as simple as that, you're done.
Select 'View' Blog and see if it is where you want it.
See Picture Below:


Happy Blogging
More Google Blog Tips will continue Thursday.
Thanks for your support.

Help Support this Blog: Please tell your friends about this Blog. The more Followers and LINKS the better for everyone.

4/20/09

Latest Blog Maintenance Update Status: COMPLETE

1/ - I have added a list of 'Blog Roll' Categories to the right, please Select from one of the categories you would like your Blog Listed.
If you want to add a NEW Blog or Change your Blog Category please email me at:
alternate4craigslist@yahoo.com
2/ - I have decided to REMOVE the LINKS to:
Twitter
FaceBook
MySpace on 'Blogs Follow Me.'

Reason: It would make 'Blogs Follow Me' to congested.

I have instead created a special Blog for other Blog Users called -
Blogs By Twitter

Please CLICK on the link to take you to:
Blogs by Twitter


Google Blog Tops will continue tomorrow.

4/19/09

Blog Updates Completed

All the New Categories for Blog Roll List have been added.

Blogs have been moved to the NEW respective Blog Roll List category.


If you wish to Change your Blog Roll List Category, please Email me at:
alternate4craigslist@yahoo.com
Thank you for your patience, email feedback and comments.

4/17/09

New Email Question and Helpful Answer:

Q) Why do I get this message after I have uploaded a video?
Email Inquiries (2).


A) Google has processed the Video for upload but has not transferred the video data for viewing. There is nothing to worry about. Wait about 2 to 5 minutes and refresh the screen and the video should work. You can also try viewing the video in another browser.

/\/\/\/\/\/\/\
BLOG Maintenance Notice: This weekend I will be performing Blog maintenance including adding NEW categories for Blog Rolls.

4/16/09

Google Blogging Tip # 23: Setting Up Your Google Blog Gadgets, Part 1

Creating a special 'Header' for your Blog:
Steps:
1. Find a picture you like from the Internet or create your own photo layout header with picture / text.
2. You will need to use some type of Imaging (photo) Software Program, like Paint for Windows, Adobe Photoshop; or Photoshop Elements for Apple iMAC, etc.
3. Size your Image for the 'Header' starting with 625 wide pixels allowing the program to auto size the height.
Note: After installing the Header Image, you may have to resize it to fit your Blog Layout.
4. Place the 'Image' you want to use on your Desktop.
5. Sign into your Blog.
6. Select Layout.
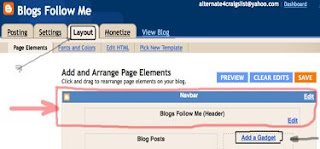
7. Select Edit 'Header' right above Add a Gadget.
See Picture Below:


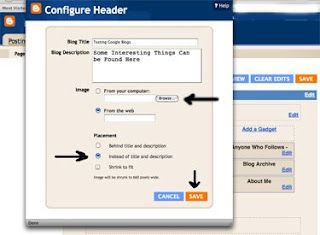
This is the pop-up window you should have.
Select 'Browse' and your image should be on your Desktop.
Next, There are several options to create this 'Header.'
I recommend the second option, 'Instead of Title and Description' but this is a personal choice.
Finally don't forget to 'Save.'
When doing your 'Header' layout you will have to experiment to see what fits and looks best for your particular Blog.
Remember - Make sure your 'Header' is not too large. It is a photo element (picture image) and they can delay your Blog loading frustrating visitors and driving them away.
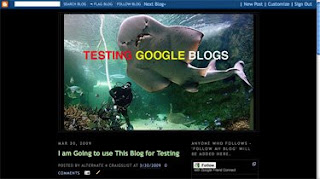
See Picture Below:


This is what my TEST 'Header' Gadget looks like.
I made this in about five minutes using Adobe Photoshop Elements on an Apple iMAC Computer.
I had to test the picture size several times to get the exact dimension.
Important: Depending on what Google Layout you select, the size may vary.
This picture is 625 Pixels Wide by 383 Pixels High.
I simply grabbed a picture from the Internet using Google Images, and placed some simple text in three different colors over the picture.
See Picture Below:


May all your Blogging be happy.
More Google Blogging Tips on Gadgets coming.

4/5/09

New Email Question and Helpful Answer: Updated

Several bloggers have ask me to help them with standard Keyboard Commands for their Windows PC's and Laptops.
Below I have listed the BASIC Keyboard Commands for Windows Computers and Apple iMac Users:
Email Inquiries (7)
Print Screen Request be added, Email Inquiries (4)

Windows Users Only -
Windows Program Keyboard Commands:
Hold down keyboard commands ....
CTRL+C: Copy
CTRL+X: Cut
CTRL+V: Paste
CTRL+Z: Undo
CTRL+B: Bold
CTRL+U: Underline
CTRL+I: Italic
PRNT SCRN, Print Screen for PC's: Print Screen
Fn+Home/Pri Sc for Laptop's and Notebooks: Print Screen


Apple iMac Users Only -
Apple iMac Program Keyboard Commands:
Hold down keyboard commands .....
(apple) KEY..and press "A" to select ALL items in an active window.
(apple) KEY..and press "I" to "get information" on item selected.
(apple) KEY..and press "P" to PRINT item selected.
(apple) KEY and press "O" to OPEN item selected.
(apple) KEY and press "N" to create a new folder.
(apple) KEY and press 'W" to CLOSE item selected.
(apple) KEY and press "C" to copy (text or picture selected) to Clipboard.
(apple) KEY and press "D" to duplicate the item selected.
(apple) KEY and press "M" to create an ALIAS of item selected.
(apple) KEY and press "E" to Eject DISK selected.
(apple) KEY and press "V" to PASTE where you wish.
(apple) KEY and press "F" to use Sherlock Search.
(apple) KEY and press "Y" to put a selected ITEM Away.
(apple) KEY and press "SHIFT" and Press '3' to Print Screen

Notice: I returned today, April 15, 2009 from my business trip. Sorry for any delayed postings of Blog Tips. I did get all the latest Blog Followers added tonight.
I will post another Blog Tip tomorrow (April 16th.)
Thanks for all the emails and questions.

Happy Blogging Everyone!

4/2/09

Google Blogging Tip # 22: Getting Your Blog Listed with MSN Search Engine

Once you create your Blog it is important to get it published (called listed) with the three major Search Engines:
Google
MSN
Yahoo

Once it is listed with these three all the others will pick it up using Robot Internet Crawlers.

Previously we discussed how to list your Blog with Google. I have even included a Link to list your Blog with Google Search Engine to the top and right of this Blog under 'Links For Everyone.'

To SUBMIT your Blog for Listing to MSN / Live / Microsoft Search Engines takes only two simply steps.

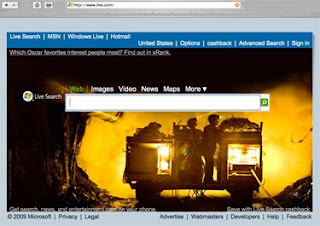
First - In your URL type in the following web address:
http://www.live.com/
Second - In the box called Live Search....
Type in, or paste, your complete URL Blog Address.
Example-
http://www.blogsfollowme.blogspot.com/
Press Enter (or Return) on your keyboard
See Pictures Below:


If your Blog is all ready listed with MSN it will appear on the Search Engine Web Page, click on it, and view your Blog.

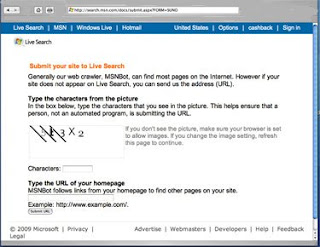
If your Blog is NOT yet listed with MSN you will get a page that is titled:
Submit Your Site to Live Search.
Simply type or paste your complete Blog URL Address in box space provided and enter 'Submit.'
Example-
http://www.blogsfollowme.blogspot.com/
It will take between 5 to 30 days for your Blog or Website to appear.
MSN / Live is probably the current fastest Search Engine for listing new sites.
See Picture Below:


Happy Blogging....
Next Google Tip - Setting Up and using your 'Gadgets.'

Note: Sorry, I have to travel on business the rest of this week so I wont be able to post the next Google Tip until next week.