Steps:
1. Find the picture you want.
2. If you have a some type of photoshop program such as Adobe, Paint, Seashore, etc. import the picture and resize it to 155 pixels (use whichever is larger width or height for the 155 pixel setting).
Note: The 155 pixel setting will work on all Google Templates. Some templates will take larger picture pixel sizes. You will have to play with it, otherwise just use the suggested size.
If you don't have a program that resizes your picture image, just see the instructions below.
3. Move the picture image to your desktop.
4. Sign-in to your Blog.
5. Select 'Layout.'
6. Select 'Gadgets.'
7. Select 'Picture.'
8. 'Save' your work.
9. 'View the Blog.'
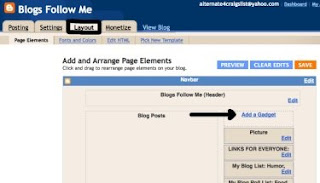
Select 'Layout'
Click on 'Gadgets'
See Picture Below:

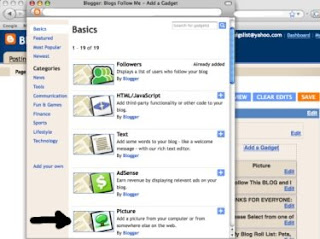
When you click on Gadgets, you get a pop-up window.
Click on 'Picture.'
See Picture Below:

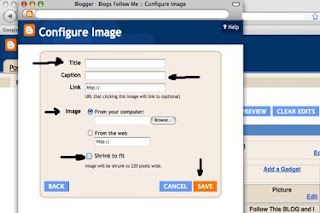
You now get a new pop-up window.
This is where you add your Picture to your Side Bar (column).
Fill in the 'Title' - This will appear above the picture.
Fill in the 'Caption' - This will appear below the picture.
Note: These fields are NOT required.
'Select Image' - this will prompt you to select the picture you have on your desktop, click on it.
Note: You can browse your computer files to get the image, I use the Desktop feature because it's easier; or you can browse the Internet and pull one from any webpage.
NOTE: If you have all ready sized your picture then uncheck the box 'Shrink to Fit.'
If your picture image has not been resized, leave the that box 'Checked.'
Google will resize the picture for you. Sometimes some of the picture is lost when Google shrinks it to fit, that is why it's best to size it yourself.
'SAVE' your image.
'View the Blog' make changes as needed.
See Picture Below:


No comments:
Post a Comment