3/31/09

Google Blogging Tip # 21: Deleting a Video or Video Link from Your Blog

Deleting a Video or a Video Link (YouTube, Google, LiveLeak, etc,) is easy.

Steps:
First sign into your Blog.
Select Posting.
Select 'Edit Posts.'
When done, View your Blog.


Select 'Edit Post.'
Find the Post you want to DELETE.
Check the box to the left next to the post.
Look to the right, click on Delete.
This will bring up a pop-up window.
Deleting a Video or Video Link is don the same way.
See the 2 Pictures Below:


Whether you are DELETING a Video or a Video Link, the instructions are the same.
Once you have click on 'Delete' from your Edit Post you will get this pop-up window.
Confirm you have checked the correct box.
Then just Click on 'Delete.'
Your Video or Video Link has been deleted from your Blog.
To confirm View Your Blog.
See Picture Below:


Happy Blogging....
Next Google Tip - Listing your Blog with MSN / Live / Microsoft Search Engine.

Note: I got a lot of emails asking me about the Conficker Virus (Worm). At this time it effects only Microsoft Computers.
To be safe, tomorrow, April 1, 2009, avoid using the Internet unless it is necessary. Do not open any emails. Make sure your computer security software is up todate and your anti virus anti spyware software is working and up todate before signing on to any browser. I updated all my stuff early this morning.
No one knows what Conficker will do if anything.
Another tip, avoid using the Internet on cellphones and other wireless devices.
If there is an attack, you may find that major Internet companies such as Google, MSN, and Yahoo shut down for a period. If they do, this will effect Blogs, YouTube, Email, and Internet access.

Please share this Blog with others.
Please Follow This Blog.

3/30/09

Google Blogging Tip # 20: Adding a Video Link to Your Blog, Part 3

This Google Tip is about -
Sizing a Video Link to fit into one of your Blog's Columns.

Steps:
First find the Video Link you want.
Next sign into your Blog.
Select the Blog you want if you have more than one under this account.
Select Layout.
Find the 'Embed' HTML Code for the Video Link.
Copy the 'Embedded Code.'
Paste the 'Embedded Code' into the HTML/JavaScript Gadet Box on your Blog.
Resize the HTML Embed Code.
Save and Post to Blog.
View Blog.


Lets Get Started.....Here are the easy instructions to get a Video Link to fit within your Blog's Column.
If you have multiple Blogs under one account as I do, Select the appropriate Blog you wish to work on.
I selected 'Blogs Follow Me.'
See Picture Below:


Next Click on 'Layout.'
See Picture Below:


This takes you to this page.
Now Click on 'Add A Gadget.'
See Picture Below:


This calls up a List of Options under 'Add A Gadget.'
Click on 'HTML/JavaScript.'
See Picture Below:


This opens up a NEW Window.
Here you Paste the Embed HTML Code from the Video Link, just like you did in Google Tip # 19.
This will place a Video Link: YouTube, LiveLeak, Google, AOL, Yahoo, etc. into your box.
The Video Link is too large to display, so it must be resized to FIT the column.
You can use a simple resize criteria of Width = 155; Height = 100. Remember you must change this in two separate places within the HTML Embed Code.
This size will fit all Video Links into Google Columns.
If you want it to be more precise, then use this math formal with a calculator:
Divide the Height and Width pixel sizes by 3.
Some Google Templates or Templates made by using Non Google Standard Templates will take larger Video Links. For these try dividing the Height and Width by 2.5
NOTE: Use whole number no fractions of a pixel.
Unfortunately this really comes down to a trial and error depending on what Blog Template you have.
Play with it and see how it fits.
You can go back and change it as needed.
Don't forget to ADD a title in the 'Title' box.
When done, don't forget to SAVE the file.
Recommended Viewing: First after saving the Video Link to your Column, select View Blog.
Again let it play all the way through with sound on.
Once done sign out of your Google Blog.
Google has now save the settings.
You should view this in more than one Web Browser.
A common mistake is that people use one Web Browser such as FireFox but items displayed within FireFox may look different in Windows Internet Explorer or iMac Apple Safari.
See Picture Below:


May You Always Have Happy Blogging....
Next Google Tip - Deleting a Video Link from your Blog.

Please share this Blog with others.
Please Follow This Blog.

3/28/09

Google Blogging Tip # 19: Adding a Video Link to Your Blog, Part 2

SIZING a Video Link from sources such as YouTube, Google, LiveLeak, Yahoo, AOL and similar Video LINKS to fit in your BLOG properly.
Reason this is necessary - Some Video Links exceed a width of 425 pixels. When this happens they bleed over (run into the column part of your Blog). It is annoying when people are visiting your Blog. The degree of distortion varies depending on what Search Engine your visitor is using, i.e. FireFox; Windows; Safari; etc.

Steps:
First find the Video Link you want.
Next sign into your Blog.
Go to Postings
Select Create.
Find the 'Embed' HTML Code for the Video Link.
Copy the 'Embedded Code'
Paste the 'Embedded Code' into the NEW Post Box on your Blog.

It should loo like this...
See Picture Below:


As explained in Google Tip # 18, find the Video Link you want from your Internet source (YouTube, LiveLeak, Google, Yahoo, AOL, etc,) and POST it in the NEW empty box.
Also add whatever title you want. As suggested, I use whatever the video link is titled but you can put anything there.
See Picture Below:


In the blow-up HTML Coding, that you pasted, note that there are two different places that 'Width' and 'Height' appear within the code.
To Resize the Video Link, you must change both places they appear.
The Width is shown as 480, change this to 425 (both places).
The Height is shown as 295, change this to 300 (both places).
Important: Take your time, make sure to do NOT change or delete any of the coding other than the size.
When your done, 'Publish' the Video Link to your Blog.
Then go to 'View Blog.'
Run the Video Link the entire length with sound.
When done, sign out of your Blog.
Google has now published your Video Link.
See Below:


Happy Blogging....
Next Google Tip - Sizing a Video Link to fit into one of your Blog's Columns.

Please share this Blog with others.
Please Follow This Blog.

3/27/09

Google Blogging Tip # 18: Adding a Video Link to Your Blog, Part 1

Uploading a Video Link.....
To 'ADD' a Video Link to your Blog, please follow these simple steps:
First go to the URL Site for the Videos, such as YouTube.
Find the Video Link you want to add to your Blog.
Copy the 'Embed' Code and paste it into your Blog.

This sample shows a YouTube Video.
See Picture Below:


After Selecting the Video Link you want from YouTube, Google Videos, Yahoo Videos, Liveleak Videos, etc. copy the 'Embed' Code for the Video Link and paste it into your Blog.
See Picture Below:
Important: The 'Embed' Code shown is for YouTube Videos, the example used. The 'Embed' code is found at different locations depending on which Video Link Site you choose. You have to look for it.
YouTube is offering a new embed posting option for color backgrounds and borders. I suggest you stick with the default settings. These work best on Google Blogs.


Blow up picture of the 'Embed' HTML Code you need to copy and paste into your Blog 'New' Post box.
See picture Below:


From the LINK URL Page (YouTube, Google, Yahoo, LiveLeak, etc.) paste the embedded code (HTML Coding) in your Blog's blank post box (create, new posting - same place you post text or pictures).....
Now Click on 'Publish Post.'
Go to - 'View Blog' and your YouTube or other Video Link should be there.
Play the video all the way through.
Then sign out of your Blog.
Google has now locked your Video Link to your Blog.
See Picture Below:
Note: Remember to ADD a 'Title' for your Video. I generally copy the YouTube Title and paste it into my title block.


More Happy Blogging....
Next Google Tip - Sizing a Video Link from sources such as YouTube, Google, LiveLeak, Yahoo, AOL and similar Video LINKS.

Please share this Blog with others.

3/25/09

Google Blogging Tip # 17: Adding a Video to Your Blog, Part 2

When uploading a personal Video or a Video downloaded from the Internet, sometimes Google takes more time than usual (about 4 minutes).
Anytime you want to upload a Video without waiting, follow the first step in Google Blog Tip # 16, and then soon as the Blue Bar (see picture below) shows 'Save Now', click to save Video.
This saves the Video to your POST File Archive.
You can then go do something else on your Blog or simply sign-out and come back later.
This way you wont have to wait for Google to finish processing your video.


Later, say about an hour or even the next day, you can sign back into your Blog, and simply go to 'Edit Post.'
You will see a line....
Edit with Draft, see picture below.
Simply Click on 'Edit.'
This will take you back to the Posting window, and just click on 'Publish Post.
Your video is now uploaded.
Go to the main Blog Page (View Blog) and your video should be there and functional.


A reminder:
Google has a Scheduled outage at 4:00PM PDT (USA Pacific Coast Time) on Thursday (March 25th). You should not try and do anything with your Blog 30 minutes before and until the next day to be safe that any changes or updates take.

Happy Blogging....
Next Google Tip - Uploading a YouTube, Google, LiveLeak, Yahoo and similar Video LINKS. This will include sizing to fit instructions.

3/23/09

Google Blogging Tip # 16: Adding a Video to Your Blog

This is how you add a personal video or a video that you have downloaded from the Internet....
Note: This is NOT how you add a YouTube or other LINK for a Video.

Recap some previous Blogging Tip information:
Google allows your to upload your personal Videos or a Video that you found on the Internet.
The Video maximum size allowable is 10 megabytes.
I have found that 3.5Mb and smaller load pretty fast and have little or no problems.
The formats acceptable by Google at this time are:
.mov
.wmv
.avi
.mpg (.mpeg)
If you have any other format, you will have to use a third party software to convert it.
If the video is larger than 10 Megabytes you will have to compress it.
Remember, even if the format and size are correct, a video from the Internet may not load due to a codec problem (formatting from the originator).
Important Note: This does NOT work on FLASH Files.

Here is how to load a Video to your Blog.
Steps -
Move the Video to your Desktop.
Open Posting, select 'Create' (create a new post).
Click once on the 'Add Video Icon.'
Check the 'Box' for accepting the 'I Agree to the Upload Terms.'
Video Title - This is any title you want. I suggest no more than two words.
Browse - This will open another box, see picture below, that should have your Desktop and the Video you want shown.
Now Click on 'Upload Video.'


After you click on 'Upload Video' this is the picture you should see.
See Below:
Now just wait until Google is done.


Once Google is done, the 'Publish Post Orange Box' will appear.
Just click on - Publish Post.
Now go view your Blog to see if the Video is there.
Important: Be patient, sometimes the Video which will appear on your Blog Page, but wont play. This is because Google hasn't finished finalizing the input on their side.
It should be Ok in a few minutes.
You can get out and come back and look at it later or use another Browser to test the video to see if it plays.
Google will give you a message if the Video did not upload or there is something wrong with the format that is unacceptable to Google.

3/19/09

Google Blogging Tip # 15: Posting Picture Images to Your Blog

It takes just THREE Simple Steps to Load a Picture Image to your Blog....

To add a picture to your BLOG, the simplest and fastest method, not the only method, is drag the picture to your desktop.
Follow the numbered steps - 1, 2, 3, 4 (more than one picture) - I have marked, see below:
1 - This sets the image to default to the 'Left, Center, or Right. It is best to set ALL pictures to 'LEFT.'
2 - This is important, Google sizes your picture image. Your image should be set to a width size between 300 to 400 pixels with the height to proportion, but the width is important. Most people use a program like Adobe or Paint to size their pictures.
Note: Maximum width should be 400 pixels.
If you are unable size your picture, then TEST you image by posting it starting with the 'Medium' setting. If it is too large go back, edit your picture, DELETE the picture entirely, repost it as 'Small.' If the image is too small, then go back, Edit, Delete the picture and upload it again using 'Large.'
Pictures that come from a digital camera are generally large in pixel size, so if you haven't resized them, select 'Small.'
3 - This selects the location, in my example, from your desktop, but they can come from a file folder on your computer, or directly from the Internet.
Remember all pictures will be a different size, unless you have resized them, so you may want to test them by loading one at a time.
Also the preferred image format is .jpg
Other formats such as .jpeg, .jpe, .gif will load but the preferred format by Google is .jpg (this is the most universal picture format unless the image is an animation, then it will be in .gif format).
4 - Simply click 'Upload Image.'
If you have more than one picture image for this one post, number them, say image-01, image-02, image-03, etc.
Google places the last picture image uploaded first.
So if you want your picture images in order, using the example (image-01, 02, 03, etc.) you would load image-03 first, then image-02, then image-01.


After 'Clicking' Upload Image, you get the following...
If this is the correct picture, then simply Click on 'Done.'
See below:


Finally, your picture image should appear in your Post Box, see below:
Note: Some Google Templates you choose will NOT show a picture image but HTML coding (which is still the picture, but in code, not image format).
You can add as many pictures as you like in this post box.
Important: All pictures and text within this POST box are considered 'One Posting.'
Once your picture has been added, then you can ADD text within this post box if you wish.
There is a 'Title' box, you should put something in there (do not leave blank). Example: This is where I put Google Blogging Tip # 15.


There will be more on Picture Images later, this is the basic instructions to get a normal picture image with or without text posted to your Blog.

Happy Blogging....
Next Tip - Adding a Video to my Blog.

3/18/09

User Clarification....

Part 1 - For Google Bloggers Only -
Some people have numerous blogs, some up to 20 or more.
I will add the FIRST one only to the 'Follow' list.
The First one only to the 'Blog Roll' roll list, by appropriate category.
The First Five Only to the LINKS list.

Part 2 - For Non Google Bloggers including Website Owners -
You will be added ONLY to the LINKS List.
As a general rule, 'Followers' don't work on websites anyway.
Google still doesn't have the bugs completely fixed on other Blogs such as MySpace and Facebook.

Please remember to report any BROKEN Links so they can be removed.
Thanks for understanding.
Happy blogging.

3/17/09

New Email Questions and Helpful Answers:

(Q)1 – According to your Google Blogging Tip # 13, I need to keep the number of items on my main Blog Page to a maximum number of 7 posts, and keep or eliminate my outside Blog features such as 'visitor counters, etc.' to one or none. Yet my Personal Blog Page loads fast on my computer after I post or add something. I am confused on this issue that my Blog Page will load slow, can you explain?
Email Inquiries (9)
(A)1 – Yes, here is the simple explanation.
Your computer, whether an Apple (iMAC) or any Windows Version, laptop or desktop, uses Cache and Cookies to store data and reduce RAM usage. Once stored on your computer this allows all previous data to load quickly.
In addition, Google uses servers located all over. So a person in New York City is using a different Google Server than someone living in Seattle Washington. Add this to the fact routing of Internet data takes different paths at different times of the day. In the short explanation, clean out your cookies and cache, then test how fast your computer loads your Blog.
Also try another computer such as one at a public library. If you have someone on the other side of the country or world ask them to clean out their cache and cookies and see how long it takes to load your Blog. You want them to do this if they are frequent visitors or users of your Blog because they will also have stored the data in their Cache and Cookies.


(Q)2 – My Blog is listed with Google Search Engine, thanks to your instructions, but when I travel outside my own area my Blog calls up differently, position, why is that?
Email Inquiries (6)

(A)2 – That's normal. Again this has to do with servers. This is not unique to Google. You will experience this on MSN and Yahoo as well. On occasion they will be the same, but there is no cause to worry if the position is different.


(Q)3 – What is the best way to get my Google Blog exposed?
Email Inquiries (29).

(A)3 – Do NOT pay for any service that claims they can get you listed on Search Engines or improve your standing (listing position) with Search Engines.
First – ALL Search Engines treat Blogs differently than they do websites.
Websites are position primarily by three factors: People who Link to that site; Number of hits (external visitors to the site; and Meta Tabs. Yahoo and MSN use some variation of these. Google does not. Google is unique in it's ability to rank and list websites. It changes the criteria frequently and this is why you could be in the top ten this month and six months from now be on page 700. Many people claim to know how to overcome this but it is just hype and bull.
Next - As for your Google Blog.... Google uses certain criteria to ascertain Blog listing and position. Remember, this is about Google Blogs not blogs from other sources such as Facebook or MySpace.
Google currently is putting high emphasis on 'Followers.' So you should concentrate on following as many Blogs as possible but they must reciprocate to make it work. Many people are reluctant to use the 'Following' feature. The simple rule is anyone who wants to 'Follow Your Blog' return the favor and follow theirs. If you 'Follow a Blog' and they do not follow you in a reasonable period of time, say two weeks, remove them. You are benefiting them with NO benefit to you.
So get out there, visit Blogs, find things common to your Blog or of interest and ADD them to your Follow List.
Last – There are FREE websites and Blogs such as mine (Blogs Follow Me) that provide FREE listings of your Blog. Use them. List with as many as you can. The more exposure the better. But never pay for service to get your blog listed, shown, positioned, discussed, or in someone's special 'Friends' list.


Got a question about your Google Blog, email me at:
alternate4craigslist@yahoo.com

To ALL Followers....

This new Google system of following is terrible.
It doesn't always place the newest follower(s) in the front, thus it makes following NEW people who have joined this Blog very difficult.
If I missed anyone, please forgive me.
Simply post a comment on this Blog, and I will catch up and add you...
or, you can send me an email to:
alternate4craigslist@yahoo.com

thanks for understanding

If you are looking for Google Blog Tips, they're plenty more coming.
When you don't see a daily post here it's because I am either swamped with work (on a deadline and burning the candle at both ends as they say), or traveling, please be patient.

Don't forget to help everyone out.....
If you find a Broken LINK posted here, send me an email, and I will remove it at once.

Coming later today, more email questions and answers.

3/11/09

Google Blogging Tip # 14 : Final Step in Choosing the Proper 'Settings' for your Blog

This is Part 3 of Selecting the Optimum Settings for your Blog:
Sign into your Blog, you should be at the Dashboard.
Select 'Settings.'
Select 'Comments.'
I have broken this page down into 4 parts.
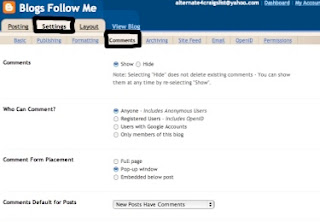
On this page, set each of your settings as follows for optimum performance-
Comments: Select, 'Show.'

Who Can Comment: This is the area with the biggest errors and most understood for use.
If you want anyone to comment on your Blog, this is the best recommended choice,
Select, 'Anyone.'
If you want to limit comments to only Google and Friends (this means the person leaving a comment must have a Google or Friends Account),
Select, 'Registered Users.'
If you want to limit comments to Google Bloggers only,
Select, 'Users with Google Accounts' (this is NOT recommended).
If you want to Publish your Blog and have NO Comments of any kind,
Select, 'Only Members of This Blog.'

Comment Form Placement: Recommended, Select, Pop-up Window.

Comments Default for Post: Leave on 'Default' Setting (New Post Have Comments).
See Picture Below:


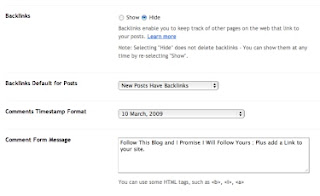
Continuing with Optimum Settings for your Comments-
Backlinks: Select, 'Hide.'

Backlinks Default for Post: Select, default setting, 'New Post have Backlinks.'

Comment Timestamp Format: Select, Recommended, 'Date Only.'

Comment Form Message: This is what the person sees when visiting your Blog and selects, leave a Comment.
You can put anything here, like 'Please, NO SPAM'; or 'Post in English Only'; or 'Please Follow My Blog', etc. or any combination of phrases.
This is Highly Recommended that you select, and put something here!
See Picture Below:


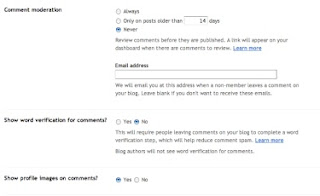
Continuing with the next part of Optimum Settings for you Comments-
Comment Moderation: This is another very misunderstood area of Google Blogging and misused.
The optimum and highly recommended setting, Select, 'NEVER.'
Many people who have a Google Blog have had a MySpace or Facebook page before. Google Blogs are for open forums on the Internet. If you want something for friends and family only, Google really isn't for you. You should get a FaceBook or MySpace Page.
Most people find it offensive or at minimum irritating to find a person who has a Blog with comments and then see, Post approved after moderation.
One argument people make is that I don't want SPAM.
Spam is part of the Internet and isn't going away. The best thing is to monitor your Blog routinely and if you see a post that is offensive or is Spam just delete it. This way you still get plenty of comments from people who are generally interested in what you post, the whole idea of Google Blogging.

Show Word Verification for Comments: Best optimum setting is 'NO.'
If your worried about Spam, then Select, 'Yes' here.

Show Profile Images on Comments: Select, 'Yes.'
See Picture Below:


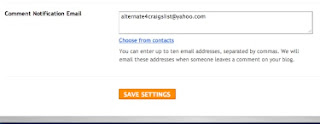
The last part of Optimum Settings for you Comments-
Comment Notification Email: This is 'Recommended.'
Simply put any complete email address you have into this box. It is highly recommended that you get and use a Yahoo Email Account for this item.
Note: You will end up with some Spam. The advantage of this block is you can check your email for comments instead of your Blog. The email will always show where the comment was from and on what post.

Save Settings; Don't forget to 'Save' your settings before quitting. Return to Dashboard and then back to this page to double check all the settings took properly.
See Picture Below:


Note: The remaining items (listed below) under 'Settings' should be left to Default Settings by Google at this time.
Archiving
Site Feed
Email
OpenID
Permissions

3/10/09

Google Blogging Tip # 13 : The Next Step in Choosing the Proper 'Settings' for your Blog

This is Part 2 of Selecting the Optimum Settings for your Blog:
Sign into your Blog, you should be at the Dashboard.
Select 'Settings.'
Select 'Formatting.'
Again, I have broken this page down into three parts.
The first thing Google list is 'SHOW.'
This is important to your overall Blog set-up and performance, how it runs.
It represents the number of 'Posts' that can appear on any one page including your main Blog page. Google sets the default setting as '7.' If you are posting pictures, videos, or YouTube Links, I recommend this setting to be '1' but not more than '3.'
This is the number of individual post, not the number of pictures or items within a post.
For Example: If you post 5 pictures within one post, that is still one post.
Your Blog functions like a Web Page. It must load the page to be viewed. Visitors with slower running Modem Speeds may get frustrated and leave your Blog before ever viewing it. All of us have visited Blogs that the main page is endless. All kinds of stuff all over the place. This takes a long time to load, is hard to follow, and does not help your Blog with Search Engines. Smaller quantity post are best.
The next three items shown on this page have to do with time and date. They are not important.
I recommend selecting from the drop down boxes DATES only.
See Picture Below:


This middle section of the page has-
Time Zone: Select whatever time zone you live in.
Language: Select whatever the language is of the country you live in, unless your target audience is another country.
Example: You live in Mexico City but your primary readers are in the United States, then you should select English.
Set the NEXT 3 items: to YES, YES, NO
See Picture Below:


This is the last section of this page.
It should be YES
Leave Blank (we will address this feature later).
Save Settings
See Picture Below:


Happy Blogging....
Tomorrow we will set-up 'Comments' under Settings.
This is the one place most people make all their error in setting up a Blog.

3/9/09

Google Blogging Tip # 12 : Choosing the Proper 'Settings' for your Blog

This is Part 1 of Selecting the Optimum Settings for your Blog:
Sign into your Blog, you should be at the Dashboard.
Select 'Settings.'
See Picture Below:


This takes you to the first item, 'Basic', I have broken the page down into three parts.
We will set-up the BASIC Settings Today....
See Picture Below, top part of the page:
You should always have a BLOG TITLE.
If you have an email address, it helps if the email address matches the Blog Title, more on this later.
You should always have a BLOG Description.
If you wish to separate the lines of description and stop them from running together, you need to use some HTML Language.
At the end of each set of words or sentence add < br > this is found above the , and . plus use the letters br, altogether no spacing. It is HTML for line break.
NOTE: Look at my main Blog Page Header, you will see how this helps set-up your blog.


The next set of settings should be YES, YES, YES, NO
See Picture Below:


The next setting, Adult Content, should be set to NO unless you have Adult Content, then set to YES.
This error by users can often get your Blog canceled (taken down) by Google, set it correctly to start with!
The next two settings should be YES, Disabled.
When finished 'Click' on Save Settings.
See Picture Below:


Clarification: Adult Settings do not necessarily just mean adult pictures. Some controversy and adult language is covered under this subject. You can read the terms of agreement set by Google. I always advise people if they are not sure to click YES. Even some subjects should not be viewed by persons under 18-years-old.

The NEXT item on SETTINGS is 'Publishing', we will not address this. It is set to a default setting for a reason, don't mess with it!

Happy Blogging....
Tomorrow we will set-up 'Formatting' under Settings.

3/8/09

Google Blogging Tip # 11 : How to Change Your Blog's Template

First determine if you are happy with your current selected 'Template.'
One way is to see if the original Blog selection has all the 'Posting' features.
See the two pictures below to determine what features are missing, if any:


To CHANGE Templates after creating your Blog, simply go to the Dashboard.
Select 'Layout.'
Then select 'Pick New Template.'
See picture below:


You are now at this page.
Here you can play around with various templates and see which ones you like.
Once you select one, go back and check to see if all the features for posting are there.
Note: Changing templates after you have started posting may cause loss of data. That's why it is important to select the template early on and live with it.
See picture below:


Happy Blogging......
Coming NEXT: Choosing the proper 'Settings' for your Blog.

3/7/09

Google Blogging Tip # 10 : Getting Started with My New Google Blog

Before starting a Google Blog you should do the following:
1/ Select a Blog Name.
2/ Select a Picture Image for your Google Profile.
3/ Select your FIRST Post Message - Text, Video, YouTube Link, etc.
4/ Select a picture or Icon if you plan to put one in the Template column.
5/ Create an EMAIL Account for your Google Blog. I recommend Yahoo Email. If possible try and get an email address with the same address as the Google Blog Name.

When you completed the above set up your Google Blog-
Lets get started:

Initial 'Selection or Choice' for your Google Blog Template.
Just pick one, and click on the arrow.
See Picture Below:


Just 'Click' on the arrow and keep going....
See Picture Below:


This 'Line' determines the functions you can easily do with your post for Text, Picture Images, and Videos.
Some Google 'Templates' for whatever reason will not display all the functions. So if you choose a 'Template' that has less functions, now is the time to change before making ANY post to your NEW Blog!
Skip this Step and go to 'Dashboard.'
See Picture Below:


Set-up Your Profile First, see Google Tips # 7 and # 8.
See Picture Below:


May you have Happy Blogging......
Coming NEXT: Changing Your Google Template BEFORE you start Blogging!

3/6/09

Google Blogging Tip # 9 : How to FOLLOW someone who is Following you.

To follow a person who is following you, simply open your Blog to the MAIN Page.
Find your box that contains all your followers.
There is a small 'Icon' in the upper right corner.
Click on it.
See picture below:


Once you have clicked on the small 'Icon' you get this page.
The ICONS shown on this page work from top left to right.
The newest one should be first.
Click on the desired Icon.
It will open the 'Follower Profile.'
See picture below:
Note: If you are using a MAC computer Safari may not display these properly or they may not open. This is why you should be using Mozilla Firefox latest version for Blog updates and maintenance.


Simply 'Click' on one of the LINKS. That will take you to the person's Blog or Webpage that is following you.
Copy the complete URL, paste it in your 'ADD' follow (see Google Blogging Tip # 5), and you are now following the person that is following you.
See picture below:


Again sorry for any delays and updates, I been horned by the Rhino Virus.
More Happy Blogging....
Next Blog Tip will be about setting up your Blog Page.

3/5/09

Latest Google Blog Questions and Updates:

Q1/ : You recently issued Google Blog Tips about setting-up a Blog which included Adding/Deleting Followers, how does this change with the NEW Google Follower Format?
Email Inquiries (11)
A1/ : If you go to Google Blog Tips #6 (Modified), you will see the changes and new instructions.

Next: How to use the New Google Follow Me Format.