Q) - I would like to make my site photos more interesting, any suggestions?
A) - Yes, one way is to add borders to your picture. Follow the LINK to The Blog Guy's Web Page and see how to install these on your Blog or Website.
Email Inquiries - 7
Click on the LINK:
to get the HTML Code from The Blog Guy for your Blog or Web Page:
How to Add a Picture Frame Border to Your Blog or Website Pictures (Photo Images)
===> IMPORTANT: Many have ask me about Auto-Blogging.
I am evaluating this now including how to use an auto-blogger program, and the pros and cons of using one.
This will be the next Blog and Website Tip I post, look for it soon.
Most Recent Google Blog Award Winner:
The Google Blog Award Winner for Week Ending (w/e) February 13, 2010, for the best Blog or Website was...
Click on the LINK below to see the Award Winner
Cartoon Daily
Don't forget to vote for your favorite Blog or Site for the Google Blog Award, you can vote for yourself. Voting closes every Saturday at 11:00pm Eastern Standard Time, USA.
Thanks for visiting.
Please support my efforts, Follow this Blog and I will Follow You.
I have created a FaceBook Page, here is the Link:
The Blog Guy's Facebook Page
I also created a Blog for my FaceBook Page Friends to get a Link by joining my page, here is the Link to my new Google Blog:
Blogs by Facebook
Coming soon is the next Posting Tip, Trick, Hint, HTML Codes, JavaScript, and Cool Fun Stuff.
Showing posts with label HTML Codes. Show all posts
Showing posts with label HTML Codes. Show all posts
2/14/10

11/14/09
Google Blogging Tip # 89: Add Changing Color Notice to Your Blog or Website
Click on the LINK:
to get Flash Code from The Blog Guy for your Blog or Website:
Adding Changing Color Notice
How to install the JavaScript ?
It's simple, just:
Copy and paste the code as instructed.
See how it works, there are two examples on The Blog Guy's Web Page ....
Installing the Code on a Google blogspot Blog Sidebar (column):
Steps:
1/ - Sign-in to your Blog.
2/ - Go to 'Layouts.'
3/ - Click on 'Add Gadgets.'
4/ - Select 'HTML / JavaScript.'
5/ - Copy and Paste the Code from The Blog Guy's Web Page.
6/ - Save, View Blog, Refresh Screen, Move to desired location, sign-out.
Installing the Code on a Web Page:
1/ - Copy and Paste the JavaScript Code from The Blog Guy's Web Page into the desired location between BODY and /BODY.
2/ - Save, View Web Page, Move as desired or needed.
Do you have a Blogging Question?
Please email me or just post it to my latest comment section on any Blogging Tip. I read all my comments.
The Blog Guy's next Blogging Tip, Trick, Hint, HTML Codes, and JavaScript will be posted on Wednesday, November 18, 2009.
Please Follow this Blog and I will Follow You!
Also, please Follow Me on Twitter, go to the bottom of this Blogs sidebar and click on my Twitter Page, sign-in to your Twitter Account and start Following Me. I will in return Follow you.
Have a great weekend.
Thank you,
The Blog Guy
to get Flash Code from The Blog Guy for your Blog or Website:
Adding Changing Color Notice
How to install the JavaScript ?
It's simple, just:
Copy and paste the code as instructed.
See how it works, there are two examples on The Blog Guy's Web Page ....
Installing the Code on a Google blogspot Blog Sidebar (column):
Steps:
1/ - Sign-in to your Blog.
2/ - Go to 'Layouts.'
3/ - Click on 'Add Gadgets.'
4/ - Select 'HTML / JavaScript.'
5/ - Copy and Paste the Code from The Blog Guy's Web Page.
6/ - Save, View Blog, Refresh Screen, Move to desired location, sign-out.
Installing the Code on a Web Page:
1/ - Copy and Paste the JavaScript Code from The Blog Guy's Web Page into the desired location between BODY and /BODY.
2/ - Save, View Web Page, Move as desired or needed.
Do you have a Blogging Question?
Please email me or just post it to my latest comment section on any Blogging Tip. I read all my comments.
The Blog Guy's next Blogging Tip, Trick, Hint, HTML Codes, and JavaScript will be posted on Wednesday, November 18, 2009.
Please Follow this Blog and I will Follow You!
Also, please Follow Me on Twitter, go to the bottom of this Blogs sidebar and click on my Twitter Page, sign-in to your Twitter Account and start Following Me. I will in return Follow you.
Have a great weekend.
Thank you,
The Blog Guy
11/6/09
Google Blogging Tip # 87: Adding Your Own Personalized Widget Button to Your Blog or Website
Why use this ?
This is better than someone bookmarking your site. This is your own personal Widget Button others install on...
Their Blog
-or- Thier Website
-or- Their Desktop
Click on the LINK:
to get The Blog Guy's HTML Code for your Blog or Website:
Adding Your Own Personalized Widget to your Blog or Website
Where do I get the ICON ?
It's best you use your Google or Friends Connect Profile Image. You can create a different image if you so desire.
This Icon Image must be stored somewhere you can retrieve it.
If you don't have your own website or storage capability you will have to use something like .... PhotoBucket or Picasa, both free online storage files for picture images.
The Icon Image should be in .jpg format
How do I install the personalized widget ?
It's simple, just:
Copy and paste the code as instructed.
See how it works below....
Installing the Code on a Google blogspot Blog Sidebar (column):
Steps:
1/ - Sign-in to your Blog.
2/ - Go to 'Layouts.'
3/ - Click on 'Add Gadgets.'
4/ - Select 'HTML / JavaScript.'
5/ - Copy and Paste the Code from The Blog Guy's Web Page.
6/ - Change the items in 'RED.'
7/ - Save, View Blog, Refresh Screen, Move to the desired location, sign-out.
Installing the Code on a Web Page:
1/ - Copy and Paste the HTML Code from The Blog Guy's Web Page in the desired location between BODY and /BODY.
2/ - Change the items in 'RED.'
3/ - Save, View Web Page, Move as desired or needed.
A sample of How The Widget Looks and Works-
Part 1 – Widget Code, as it appears on your site or blog for others to copy and paste.
Add The Blog Guy's Widget Button to your Blog
Part 2 – A Working Widget after Installation.

Part 3 – See the Widget Install Code on the top of this Blogs sidebar.
Do you have a Blogging Question?
Please email or just post it to my latest comment section on any Blogging Tip. I read all my comments.
Look for The Blog Guy's next Blogging Tip, Trick, Hint, HTML Codes, and JavaScript coming soon.
Please Follow this Blog and I will Follow You!
Also, please Follow Me on Twitter, go to the bottom of this Blogs sidebar and click on my Twitter Page, sign-in to your Twitter Account and start Following Me. I will in return Follow you.
This is better than someone bookmarking your site. This is your own personal Widget Button others install on...
Their Blog
-or- Thier Website
-or- Their Desktop
Click on the LINK:
to get The Blog Guy's HTML Code for your Blog or Website:
Adding Your Own Personalized Widget to your Blog or Website
Where do I get the ICON ?
It's best you use your Google or Friends Connect Profile Image. You can create a different image if you so desire.
This Icon Image must be stored somewhere you can retrieve it.
If you don't have your own website or storage capability you will have to use something like .... PhotoBucket or Picasa, both free online storage files for picture images.
The Icon Image should be in .jpg format
How do I install the personalized widget ?
It's simple, just:
Copy and paste the code as instructed.
See how it works below....
Installing the Code on a Google blogspot Blog Sidebar (column):
Steps:
1/ - Sign-in to your Blog.
2/ - Go to 'Layouts.'
3/ - Click on 'Add Gadgets.'
4/ - Select 'HTML / JavaScript.'
5/ - Copy and Paste the Code from The Blog Guy's Web Page.
6/ - Change the items in 'RED.'
7/ - Save, View Blog, Refresh Screen, Move to the desired location, sign-out.
Installing the Code on a Web Page:
1/ - Copy and Paste the HTML Code from The Blog Guy's Web Page in the desired location between BODY and /BODY.
2/ - Change the items in 'RED.'
3/ - Save, View Web Page, Move as desired or needed.
A sample of How The Widget Looks and Works-
Part 1 – Widget Code, as it appears on your site or blog for others to copy and paste.
Add The Blog Guy's Widget Button to your Blog
Part 2 – A Working Widget after Installation.
Part 3 – See the Widget Install Code on the top of this Blogs sidebar.
Do you have a Blogging Question?
Please email or just post it to my latest comment section on any Blogging Tip. I read all my comments.
Look for The Blog Guy's next Blogging Tip, Trick, Hint, HTML Codes, and JavaScript coming soon.
Please Follow this Blog and I will Follow You!
Also, please Follow Me on Twitter, go to the bottom of this Blogs sidebar and click on my Twitter Page, sign-in to your Twitter Account and start Following Me. I will in return Follow you.
11/2/09
Google Blogging Tip # 86: Adding Teletype Scrolling Text to Your Blog or Website
Q) I like your Blog and Website Tips. The vertical scrolling text described in Tip # 82 is appreciated but it takes up more space on my sidebar than I would like. So, can you please provide a more condensed Text Message like a digital printout (teletype)?
Reference : Google Blogging Tip # 82: Adding Vertical Scrolling Text to Your Blog or Website
Installing Vertical Scrolling Text
A) There is a Teletype Scrolling Text that may provide you with what you are looking for.
Email Inquiries: 6
Click on the LINK:
to get The Blog Guy's JavaScript Code for your Blog or Website:
Scrolling Teletype Text
Note: There are two different JavaScript Codes with a sample of how these look and work.
Choose the one that applies to your specific needs – WHITE (light colored backgrounds) -or- BLACK (dark colored backgrounds).
Then copy and paste the code as instructed.
Installing the Code on a Google blogspot Blog Sidebar (column):
Steps:
1/ - Sign-in to your Blog.
2/ - Go to 'Layouts.'
3/ - Click on 'Add Gadgets.'
4/ - Select 'HTML / JavaScript.'
5/ - Copy and Paste the Code from The Blog Guy's Web Page.
5/ - Save, View Blog, Refresh Screen, Move to desired location, sign-out.
Installing the Code on a Web Page:
1/ - Copy and Paste the JavaScript Code from The Blog Guy's Web Page in the desired location between BODY and /BODY.
2/ - Save, View Web Page, Move as desired or needed.
Do you have a Blogging Question?
Please email or just post it to my latest comment section on any Blogging Tip. I read all my comments.
Next Blogging Tip, Trick, Hint, HTML Codes, and JavaScript will be posted on: Friday, November 6, 2009.
Please Follow this Blog and I will Follow You!
Also, please Follow Me on Twitter, go to the bottom of this Blogs sidebar and click on my Twitter Page, sign-in to your Twitter Account and start Following Me. I will in return Follow you.
Reference : Google Blogging Tip # 82: Adding Vertical Scrolling Text to Your Blog or Website
Installing Vertical Scrolling Text
A) There is a Teletype Scrolling Text that may provide you with what you are looking for.
Email Inquiries: 6
Click on the LINK:
to get The Blog Guy's JavaScript Code for your Blog or Website:
Scrolling Teletype Text
Note: There are two different JavaScript Codes with a sample of how these look and work.
Choose the one that applies to your specific needs – WHITE (light colored backgrounds) -or- BLACK (dark colored backgrounds).
Then copy and paste the code as instructed.
Installing the Code on a Google blogspot Blog Sidebar (column):
Steps:
1/ - Sign-in to your Blog.
2/ - Go to 'Layouts.'
3/ - Click on 'Add Gadgets.'
4/ - Select 'HTML / JavaScript.'
5/ - Copy and Paste the Code from The Blog Guy's Web Page.
5/ - Save, View Blog, Refresh Screen, Move to desired location, sign-out.
Installing the Code on a Web Page:
1/ - Copy and Paste the JavaScript Code from The Blog Guy's Web Page in the desired location between BODY and /BODY.
2/ - Save, View Web Page, Move as desired or needed.
Do you have a Blogging Question?
Please email or just post it to my latest comment section on any Blogging Tip. I read all my comments.
Next Blogging Tip, Trick, Hint, HTML Codes, and JavaScript will be posted on: Friday, November 6, 2009.
Please Follow this Blog and I will Follow You!
Also, please Follow Me on Twitter, go to the bottom of this Blogs sidebar and click on my Twitter Page, sign-in to your Twitter Account and start Following Me. I will in return Follow you.
10/26/09
Google Blogging Tip # 84: HTML Code – Using an Animated Picture or Icon for an EMAIL LINK for Your Blog or Website
Click on the LINK-
to get The Blog Guy's HTML Codes for your Blog or Website:
HTML Codes for Using Animation Pictures or Icons for Email Links
Note: There are two different HTML Codes with a sample of how these 'Email Link Icons' look and work. Choose the one that applies to your specific needs – smaller space such as a sidebar (column) -or- larger animated image for your Post or Web Page.
Then copy and paste the code as instructed.
Remember: To change the email address to your own.
Also you may change the Icon / Animated Picture Image (.gif) to any picture image (.gif .jpg .png) you want to use. You will then have to use a third party source such as PhotoBucket to upload the image.
Please feel free to use either one of The Blog Guy's Images.
Yes, you can ADD your own 'Animation File' to The Blog Guy's Free File Storage Hosting Site. Check out the site first to see if there are any animations files you want first, if not then submit one to me via email,
Just Click on the LINK:
Animation File Storage Page
If you are looking for an adult animation files, please go to The Blog Guy's Adult File Storage Page,
Just Click on the Link:
Adult Animation (.gif) Files
Please remember to Follow this Blog.
Tomorrow I will get caught up on all my Blog Followers and Twitter Page Followers.
to get The Blog Guy's HTML Codes for your Blog or Website:
HTML Codes for Using Animation Pictures or Icons for Email Links
Note: There are two different HTML Codes with a sample of how these 'Email Link Icons' look and work. Choose the one that applies to your specific needs – smaller space such as a sidebar (column) -or- larger animated image for your Post or Web Page.
Then copy and paste the code as instructed.
Remember: To change the email address to your own.
Also you may change the Icon / Animated Picture Image (.gif) to any picture image (.gif .jpg .png) you want to use. You will then have to use a third party source such as PhotoBucket to upload the image.
Please feel free to use either one of The Blog Guy's Images.
Yes, you can ADD your own 'Animation File' to The Blog Guy's Free File Storage Hosting Site. Check out the site first to see if there are any animations files you want first, if not then submit one to me via email,
Just Click on the LINK:
Animation File Storage Page
If you are looking for an adult animation files, please go to The Blog Guy's Adult File Storage Page,
Just Click on the Link:
Adult Animation (.gif) Files
Please remember to Follow this Blog.
Tomorrow I will get caught up on all my Blog Followers and Twitter Page Followers.
10/19/09
Google Blogging Tip # 83: HTML Code - Adding an Animated Picture Marquee to Your Blog or Website
Click on the LINK-
to get The Blog Guy's HTML Codes for your Blog or Website:
HTML Codes for Animated Picture Marquee
Note: There are two different HTML Codes with a sample of how this 'Marquee' looks and works. Choose the one that applies to your specific needs. Then copy and paste the code as instructed.
The difference in codes are-
The first Code is for using The Blog Guy's Free Animation File Pages.
The second code is for those who have their own source of animation or use a third party file storage such as PhotoBucket.
Yes, you can ADD your own 'Animation File' to The Blog Guy's Free Storage Site. Check out the site first to see if there are any animations files you want first, if not then submit one to me via email,
Just Click on the LINK:
Animation File Storage Page
If you are looking for an adult animation files, please go to The Blog Guy's Adult File Storage Page,
Just Click on the Link:
Adult Animation (.gif) Files
to get The Blog Guy's HTML Codes for your Blog or Website:
HTML Codes for Animated Picture Marquee
Note: There are two different HTML Codes with a sample of how this 'Marquee' looks and works. Choose the one that applies to your specific needs. Then copy and paste the code as instructed.
The difference in codes are-
The first Code is for using The Blog Guy's Free Animation File Pages.
The second code is for those who have their own source of animation or use a third party file storage such as PhotoBucket.
Yes, you can ADD your own 'Animation File' to The Blog Guy's Free Storage Site. Check out the site first to see if there are any animations files you want first, if not then submit one to me via email,
Just Click on the LINK:
Animation File Storage Page
If you are looking for an adult animation files, please go to The Blog Guy's Adult File Storage Page,
Just Click on the Link:
Adult Animation (.gif) Files
10/12/09
Google Blogging Tip # 82: Adding Vertical Scrolling Text to Your Blog or Website
Click on the LINK-
to get The Blog Guy's HTML Codes for your Blog or Website:
HTML Codes for Vertical Scrolling Text
Note: There are three different HTML Codes with samples of how they look and work. Choose the one that works for your needs. Then copy and paste the code as instructed.
Yes, the Text Color, Background Color, and Scroll Speed can be changed.
For a complete Color Chart, remember to use The Blog Guy's HTML Color Code Chart,
Just Click on the LINK:
HTML Color Chart for Blogs and
Web Pages
Sample Picture -

to get The Blog Guy's HTML Codes for your Blog or Website:
HTML Codes for Vertical Scrolling Text
Note: There are three different HTML Codes with samples of how they look and work. Choose the one that works for your needs. Then copy and paste the code as instructed.
Yes, the Text Color, Background Color, and Scroll Speed can be changed.
For a complete Color Chart, remember to use The Blog Guy's HTML Color Code Chart,
Just Click on the LINK:
HTML Color Chart for Blogs and
Web Pages
Sample Picture -

9/3/09
Google Blogging Tip # 68: HTML Tip
Using an HTML Code for 'Spacing or Ending a Text.'
This is a simple HTML Code that really comes in handy.
Q) I have a website. I do a lot of TEXT posting and the sentences or paragraphs don't always appear as I would like them to when I publish the site to the Internet. What can I do to fix this?
A) There are a couple of alternatives but the simplest method is to use the 'break, space, or return function' It is one of the most often used HTML Code.
The Picture shows the HTML Code. It is NOT case sensitive.
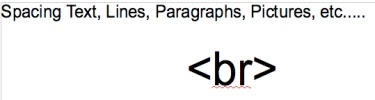
Some uses are:
- Break a sentence or paragraph where you want and start a new line.
- Separate picture images.
- Increase the spacing between items such as paragraphs or links.
- For Blogs, many people don't like the way the post is so close to the comments, backlinks, etc. once the post is published. Using this simply technique will leave a space between the end of your post and the Blog's automated system postings.
Example, I will use it here and you can see that a space exists between the Post and the Labels.
--->I have received a lot of emails about using Google AdSense after people sign-up for it. To answer your questions properly, I had to sign-up for Google AdSense myself. I am playing around with the different types of AdSense Ads you can use. Once I get a feel of what works best I'll publish some Tips on 'How to ADD Google AdSense Ads to your Blog or Website.' Please be patient.
Reference: Google Blogging Tip # 28.
Next Trick, Hint, Tip, HTML Code, and JavaScript will be Friday, September 4, 2009.
Please FOLLOW this Blog.
This is a simple HTML Code that really comes in handy.
Q) I have a website. I do a lot of TEXT posting and the sentences or paragraphs don't always appear as I would like them to when I publish the site to the Internet. What can I do to fix this?
A) There are a couple of alternatives but the simplest method is to use the 'break, space, or return function' It is one of the most often used HTML Code.
The Picture shows the HTML Code. It is NOT case sensitive.

Some uses are:
- Break a sentence or paragraph where you want and start a new line.
- Separate picture images.
- Increase the spacing between items such as paragraphs or links.
- For Blogs, many people don't like the way the post is so close to the comments, backlinks, etc. once the post is published. Using this simply technique will leave a space between the end of your post and the Blog's automated system postings.
Example, I will use it here and you can see that a space exists between the Post and the Labels.
--->I have received a lot of emails about using Google AdSense after people sign-up for it. To answer your questions properly, I had to sign-up for Google AdSense myself. I am playing around with the different types of AdSense Ads you can use. Once I get a feel of what works best I'll publish some Tips on 'How to ADD Google AdSense Ads to your Blog or Website.' Please be patient.
Reference: Google Blogging Tip # 28.
Next Trick, Hint, Tip, HTML Code, and JavaScript will be Friday, September 4, 2009.
Please FOLLOW this Blog.
8/29/09
Google Blogging Tip # 66: HTML Trick for Blogs and Websites
Q) Can you please provide the HTML Code for pages that load without moving away from the original page? They appear as a second independent page.
(A) YES, here is the HTML Code...
Example: See the code portion in RED, in the picture below, just ADD it as shown -

Please Support this Blog, Follow Me.
(A) YES, here is the HTML Code...
Example: See the code portion in RED, in the picture below, just ADD it as shown -

Please Support this Blog, Follow Me.
8/23/09
Latest Question about Google Blogging Issues:
Q) Can you change the Copy code portion in your Blogging Tip # 53, the code is too difficult to read?
A) Corrected. Sorry for this, and thanks for reminding me. There is now a LINK for both methods at The Blog Guy's Website. Click on the Link you need and the code is their, copy and paste it into your Blog or Web Page. There will be no problem reading it now.
Reference: Google Blogging Tip # 53: HTML Codes for Blogs and Websites, Highlighting Text and Links, originally posted June 29, 2009, updated and corrected August 23, 2009.
Email Inquires: 1
Got a question about your Google Blog, email me at:
alternate4craigslist@yahoo.com
A) Corrected. Sorry for this, and thanks for reminding me. There is now a LINK for both methods at The Blog Guy's Website. Click on the Link you need and the code is their, copy and paste it into your Blog or Web Page. There will be no problem reading it now.
Reference: Google Blogging Tip # 53: HTML Codes for Blogs and Websites, Highlighting Text and Links, originally posted June 29, 2009, updated and corrected August 23, 2009.
Email Inquires: 1
Got a question about your Google Blog, email me at:
alternate4craigslist@yahoo.com
8/16/09
Google Blogging Tip # 61: HTML Code for Redirecting a Blog or Website
Q-1) How can I get my Website Page to 'Redirect' to my Blog?
Q-2) How can you use a Google Blog to forward it to a Website?
A) The answer to both questions is the same. Forwarding means to Re-Direct a 'Page' to another location.
Email Inquiries: 13
Websites and Web Pages are the same. They are the easiest to do. The HTML Code is simply and works. The problem with Blogs and Social Networking Sites is you may not have access to change the HTML Coding. If there is no access you cannot do it. Google, however, allows their users to modify their HTML Coding.
Please go to The Blog Guy's Website Page to obtain the HTML Codes. Simply Copy and Paste the codes as instructed. There is a TEST so you can see how the Redirect (forwarding) works.
Click on the LINK, to get the code:
HTML Coding for Redirecting A Website or Blog
To Redirect a Google Blog to another Blog Location, Website, or Web Page, follow these instruction:
1. Sign in to your Blog
2. Go to Layout
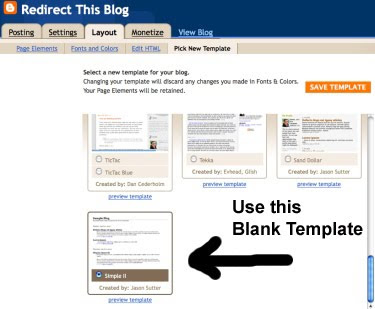
3. Select 'Change' Templates.
4. Select the Blank Template, see picture below.
5. Go to 'Posting.'
6. Place a Title in the NEW Post, I suggest ...
Redirecting this BLOG
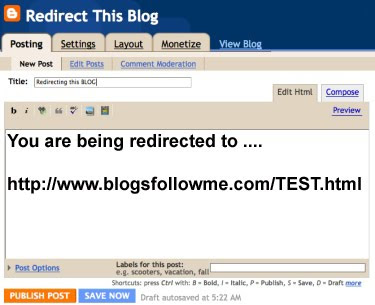
7. In the Post block - Put the TEXT ....
Line 1-You Are Being Redirected to:
Line 2-Complete URL Address (this is where the Blog is being sent to). Save, Publish, and View. See Picture Below.
8. Now go back to 'Layout.'
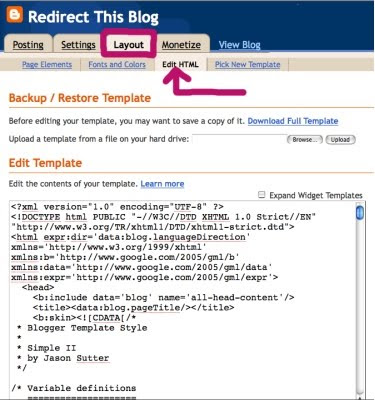
9. Select 'Edit HTML.'
10. Find the word /HEAD - just above that line put the first part of the HTML Code found on my web page link.
Important: Do Not Change or Delete anything from HEAD to /HEAD, only ADD the first part of the code. See Picture Below.
11. Now everything starting with and including the word BODY, delete down to /BODY and just above /BODY add the second part of the HTML Code from my Web Page Link. Save HTML Settings. See Picture Below.
12. View Blog, it should automatically Forward (REDIRECT) to the Site you chose.
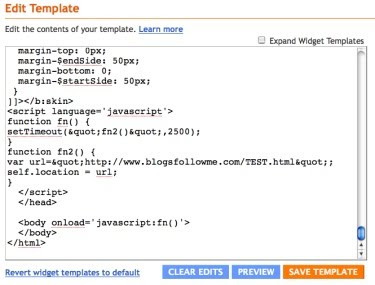
IMPORTANT: When you Copy and Paste the Code, whether it be for a Website, Web Page, or Blog you must change the URL Address (location).
It is currently set to:
http://www.blogsfollowme.com/TEST.html
Change this to whatever site or blog you want. Remember to use the full URL Address.
A Personal Note: Most mistakes are made in typing. So be careful when typing your URL Address.
Yes, there are lots more Hints, Tips, and Tricks plus HTML Codes and JavaScripts coming for your Blog and Website.
Happy Blogging.
Please support this Blog, Follow me.
You can also follow my website, The Blog Guy.
I have two variations of Google Friends Connect on my Web Pages, more on this later!
Q-2) How can you use a Google Blog to forward it to a Website?
A) The answer to both questions is the same. Forwarding means to Re-Direct a 'Page' to another location.
Email Inquiries: 13
Websites and Web Pages are the same. They are the easiest to do. The HTML Code is simply and works. The problem with Blogs and Social Networking Sites is you may not have access to change the HTML Coding. If there is no access you cannot do it. Google, however, allows their users to modify their HTML Coding.
Please go to The Blog Guy's Website Page to obtain the HTML Codes. Simply Copy and Paste the codes as instructed. There is a TEST so you can see how the Redirect (forwarding) works.
Click on the LINK, to get the code:
HTML Coding for Redirecting A Website or Blog
To Redirect a Google Blog to another Blog Location, Website, or Web Page, follow these instruction:
1. Sign in to your Blog
2. Go to Layout
3. Select 'Change' Templates.
4. Select the Blank Template, see picture below.
5. Go to 'Posting.'
6. Place a Title in the NEW Post, I suggest ...
Redirecting this BLOG
7. In the Post block - Put the TEXT ....
Line 1-You Are Being Redirected to:
Line 2-Complete URL Address (this is where the Blog is being sent to). Save, Publish, and View. See Picture Below.
8. Now go back to 'Layout.'
9. Select 'Edit HTML.'
10. Find the word /HEAD - just above that line put the first part of the HTML Code found on my web page link.
Important: Do Not Change or Delete anything from HEAD to /HEAD, only ADD the first part of the code. See Picture Below.
11. Now everything starting with and including the word BODY, delete down to /BODY and just above /BODY add the second part of the HTML Code from my Web Page Link. Save HTML Settings. See Picture Below.
12. View Blog, it should automatically Forward (REDIRECT) to the Site you chose.


IMPORTANT: When you Copy and Paste the Code, whether it be for a Website, Web Page, or Blog you must change the URL Address (location).
It is currently set to:
http://www.blogsfollowme.com/TEST.html
Change this to whatever site or blog you want. Remember to use the full URL Address.
A Personal Note: Most mistakes are made in typing. So be careful when typing your URL Address.
Yes, there are lots more Hints, Tips, and Tricks plus HTML Codes and JavaScripts coming for your Blog and Website.
Happy Blogging.
Please support this Blog, Follow me.
You can also follow my website, The Blog Guy.
I have two variations of Google Friends Connect on my Web Pages, more on this later!
8/10/09
Google Blogging Tip # 60: New HTML Code for Blogs and Websites
ADDING 'Blinking Text' to your Blog or Web Page.
Q/ - I noticed on your Blog that some of the TEXT Lines where blinking. How do I add this feature?
A/ - Simple, the HTML Code is in the picture below...
Important Notation: This feature WILL WORK only in Firefox for Windows; Firefox for iMAC (Apple); and Windows XP.
It will NOT work in iMAC (Apple Safari); or Windows Vista.
However, where it does not work it simply appears as plain TEXT. So there is no harm in using the simple HTML Coding feature.
Email Inquiries: 3

Here is an example of how it looks:
Remember, to be followed you have to follow others.
Also, don't forget I offer FREE Web Storage for your files at my website for:
FLASH (.swf) Files
Animation (.gif) Files
Midi (.mid) Music Files
WAV (.wav) Sound and Music Files
Q/ - I noticed on your Blog that some of the TEXT Lines where blinking. How do I add this feature?
A/ - Simple, the HTML Code is in the picture below...
Important Notation: This feature WILL WORK only in Firefox for Windows; Firefox for iMAC (Apple); and Windows XP.
It will NOT work in iMAC (Apple Safari); or Windows Vista.
However, where it does not work it simply appears as plain TEXT. So there is no harm in using the simple HTML Coding feature.
Email Inquiries: 3

Here is an example of how it looks:
Remember, to be followed you have to follow others.
Also, don't forget I offer FREE Web Storage for your files at my website for:
FLASH (.swf) Files
Animation (.gif) Files
Midi (.mid) Music Files
WAV (.wav) Sound and Music Files
7/17/09
Google Blogging Tip # 56: Standard HTML Codes for Text:
By using standard HTML Codes, you can 'Change' your TEXT on any BLOG or Web Page the way you want it to appear.
These few simply Codes are shown as EXAMPLES below with a corresponding Number of 1. through 10.
In the Picture Below, I have the actual HTML for each 'Code' needed to achieve the desired TEXT Appearance. You can mix and match these for the any desired look.
These can be used for -
One Letter
One Word
One Phrase
One Sentence
One Paragraph
The Entire Page
1. Blogs Follow Me
2. Blogs Follow Me
3. Blogs Follow Me
4. Blogs Follow Me
5. Blogs Follow Me
6. Blogs Follow Me
7. Blogs Follow Me
8. Blogs Follow Me
Examples of Intermixing the HTML Codes:
9. Blogs Follow Me
10. Blogs Follow Me

Note when centering anything: Text, Pictures, Animation, Movie - this code MUST start at the beginning and end last.
The reason I added these HTML Codes.....
Google Blog Templates are NOT standard or uniform, especially on the 'New Postings / Publish Post Box'
They can look like one of these two basic types:
The FIRST Picture shows a Post Box with only 7 functions....

The SECOND Picture shows a Post Box with more functions....

Happy Blogging and have a good weekend.
Yes, there are many more Tips, Tricks, Hints, HTML Codes, and JavaScripts coming for your Blogs and Websites.
Concerning your EMAILS, they will all be answered, please be patient.
At the moment I am maxed out for followers of 300, as many of you are. Google only allows the Blogger, in this case that's me, to follow a maximum of 300. However, you can have an unlimited number of Followers Following you, so please support this Blog, Follow it. You will still be ADDED to the Blog Rolls and the LINKS section of this Blog, when you follow: Blogs Follow Me.
Thank you...
These few simply Codes are shown as EXAMPLES below with a corresponding Number of 1. through 10.
In the Picture Below, I have the actual HTML for each 'Code' needed to achieve the desired TEXT Appearance. You can mix and match these for the any desired look.
These can be used for -
One Letter
One Word
One Phrase
One Sentence
One Paragraph
The Entire Page
1. Blogs Follow Me
3. Blogs Follow Me
4. Blogs Follow Me
5. Blogs Follow Me
6. Blogs Follow Me
7. Blogs Follow Me
8. Blogs Follow Me
Examples of Intermixing the HTML Codes:
10. Blogs Follow Me

Note when centering anything: Text, Pictures, Animation, Movie - this code MUST start at the beginning and end last.
The reason I added these HTML Codes.....
Google Blog Templates are NOT standard or uniform, especially on the 'New Postings / Publish Post Box'
They can look like one of these two basic types:
The FIRST Picture shows a Post Box with only 7 functions....

The SECOND Picture shows a Post Box with more functions....

Happy Blogging and have a good weekend.
Yes, there are many more Tips, Tricks, Hints, HTML Codes, and JavaScripts coming for your Blogs and Websites.
Concerning your EMAILS, they will all be answered, please be patient.
At the moment I am maxed out for followers of 300, as many of you are. Google only allows the Blogger, in this case that's me, to follow a maximum of 300. However, you can have an unlimited number of Followers Following you, so please support this Blog, Follow it. You will still be ADDED to the Blog Rolls and the LINKS section of this Blog, when you follow: Blogs Follow Me.
Thank you...
7/13/09
Google Blogging Tip # 55: Adding an mp3 Player to Your Blog or Website
[Q] Can you provide a FREE mp3 Music Player that works on websites and blogs?
[A] Yes. See the HTML/JavaScript Code Below. Also see notes.
Number of Email Inquiries: 6
mp3 Music Player for Blogs and Websites
Steps:
1. Sign-in to your Blog.
2. Select 'Layouts.'
3. Select 'Gadgets.'
4. Select 'HTML / JavaScript.'
5. Copy and Paste Code.
6. Change URL Address and mp3 Song.
7. Save, View Blog, make changes as needed including move snippet icon to desired location.
Copy and Paste the JavaScript Code....
The picture below shows the code when copied into your HTML / JavaScript Gadget Box on your Google Blog. This will appear on your 'Sidebar (column).'
The Item in RED must be changed for your music. It must contain the complete URL Address.
Remember to change both, it appears twice.
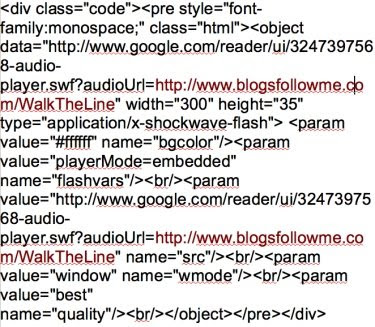
NOTES:
1) Always remember your Blog will appear differently on different web browsers.
2) Do NOT loop or use autostart on the song. This is annoying for people who visit your Blog. If they want to play the mp3 file they will. Also using autostart feature will cause a sound conflict if you add a Video File, such as YouTube.
3) Newer versions of Windows have a hissy fit with file extensions. These can cause errors.
Hint - The TRICK is to load the sound file without the file extension, then windows ignores the file and just plays the sound.
4) I have tested this mp3 player in Windows Vista, Firefox for Windows, iMAC Safari, and Firefox for Apple.
5) To play an mp3 file in your player you must have a source. This is like loading animations files or flash files, you must have a place to extract the complete URL Address with the mp3 file name to work.
If you do not have one, there are some available on the Internet.
You can use the song I chose by Johnny Cash, Walk the Line and just use my source code.
6) If you are adding this to your Website, it goes after BODY, place it where you want it to appear on your site.
To see an Example of how this 'Gadget' works:
Please visit TESTING GOOGLE BLOGS
http://www.testinggoogleblogs.blogspot.com/
thanks to AddThis for the gadget.
[A] Yes. See the HTML/JavaScript Code Below. Also see notes.
Number of Email Inquiries: 6
mp3 Music Player for Blogs and Websites
Steps:
1. Sign-in to your Blog.
2. Select 'Layouts.'
3. Select 'Gadgets.'
4. Select 'HTML / JavaScript.'
5. Copy and Paste Code.
6. Change URL Address and mp3 Song.
7. Save, View Blog, make changes as needed including move snippet icon to desired location.
Copy and Paste the JavaScript Code....
The picture below shows the code when copied into your HTML / JavaScript Gadget Box on your Google Blog. This will appear on your 'Sidebar (column).'
The Item in RED must be changed for your music. It must contain the complete URL Address.
Remember to change both, it appears twice.

NOTES:
1) Always remember your Blog will appear differently on different web browsers.
2) Do NOT loop or use autostart on the song. This is annoying for people who visit your Blog. If they want to play the mp3 file they will. Also using autostart feature will cause a sound conflict if you add a Video File, such as YouTube.
3) Newer versions of Windows have a hissy fit with file extensions. These can cause errors.
Hint - The TRICK is to load the sound file without the file extension, then windows ignores the file and just plays the sound.
4) I have tested this mp3 player in Windows Vista, Firefox for Windows, iMAC Safari, and Firefox for Apple.
5) To play an mp3 file in your player you must have a source. This is like loading animations files or flash files, you must have a place to extract the complete URL Address with the mp3 file name to work.
If you do not have one, there are some available on the Internet.
You can use the song I chose by Johnny Cash, Walk the Line and just use my source code.
6) If you are adding this to your Website, it goes after BODY, place it where you want it to appear on your site.
To see an Example of how this 'Gadget' works:
Please visit TESTING GOOGLE BLOGS
http://www.testinggoogleblogs.blogspot.com/
thanks to AddThis for the gadget.
6/29/09
Google Blogging Tip # 53: HTML Codes for Blogs and Websites, Highlighting Text and Links
Adding 'Highlighting' for Text and Links using HTML Coding.
---> This HTML Code has been updated and Modified for easier use. Updated on Sunday, August 23, 2009.
The coding is simple, the trick is selecting the color for the background and text to make it appear correctly.
Highlighting Text and Links....
Method # 1: Highlighting Text
Copy and paste the code into the HTML portion of your Blog or Web Page where you would like the highlighted TEXT to appear-
Go to The Blog Guy's Website Link to get the HTML Code, click on the LINK:
Highlighting TEXT
For an example of how this works-
Click on the URL LINK ....
'Testing Google Blogs'
http://www.testinggoogleblogs.blogspot.com/
I have included TWO Samples: First one with a RED Background and WHITE Letters, good for dark colored template backgrounds; and Second, one with YELLOW Background and BLACK Letters, typically used on Websites or Blogs with white backgrounds.
Method # 2: Highlighting a Link
Copy and paste the code into the HTML portion of your Blog or Web Page where you would like the highlighted LINK to appear-
Go to The Blog Guy's Website Link to get the HTML Code, click on the LINK:
Highlighting a LINK
Link Highlighted Background:
Best suited for - White Template Blog or Web Page Backgrounds....
Here's How Method # 1 Looks (on either a white or black background, if your want to change the color schemes, use the HTML Color Attribute Chart below) –
http://www.blogsfollowme.com/
Method # 2 – works with White or Black Backgrounds.
Link Name
Note: Black or dark colored backgrounds, you may want to change ....
background:red
For all others refer to the HTML Color Chart, experiment for what's best for your Blog or Website Page Background.
These Two PICTURES may offer further help.....
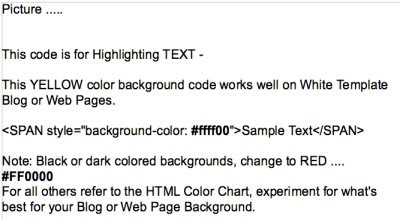
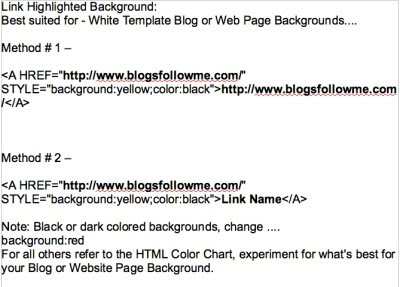
HTML Color Chart for Blogs and Websites.
Please Click on the LINK -
http://www.colorchart4html.blogspot.com/
---> This HTML Code has been updated and Modified for easier use. Updated on Sunday, August 23, 2009.
The coding is simple, the trick is selecting the color for the background and text to make it appear correctly.
Highlighting Text and Links....
Method # 1: Highlighting Text
Copy and paste the code into the HTML portion of your Blog or Web Page where you would like the highlighted TEXT to appear-
Go to The Blog Guy's Website Link to get the HTML Code, click on the LINK:
Highlighting TEXT
For an example of how this works-
Click on the URL LINK ....
'Testing Google Blogs'
http://www.testinggoogleblogs.blogspot.com/
I have included TWO Samples: First one with a RED Background and WHITE Letters, good for dark colored template backgrounds; and Second, one with YELLOW Background and BLACK Letters, typically used on Websites or Blogs with white backgrounds.
Method # 2: Highlighting a Link
Copy and paste the code into the HTML portion of your Blog or Web Page where you would like the highlighted LINK to appear-
Go to The Blog Guy's Website Link to get the HTML Code, click on the LINK:
Highlighting a LINK
Link Highlighted Background:
Best suited for - White Template Blog or Web Page Backgrounds....
Here's How Method # 1 Looks (on either a white or black background, if your want to change the color schemes, use the HTML Color Attribute Chart below) –
http://www.blogsfollowme.com/
Method # 2 – works with White or Black Backgrounds.
Link Name
Note: Black or dark colored backgrounds, you may want to change ....
background:red
For all others refer to the HTML Color Chart, experiment for what's best for your Blog or Website Page Background.
These Two PICTURES may offer further help.....


HTML Color Chart for Blogs and Websites.
Please Click on the LINK -
http://www.colorchart4html.blogspot.com/
6/12/09
Blog Updates and Changes to Google Blogging Tips:
I received several emails almost as soon as I posted Google Blogging Tip # 46, 'How to ADD Flash Files to My Blog' ....
Method # 1 - contained other HTML Codes that I have not yet covered.
Sorry about this.
Yes, I will issue HTML Blog Tips in the future on how to do these other types of codes.
But at this time, I have removed the Picture Image posted yesterday, that shows Method # 1, and replaced it with a simply explanation.
Everything else remains the same on Google Blogging Tip #46.
Method # 1 - contained other HTML Codes that I have not yet covered.
Sorry about this.
Yes, I will issue HTML Blog Tips in the future on how to do these other types of codes.
But at this time, I have removed the Picture Image posted yesterday, that shows Method # 1, and replaced it with a simply explanation.
Everything else remains the same on Google Blogging Tip #46.
6/11/09
How to ADD your FLASH Files to Your Google Blog using JavaScript / HTML Codes: Google Blogging Tip # 46
Adding FLASH Files (.swf / .flv format) to your blog can be frustration for many seeking how to do it.
1) FLASH Files (.swf / .flv format) cannot be uploaded through the normal add a 'Picture Image' -or- add a 'Movie', which most people have found out.
2) FLASH Files (.swf / .flv format) must have a designation or URL Address to be uploaded to a Google Blog.
3) So you will have to do some pre-work before adding any FLASH File to your Google Blog.
Here is what you need to do to get started:
1) - Identify the Flash (.swf / .flv format) file you want to use, copy them to your desktop.
Helpful Hint: There are FREE online websites that provide a variety of Flash Files (.swf / .flv format) for your use.
2) - You will need a 'Source' for your Flash File to work. Like animated files, you will need a complete URL Address for your Flash File to work as a JavaScript on Google blogspot Blogs.
Note: I searched the Internet and couldn't come up with a FREE service that allows Flash Files to be used and stored. Photobucket, which I use for my animation file storage, wants you to upgrade to a pay service to store and use 'Flash Files.'
Therefore, I created a Website, that I will allow FREE uploads for Flash Files in .swf file format only, maximum size 500 Kb. To see more on this FREE feature offered by me (blogsfollowme) see below.
If you have your own website or know someone who does, you can upload your Flash Files there. But you must have a 'Source' for Flash to work on Google Blogs.
3) - Upload your Flash Files (.swf format) to your host online website storage account, in this case, 'www.blogsfollowme.com.'
4) - Make sure the Flash File uploaded is working.
5) - Select the Flash File you desire to place on your Blog.
6) - Determine where your Flash File is to appear on your Blog: In the main Text as a POST; or on your side bar (column).
7) - Copy the .swf Flash embed code and paste it into one of the JavaScript Codes below.
8) - Now Copy and Paste the entire JavaScript / HTML Code to your Blog's desired location.
9) - View the Blog and make sure it is working.
Important: Your Flash File should be tested in at least two different browsers, like Firefox and Windows Internet Explorer.
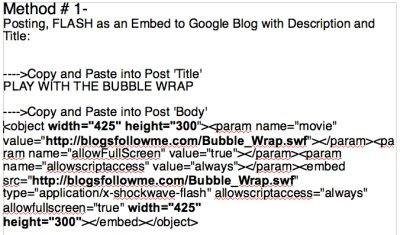
This is a picture Image only, so you will have to carefully copy the entire HTML Code.
I recommend using a word type program like Word Pad, NeoOffice, Microsoft Word, etc.
After you copy the entire code, save it.
Now find your 'Source' for your Flash File. Remember, this must be a complete URL Address, see the 'BOLD' area in the picture. This is where you insert your URL and Flash File Name.
This 'Image' example is for a Flash File to be posted using your 'Posting' Feature on your Google Blog.
The size of the Flash File, also in 'BOLD' will fit any Google Blog Template. I recommend using this size format.
See an example of Flash as a 'Post' at:
Turn on your sound.
Click on the LINK-
Blogs by Google
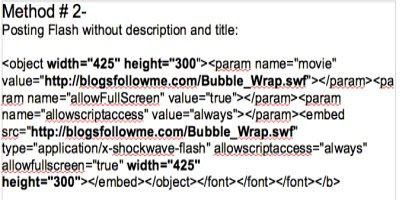
This is also a picture Image only, so you will have to carefully copy the entire HTML Code.
This is the same method as the one above but without a 'Title.'
These work well on Google's open format template, but I still recommend a 'Title.'
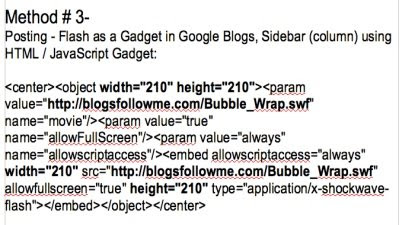
This is also a picture Image only, so you will have to carefully copy the entire HTML Code.
This 'Method' is for adding a Flash File to your Sidebar (column) on your Google Blog.
Note: The size of the Flash File has been reduced and should fit all Google templates. Adjust if necessary. Don't forget, the size has two locations in the embed code.
See an example of Flash on a 'Sidebar' at:
Turn on your sound.
Click on the LINK-
Blogs by Google
If you are going to use my FREE Flash Storage Service, this is the address you need to use.
Just change the Flash File Name shown in RED for your Flash File.
To get the name, go to the website page, find the picture of your Flash File, and use the name and code.
Allow up to 72-hours from submittal before your Flash File is available.
See the Website for Complete Instructions and Rules.

This is where you can upload your FREE Flash Files to my NEW Website (Click on the Link):
FREE Flash File Uploads
Happy Blogging.
Please report all down or broken Links.
Remember, to be Followed - You have to Follow others!
Got a question about Google Blogs, HTML Codes, or JavaScripts for Blogs...
-or-
Want to send me a Flash File for upload to my website (www.blogsfollowme.com), read the instructions and rules first...
email me at:
alternate4craigslist@yahoo.com
1) FLASH Files (.swf / .flv format) cannot be uploaded through the normal add a 'Picture Image' -or- add a 'Movie', which most people have found out.
2) FLASH Files (.swf / .flv format) must have a designation or URL Address to be uploaded to a Google Blog.
3) So you will have to do some pre-work before adding any FLASH File to your Google Blog.
Here is what you need to do to get started:
1) - Identify the Flash (.swf / .flv format) file you want to use, copy them to your desktop.
Helpful Hint: There are FREE online websites that provide a variety of Flash Files (.swf / .flv format) for your use.
2) - You will need a 'Source' for your Flash File to work. Like animated files, you will need a complete URL Address for your Flash File to work as a JavaScript on Google blogspot Blogs.
Note: I searched the Internet and couldn't come up with a FREE service that allows Flash Files to be used and stored. Photobucket, which I use for my animation file storage, wants you to upgrade to a pay service to store and use 'Flash Files.'
Therefore, I created a Website, that I will allow FREE uploads for Flash Files in .swf file format only, maximum size 500 Kb. To see more on this FREE feature offered by me (blogsfollowme) see below.
If you have your own website or know someone who does, you can upload your Flash Files there. But you must have a 'Source' for Flash to work on Google Blogs.
3) - Upload your Flash Files (.swf format) to your host online website storage account, in this case, 'www.blogsfollowme.com.'
4) - Make sure the Flash File uploaded is working.
5) - Select the Flash File you desire to place on your Blog.
6) - Determine where your Flash File is to appear on your Blog: In the main Text as a POST; or on your side bar (column).
7) - Copy the .swf Flash embed code and paste it into one of the JavaScript Codes below.
8) - Now Copy and Paste the entire JavaScript / HTML Code to your Blog's desired location.
9) - View the Blog and make sure it is working.
Important: Your Flash File should be tested in at least two different browsers, like Firefox and Windows Internet Explorer.
This is a picture Image only, so you will have to carefully copy the entire HTML Code.
I recommend using a word type program like Word Pad, NeoOffice, Microsoft Word, etc.
After you copy the entire code, save it.
Now find your 'Source' for your Flash File. Remember, this must be a complete URL Address, see the 'BOLD' area in the picture. This is where you insert your URL and Flash File Name.
This 'Image' example is for a Flash File to be posted using your 'Posting' Feature on your Google Blog.
The size of the Flash File, also in 'BOLD' will fit any Google Blog Template. I recommend using this size format.
See an example of Flash as a 'Post' at:
Turn on your sound.
Click on the LINK-
Blogs by Google

This is also a picture Image only, so you will have to carefully copy the entire HTML Code.
This is the same method as the one above but without a 'Title.'
These work well on Google's open format template, but I still recommend a 'Title.'

This is also a picture Image only, so you will have to carefully copy the entire HTML Code.
This 'Method' is for adding a Flash File to your Sidebar (column) on your Google Blog.
Note: The size of the Flash File has been reduced and should fit all Google templates. Adjust if necessary. Don't forget, the size has two locations in the embed code.
See an example of Flash on a 'Sidebar' at:
Turn on your sound.
Click on the LINK-
Blogs by Google

If you are going to use my FREE Flash Storage Service, this is the address you need to use.
Just change the Flash File Name shown in RED for your Flash File.
To get the name, go to the website page, find the picture of your Flash File, and use the name and code.
Allow up to 72-hours from submittal before your Flash File is available.
See the Website for Complete Instructions and Rules.

This is where you can upload your FREE Flash Files to my NEW Website (Click on the Link):
FREE Flash File Uploads
Happy Blogging.
Please report all down or broken Links.
Remember, to be Followed - You have to Follow others!
Got a question about Google Blogs, HTML Codes, or JavaScripts for Blogs...
-or-
Want to send me a Flash File for upload to my website (www.blogsfollowme.com), read the instructions and rules first...
email me at:
alternate4craigslist@yahoo.com
6/2/09
How to ADD your Twitter Page Posts to your Google Blog using JavaScript (HTML Codes): Google Blogging Tip # 45 (Modified)
This Google Blogging Tip has been upgraded, modified, and changed.
To ADD your Twitter Page Posts to your Google Blog follow these steps:
Step 1 - Go to the LINK below, fill in required fields.
Step 2 - Click on 'Customize' ; then 'Add Widget to My Blog.'
Step 3 - Follow the steps (see pictures below).
Step 4 - 'View' your BLOG. Your Twitter Page LAST posts should appear on on your Google 'Sidebar' (column) at the top.
Step 5 - Now open your Twitter Page (in a different Browser) and check to see that the posts that appear on you Google Blog match the last posts on your Twitter Page.
NOTE: This shows ONLY your Post on Twitter! It will NOT show any followers who posted to Twitter that appear on your page.
Step 6 - After you have confirmed Twitter is working on your Google Blog, Go to Layout, move Widget to desired location.
Lets get started....
Please 'Click' on the LINK:
ADD Twitter to My Google Blog
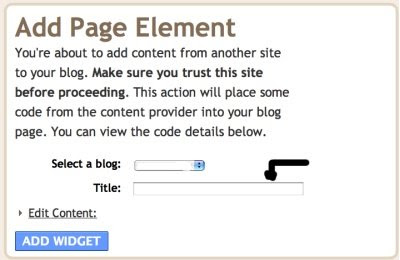
This will take you to this page....
Sign-in to your blog.
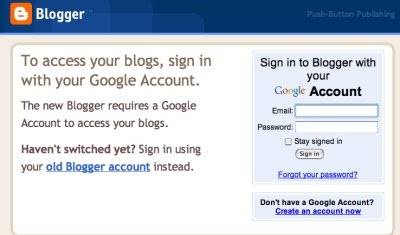
This will move you to this Page.
Make sure your BLOG is shown in 'Select a Blog.'
Leave 'Title' BLANK!
Ignore - 'Edit Content.'
Click on 'Add Widget.'
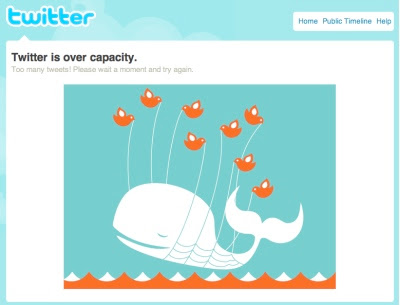
Sign-in to Twitter, make some NEW posts.
Oops, I got this page when signing into Twitter.
This is NOT an ERROR. Twitter simply cannot process your request. There are simply too many users on Twitter, try back later!
To see an Example of:
Creating 'Your Twitter Post' to your Google Blog
please visit BLOGS BY TWITTER
http://www.blogsbytwitter.blogspot.com/
Important:
1) Please follow the instructions carefully!
When using this JavaScript Gadget, please keep in mind it is a BETA. If it fails, report it to me immediately.
2) Remember, you are LINKING to a NON-Google Blog. So if the 'Twitter Post' doesn't always appear then either Google or Twitter may be down or experiencing problems. Just wait 24-hours it should restore itself.
3) If you need to MOVE your Gadget refer to Google Blogging Tip # 24, Moving Gadgets Around.
Thanks to Doc for developing this Beta JavaScript.
I will be posting HTML Codes every few days.
Check back often.
If you need a specific code, please email me.
The HTML Codes will include some JavaScript.
Not all JavaScript or HTML Codes will work on Google Blogs.
Things that say, 'BETA' are being tested and some errors may occur or the script may fail because Google or Twitter changed the criteria.
Happy Blogging.
Please recommend this Blog to other Bloggers.
To be FOLLOWED you must FOLLOW others!
To ADD your Twitter Page Posts to your Google Blog follow these steps:
Step 1 - Go to the LINK below, fill in required fields.
Step 2 - Click on 'Customize' ; then 'Add Widget to My Blog.'
Step 3 - Follow the steps (see pictures below).
Step 4 - 'View' your BLOG. Your Twitter Page LAST posts should appear on on your Google 'Sidebar' (column) at the top.
Step 5 - Now open your Twitter Page (in a different Browser) and check to see that the posts that appear on you Google Blog match the last posts on your Twitter Page.
NOTE: This shows ONLY your Post on Twitter! It will NOT show any followers who posted to Twitter that appear on your page.
Step 6 - After you have confirmed Twitter is working on your Google Blog, Go to Layout, move Widget to desired location.
Lets get started....
Please 'Click' on the LINK:
ADD Twitter to My Google Blog
This will take you to this page....
Sign-in to your blog.

This will move you to this Page.
Make sure your BLOG is shown in 'Select a Blog.'
Leave 'Title' BLANK!
Ignore - 'Edit Content.'
Click on 'Add Widget.'

Sign-in to Twitter, make some NEW posts.
Oops, I got this page when signing into Twitter.
This is NOT an ERROR. Twitter simply cannot process your request. There are simply too many users on Twitter, try back later!

To see an Example of:
Creating 'Your Twitter Post' to your Google Blog
please visit BLOGS BY TWITTER
http://www.blogsbytwitter.blogspot.com/
Important:
1) Please follow the instructions carefully!
When using this JavaScript Gadget, please keep in mind it is a BETA. If it fails, report it to me immediately.
2) Remember, you are LINKING to a NON-Google Blog. So if the 'Twitter Post' doesn't always appear then either Google or Twitter may be down or experiencing problems. Just wait 24-hours it should restore itself.
3) If you need to MOVE your Gadget refer to Google Blogging Tip # 24, Moving Gadgets Around.
Thanks to Doc for developing this Beta JavaScript.
I will be posting HTML Codes every few days.
Check back often.
If you need a specific code, please email me.
The HTML Codes will include some JavaScript.
Not all JavaScript or HTML Codes will work on Google Blogs.
Things that say, 'BETA' are being tested and some errors may occur or the script may fail because Google or Twitter changed the criteria.
Happy Blogging.
Please recommend this Blog to other Bloggers.
To be FOLLOWED you must FOLLOW others!
5/30/09
How to create a 'Clickable EMAIL Link' on your Blog or Website using HTML Codes: Google Blogging Tip # 44
There can be some downsides to Creating a Clickable EMAIL Link:
The foremost and common problem encountered by visitors (users) of your Blog or Website is if the 'Clickable Email Link' doesn't work you won't know it, and they will just move on.
This problem is generally caused by the Visitor to your Blog or Web Page. In order for this to work for ANY Visitor they must have their Pop Email Server Set-up. So if your visitor hasn't set up their email server then this LINK wont work.
Email Pop Servers such as Out Look Express for Windows (all versions) generally wont allow FREE Email Links.
Example: If someone uses a Yahoo FREE Email Account as their email address, then pop servers probably wont work.
However, if they use their Internet Provider, such as Verizon or Comcast as their email provider then the 'Clickable Email Link' you have on your Blog or Web Page will work on Windows Computers.
I advise putting the following along with your clickable EMAIL Link, see example on Testing Google Blogs.
If the Clickable LINK doesn't work, please copy and paste the following email address:
alternate4craigslist@yahoo.com
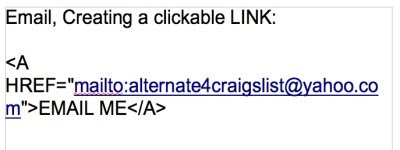
The picture below gives you the HTML Code for creating a Link from your Blog or Website to Your EMAIL Account using a mouse.
Steps:
1) Type in any email address you want to receive the message.
2) Create ANYTHING you want it to say, most used phrase is – 'EMAIL ME', as shown in the example picture, but you can call it anything you want.
IMPORTANT: Some email providers BLOCK these types of emails. To be safe, and get your email, use either an email provided from your Internet Provider -or- a .com email address.
Yahoo was used an an example only. Yahoo may block your mail if you are using a FREE account.
To see Two Types of Examples of:
Creating a Clickable EMAIL LINK for your Blog
-First, using Google Blog Posting
-Second, using Google Blog Gadgets, HTML/JavaScript
please visit TESTING GOOGLE BLOGS
http://www.testinggoogleblogs.blogspot.com/
Important:
1) Look at the code carefully and make sure you have it copied exactly including the characters and symbols.
These codes can be used either in your Posting TEXT portion; or in the Sidebar using the JavaScript Gadget.
2) This HTML Code only works on email addresses.
I will be posting HTML Codes every few days.
Check back often.
If you need a specific code, please email me.
The HTML Codes will include some JavaScript.
Not all JavaScript or HTML Codes will work on Google Blogs.
Have a Good Weekend, and Happy Blogging.
To be followed you must follow others.
The foremost and common problem encountered by visitors (users) of your Blog or Website is if the 'Clickable Email Link' doesn't work you won't know it, and they will just move on.
This problem is generally caused by the Visitor to your Blog or Web Page. In order for this to work for ANY Visitor they must have their Pop Email Server Set-up. So if your visitor hasn't set up their email server then this LINK wont work.
Email Pop Servers such as Out Look Express for Windows (all versions) generally wont allow FREE Email Links.
Example: If someone uses a Yahoo FREE Email Account as their email address, then pop servers probably wont work.
However, if they use their Internet Provider, such as Verizon or Comcast as their email provider then the 'Clickable Email Link' you have on your Blog or Web Page will work on Windows Computers.
I advise putting the following along with your clickable EMAIL Link, see example on Testing Google Blogs.
If the Clickable LINK doesn't work, please copy and paste the following email address:
alternate4craigslist@yahoo.com
The picture below gives you the HTML Code for creating a Link from your Blog or Website to Your EMAIL Account using a mouse.
Steps:
1) Type in any email address you want to receive the message.
2) Create ANYTHING you want it to say, most used phrase is – 'EMAIL ME', as shown in the example picture, but you can call it anything you want.
IMPORTANT: Some email providers BLOCK these types of emails. To be safe, and get your email, use either an email provided from your Internet Provider -or- a .com email address.
Yahoo was used an an example only. Yahoo may block your mail if you are using a FREE account.

To see Two Types of Examples of:
Creating a Clickable EMAIL LINK for your Blog
-First, using Google Blog Posting
-Second, using Google Blog Gadgets, HTML/JavaScript
please visit TESTING GOOGLE BLOGS
http://www.testinggoogleblogs.blogspot.com/
Important:
1) Look at the code carefully and make sure you have it copied exactly including the characters and symbols.
These codes can be used either in your Posting TEXT portion; or in the Sidebar using the JavaScript Gadget.
2) This HTML Code only works on email addresses.
I will be posting HTML Codes every few days.
Check back often.
If you need a specific code, please email me.
The HTML Codes will include some JavaScript.
Not all JavaScript or HTML Codes will work on Google Blogs.
Have a Good Weekend, and Happy Blogging.
To be followed you must follow others.
5/28/09
How to create a 'MARQUEE - Scrolling Text' on your Blog or Website using HTML Codes: Google Blogging Tip # 43
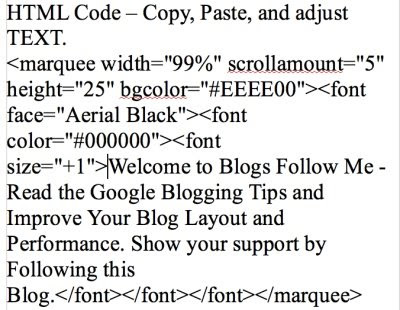
Instructions:
1 - TEXT: Find this text in the HTML Code below: Welcome to Blogs Follow Me - Read the Google Blogging Tips and Improve Your Blog Layout and Performance. Show your support by Following this Blog.
--->Replace the TEXT with whatever you want it to say.
Helpful Hint: Keep the TEXT reasonable short, don't make it too long or no one will read it.
2 - Marguee Size: Find this HTML Code below: marquee width="99%" scrollamount="5" height="25"
adjust the code as desired.
Note: If your using a Google Blog I recommend width-99% and height remain at 25
If you are using a Web Page I recommend the width=95% or less depending on the location.
3 - Marquee Colors: Adjust these to whatever is desired. To get a complete list of HTML Color Code Attributes, go to my BLOG Page: HTML Color Chart for Blogs.
Please Click on the LINK -
http://www.colorchart4html.blogspot.com/
Helpful Hint: When in doubt, use Black for TEXT (font color) #000000 and White for Background (bgcolor) #FFFFFF
Play around with it till you get something you like that fits your overall Blog or Web Page Background.
4 - Changing Font Styles and Size: Aerial Black works well so does font size 1.
Helpful Hint: Later, I will be adding a Google Blogging Tip on how to use HTML Codes that you can use for changing Font Size and Types (styles).
5 - Remember, ALL characters and symbols must be in the correct position, so if you try this and it doesn't work, generally thats where the ERROR is!
For an example of how this works-
Click on the URL LINK ....
'Testing Google Blogs'
http://www.testinggoogleblogs.blogspot.com/
I have included two examples:
1) inside the 'Posting Text' - this one I changed the TEXT, color background, color of the text, and the width.
2) On the 'Sidebar (column)' - this one I changed the TEXT, color background, and color of the text.
Happy Blogging.
Please recommend this BLOG to others.
Please support this Blog, Follow me or LINK to me.
Next Google Blogging Tip for HTML Codes will be posted Saturday.
1 - TEXT: Find this text in the HTML Code below: Welcome to Blogs Follow Me - Read the Google Blogging Tips and Improve Your Blog Layout and Performance. Show your support by Following this Blog.
--->Replace the TEXT with whatever you want it to say.
Helpful Hint: Keep the TEXT reasonable short, don't make it too long or no one will read it.
2 - Marguee Size: Find this HTML Code below: marquee width="99%" scrollamount="5" height="25"
adjust the code as desired.
Note: If your using a Google Blog I recommend width-99% and height remain at 25
If you are using a Web Page I recommend the width=95% or less depending on the location.
3 - Marquee Colors: Adjust these to whatever is desired. To get a complete list of HTML Color Code Attributes, go to my BLOG Page: HTML Color Chart for Blogs.
Please Click on the LINK -
http://www.colorchart4html.blogspot.com/
Helpful Hint: When in doubt, use Black for TEXT (font color) #000000 and White for Background (bgcolor) #FFFFFF
Play around with it till you get something you like that fits your overall Blog or Web Page Background.
4 - Changing Font Styles and Size: Aerial Black works well so does font size 1.
Helpful Hint: Later, I will be adding a Google Blogging Tip on how to use HTML Codes that you can use for changing Font Size and Types (styles).
5 - Remember, ALL characters and symbols must be in the correct position, so if you try this and it doesn't work, generally thats where the ERROR is!

For an example of how this works-
Click on the URL LINK ....
'Testing Google Blogs'
http://www.testinggoogleblogs.blogspot.com/
I have included two examples:
1) inside the 'Posting Text' - this one I changed the TEXT, color background, color of the text, and the width.
2) On the 'Sidebar (column)' - this one I changed the TEXT, color background, and color of the text.
Happy Blogging.
Please recommend this BLOG to others.
Please support this Blog, Follow me or LINK to me.
Next Google Blogging Tip for HTML Codes will be posted Saturday.
Subscribe to:
Posts (Atom)





 Chinese
 French
 German
 Italian
 Japanese
 Korean
 Russian
 Spanish