To add a picture to your BLOG, the simplest and fastest method, not the only method, is drag the picture to your desktop.
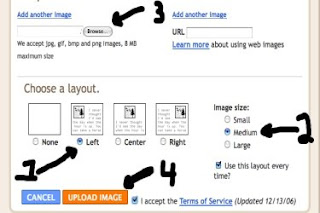
Follow the numbered steps - 1, 2, 3, 4 (more than one picture) - I have marked, see below:
1 - This sets the image to default to the 'Left, Center, or Right. It is best to set ALL pictures to 'LEFT.'
2 - This is important, Google sizes your picture image. Your image should be set to a width size between 300 to 400 pixels with the height to proportion, but the width is important. Most people use a program like Adobe or Paint to size their pictures.
Note: Maximum width should be 400 pixels.
If you are unable size your picture, then TEST you image by posting it starting with the 'Medium' setting. If it is too large go back, edit your picture, DELETE the picture entirely, repost it as 'Small.' If the image is too small, then go back, Edit, Delete the picture and upload it again using 'Large.'
Pictures that come from a digital camera are generally large in pixel size, so if you haven't resized them, select 'Small.'
3 - This selects the location, in my example, from your desktop, but they can come from a file folder on your computer, or directly from the Internet.
Remember all pictures will be a different size, unless you have resized them, so you may want to test them by loading one at a time.
Also the preferred image format is .jpg
Other formats such as .jpeg, .jpe, .gif will load but the preferred format by Google is .jpg (this is the most universal picture format unless the image is an animation, then it will be in .gif format).
4 - Simply click 'Upload Image.'
If you have more than one picture image for this one post, number them, say image-01, image-02, image-03, etc.
Google places the last picture image uploaded first.
So if you want your picture images in order, using the example (image-01, 02, 03, etc.) you would load image-03 first, then image-02, then image-01.

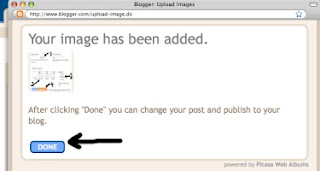
After 'Clicking' Upload Image, you get the following...
If this is the correct picture, then simply Click on 'Done.'
See below:

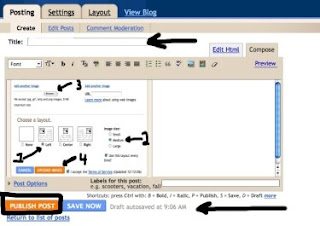
Finally, your picture image should appear in your Post Box, see below:
Note: Some Google Templates you choose will NOT show a picture image but HTML coding (which is still the picture, but in code, not image format).
You can add as many pictures as you like in this post box.
Important: All pictures and text within this POST box are considered 'One Posting.'
Once your picture has been added, then you can ADD text within this post box if you wish.
There is a 'Title' box, you should put something in there (do not leave blank). Example: This is where I put Google Blogging Tip # 15.

There will be more on Picture Images later, this is the basic instructions to get a normal picture image with or without text posted to your Blog.
Happy Blogging....
Next Tip - Adding a Video to my Blog.


2 comments:
Muchas gracias por todo, por bancarnos desde el comienzo y hasta hoy en dia, gracias por eso y por ser uno de los seguidores de ABRAN CANCHA.
Hoy, y en parte por ti, hemos superado los 100 seguidores!!!
Gracias por ser como sos.
ABRAN CANCHA
www.abran-cancha.blogspot.com
I would appreciate being added to your Blog Roll, Links, and Follow listings.
Thankx
http://areyoureligious.blogspot.com/
ARE YOU RELIGIOUS?
Category, general or whatever you think!
Post a Comment