(Q) In response to both Emails and Comments posted here about -
Can I provide a different 'Language Translator' that has more capabilities (more languages)?
(A) Yes, Google makes one. The reason I selected the 'Flag' method (limited number of country languages, is that the complete translator is not 100 percent accurate.
Provided below, is a complete Language Translator by Google.
This 'Google Translator Gadget' is very easy to ADD to your Blog or Website.
Steps:
1. Go to this Google webpage:
CLICK on the Link-
Google Translate Gadget
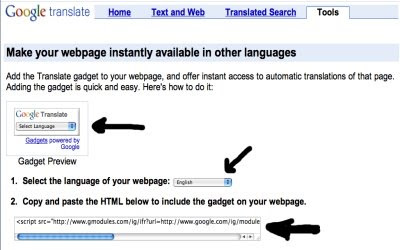
2. 'Copy' the embed javascript code, see picture below.
Note" This works just like copying the embed code from a YouTube Video.
3. Sign-in to your Blog.
4. Select 'Layouts.'
5. Select 'Gadgets.'
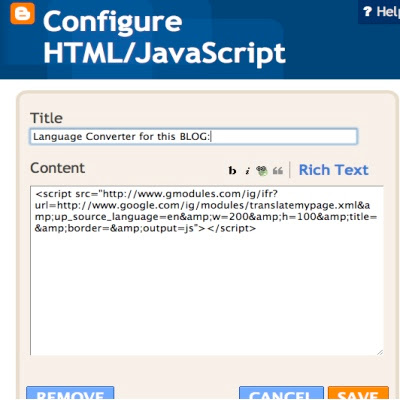
6. Select 'HTML / JavaScript.'
7. Recommended, but not necessary, 'Change' the width to 200 and the height to 100.
8. Save, View Blog, move Gadget to desired location. Recommend this be at the TOP of your sidebar (column).
9. Go here to see an example of how Google Translate Gadget works:
CLICK on the Link-
Blogs By Twitter
The picture shows the Google Page you need to get the embed javascript code for the Google Translate Gadget.
Make sure the 'Box' has 'the language you speak' ; shown is 'English' but you can change that.
Note: Ignore everything else on the the Google web page below the embed javascript code you need.

This is how the javascript code should look when you 'Paste' it into the Gadget, 'HTML / JavaScript.'
Again, I recommend you change the size to:
Width (w) 200
Height (h) 100

Happy Blogging and have a great weekend.
Next Google Tips, Hints, Tricks, and Codes posting will be on Monday, June 29, 2009.
Show your support by following this Blog...
And, please recommend this Blog to your friends and followers.


1 comment:
Thanks for the Widget it works great.
Post a Comment