A) In Google Tip # 40, this refers to a third party such as Photobucket. At the time I wrote that Blog and Website Tip I did not offer FREE Online Storage of Animation Files (.gif), Flash Files (.swf), Midi Sound Files (.mid), and Wav Files (wav). The code you need to use is on The Blog Guy's Web Page. I have now included an explanation below how to use the code to install an 'Animation (.gif) File on either your Google Blog or any Website (Web Page).
Email Inquires: 7
Reference: Google Blogging Tip # 40
Copy and Paste the code as instructed on The Blog Guy's Website Link:
Click on the LINK-
Free Animation Files
Important Note: This Web Page includes the two HTML Codes you need to install an Animation File. See below which one to use and how.
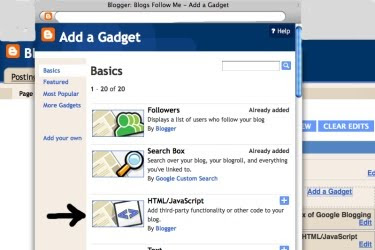
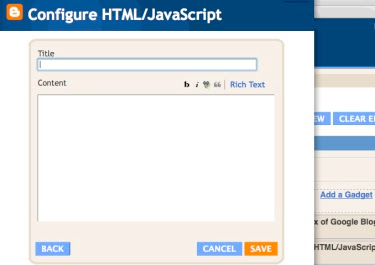
The First three pictures below show how to install an 'Animation (.gif) File' on a Google Blog Sidebar (column) using Gadgets, HTML / JavaScript ; -or- within a NEW Post of ANY Blog ; -or- on any Website or Web Page.
Steps-
1) Open the Blog Guy's Animation Web Page.
2) In a NEW Window or different Browser, sign-in to your Google Blog.
For Google Sidebar -
1) Select 'Layout.'
2) Select 'Add Gadget.'
3) Select 'HTML / JavaScript.'
4) Copy and Paste from The Blog Guy's Web Page the following HTML Code shown in the third picture.
5) From The Blog Guy's FREE Animation Files, select the image you want. Change the code in RED to that .gif file name.
6) Save, View Blog, Move Gadget to desired location within Blog.
For ANY Blog Post including Google -
1) Copy and Paste from The Blog Guy's Web Page the following HTML Code shown in the third picture.
2) From The Blog Guy's FREE Animation Files, select the image you want. Change the code in RED to that .gif file name.
3) Save, View Your Blog Post.
For ANY Website or Web Page -
1) Copy and Paste from The Blog Guy's Web Page the following HTML Code shown in the third picture. Place this is the desired location of the Website (Page) between BODY and /BODY
2) From The Blog Guy's FREE Animation Files, select the image you want. Change the code in RED to that .gif file name.
3) Save, View Your Website or Page.


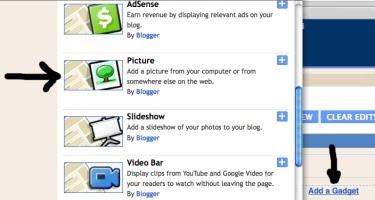
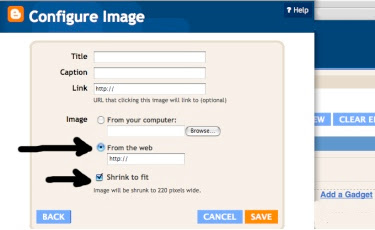
The NEXT two pictures below show how to install an 'Animation (.gif) File' on a Google Blog Sidebar (column) using 'Picture.'
Steps-
1) Open the Blog Guy's Animation Web Page.
2) In a NEW Window or different Browser, sign-in to your Google Blog.
3) Select 'Layout.'
4) Select 'Add Gadget.'
5) Select 'Picture.'
6) Select 'From the Web.'
7) Select 'Shrink to Fit.'
8) Copy and Paste from The Blog Guy's Web Page the following HTML Code shown in the third picture.
9) From The Blog Guy's FREE Animation Files, select the image you want. Change the code in RED to that .gif file name.
10) Save, View Blog, Move Gadget to desired location within Blog.


Do you have an animation file you want to use that is not in The Blog Guy's List? Then submit it to me by email. The File storage is free.
Email Your File to The Blog Guy at:
alternate4craigslist@yahoo.com
Next Google Blogging Tip, Trick, Hint, HTML Code, or JavaScript will be on Friday, October 9, 2009.
How to get rid of the Google Blog Bar at the top of the page.
Please support my efforts, Follow This Blog.
Thanks - The Blog Guy
<title">http://blogsfollowme.blogspot.com, Blogs Follow Me<title/>
<meta name="location" content="url-http://blogsfollowme.blogspot.com/">


1 comment:
Hey thanks for the FREE file sharing.
I added my picture I submitted to for site and found one other you had that I am using.
Great stuff here...thank you.
If readers have time, stop by and catch a joke or two - I publish a new joke everyday.
Post a Comment