Showing posts with label Email Q_n_A. Show all posts

2/8/10

Google Blogging Tip # 100: Google Blogs, Substituting a Picture for the Title on a Post

Q) I have tried repeatedly to add an HTML Code within the 'Title' bar of Google blogspot Blog 'New Post' and cannot get it to work. I want to substitute a Picture for the Title on my Post. I have seen this done on other blogs.
How do you do this?

A) Google blocks the use of HTML and JavaScript within its Title Block for Posts. To avoid using the Layout, and 'Edit HTML' function, there is a simple way to accomplish this. Just don't use the 'Title Bar' at all. Also, do not use the Link Bar if you have it enabled.
Place your picture at the top of the empty block where you would add any text, pictures, or video. I believe this will accomplish what you are trying to do. I recommend the picture image be 375 pixels wide x 55 pixels high.
Email Inquiries - 11

See the picture below:


See the sample of how it's done and should look like.
Click on the Link:
Testing Google Blogs


Most Recent Google Blog Award Winner:
The Google Blog Award Winner for Week Ending (w/e) February 06, 2010, for the best Blog or Website was...
Click on the LINK below to see the Award Winner
Condom Facts

Don't forget to vote for your favorite Blog or Site for the Google Blog Award, you can vote for yourself. Voting closes every Saturday at 11:00 PM Eastern Standard Time, USA.


Thanks for visiting.
Please support my efforts, Follow this Blog, and I will Follow you.

The next Posting Tip, Trick, Hint, HTML Codes, JavaScript, and Cool Fun Stuff is coming very soon.

I am current on all my Followers. If I missed anyone I apologize leave me a comment and I will add you.
Thanks,
The Blog Guy

1/28/10

Google Blogging Tip # 99: How to Perform Maintenance on Your Twitter Page

Q) My Twitter Page is a mess. I am Following more people than are Following Me. How can I clean up my Twitter Page and get rid of all the dead beats to make room for legitimate Followers I want to add?


A) Twitter makes this quite hard for their users. First at the moment as a Twitter Page user you are only allowed to have 2,001 Tweets you can follow. However, there is no limit to the number of people who can follow you.
Fortunately, there are some third party software providers that can clean up your Twitter Page account. I experimented with two. One didn't work for me at all.
I found that using Tweepi is the best approach.
Email Inquiries: 24

Just click on the Link and it will take you to the Tweepi Page.
First I have laid out a step by step illustration to walk you through how to use Tweepi and what each step will look like till you're finished.
If you have a high number of people you are following on your Twitter Page, say between 1,500 to 2,000 this process may take about an hour to complete. So allow enough time.

Link:
Tweepi Home Page

First sign-in to your Twitter Page and see how many people your are Following and how many people are Following you.


This is Tweepi main page. Slect 'FLUSH.'

Note: Once in do not use any of the option or settings other than what is shown in the pictures below.


This will take you to the Tweepi Flush Page.


You will get this next widow...
From here you must sign-in to your Twitter Account.


You are now connected to Tweepi Clean-up and your Twitter Page.
When getting started with Tweepi clean-up, which they call Flush, make sure you allow the blue bar to load all the way.
Just above the Blur Bar you will see the number of Followers you need to get rid of. Then the column to the far right, under 'Friend' you will see 'You're Following User.' At the top far right column, check the box 'Follow' all the boxes under 'Follow' should have a check mark. Next simply go to the bottom of the page and click on 'UNFOLLOW.' At this point, by default you will be loading 20 Followers at a time. If you click on the bottom box 'Tweet This' Tweepi will load 40 Followers at a time. It will put a tweet on your Twitter Page automatically but it saves a lot of time.


Here Tweepi is processing getting rid of the pages you no longer want to follow. Do NOT interrupt the process.


Tweepi has 'Unfollowed' those unwanted Tweets. Remember this has to be done repeatedly of 40 Twitter Followers per Tweepi page until completed. Use the 'Next' page function and Tweepi loads it automatically. Again wait for the Blue Bar to load all the way, and check Follow on ALL. Then UNFOLLOW to get rid of them. Just keep doing this until Tweepi has cleaned up your Twitter Page.


How your Twitter Page should look when you are done cleaning it up with Tweepi.


Important Note:
I suggest running Tweepi once per month to clean up your Twitter Page.


Most Recent Google Blog Award Winner:
The Google Blog Award Winner for Week Ending (w/e) January 23, 2010, for the best Blog or Website was...
Click on the LINK below to see the Award Winner
Impeach President Obama

Don't forget to vote for your favorite Blog / Site for the Google Blog Award, you can vote for yourself. Voting closes every Saturday at 11:00pm Eastern Standard Time, USA.


Thanks for visiting. Please Follow this Blog.
The next Posting Tip, Trick, Hint, HTML Codes, JavaScript, and Cool Fun Stuff is coming soon.

Sunday, January 31, 2010 - I am caught up on all my Followers. If I missed anyone I apologize leave me a comment and I will add you.

1/18/10

Google Blogging Tip # 98: How to Create a Google Only Blog Profile

Q) Can you tell me how to create a Google 'Profile' without creating a Google Blog?

A) To create a Google 'Profile' simply follow the steps below.
The Google 'Profile' can be used for several reasons:
1) To reserve a name. The Blog can be added later.
2) So you can Follow someone who all ready has a Google Blog using Google Friends Connect.
Email Inquiries: 19

To create a Google only 'PROFILE' please follow these steps:

1/ - If you do not all ready have an email account create one. You will need an email address. If you don't have an email address or want a separate email just for your 'Google Profile' then Gmail or Yahoo are probably the best options but there are others such as myway; msn; live; and hotmail.

2/ - Write down the name you want to use for your Profile, example: blogsfollowme. I would recommend using this for the Blog Title as well.

3/ - Go to the following Google Link-
Create A Blog
See Picture Below:


4/ - The following window appears, see picture below:
Fill in all the required information.
When finished click on 'Continue.'


5/ - You will get another page. This is the page that you will create a 'Profile Only.'
Fill in the two required items, then click on 'skip this and create a blog later.'
See Picture Below:


6/ - This will take you to the final page.
If you want you can click on Edit Profile, Add a Profile Picture or just sign out.
Then open your email account. Google will have a confirmation email, click on it, sign back into your Profile, then sign out.
You are done.

How to use your PROFILE:
Anytime you wish to Follow someone, like me, The Blog Guy, just click on the 'follow' button just above 'Followers. Sign in with your email account and password and follow that Blog or Google Friends Connect on a website.
See Picture Below:


Most Recent Google Blog Award Winners:
The Google Blog Award Winner for Week Ending (w/e) January 16, 2010, for the best Blog or Website was...
Click on the LINK below to see the Award Winner
Uses for Duck Tape

The Google Blog Award Winner for Week Ending (w/e) January 09, 2010, for the best Blog or Website was...
Click on the LINK below to see the Award Winner
War Stories

Don't for get to vote for your favorite Blog / Site for the Google Blog Award, you can vote for yourself.


Thanks for visiting. Please Follow this Blog.
Coming soon, the next Posting Tip, Trick, Hint, HTML Codes, JavaScript, and Cool Fun Stuff.

1/6/10

Google Blogging Tip # 97: Adding a Horizontal Menu Bar to Your Website or Blog

Q/ - I want to add a Menu Bar to my Blog and Website, can you tell me how to do this?

A/ - Yes, Here is a 'Horizontal Menu Bar' that works on both Blogs and Web Pages.
Email Inquiries: 30
Link:
Horizontal Menu Bar

The instructions for installing the 'Horizontal Menu Bar' provided by The Blog Guy are on my web page. There is also an example of how it looks and works on both a Blog and Web Page, visit first before installing.


I am still catching up with all my Twitter Followers, Twitter Pages.

You can expect lots more Free Blog and Website Tips, Tricks, Hints, Fun Stuff, HTML Codes, and JavaScripts for your Blog and Website.

Support my efforts to bring you FREE stuff, please Follow my Google Blog.

Don't forget to follow me on Twitter.

I noticed not many people are voting for the Google Blog Award issued each week. Check it out, vote today, voting for this weeks winner closes at 11:00pm Saturday East Coast, USA, time. Vote for yourself, or vote for your favorite Blog or Site. If you don't vote you cannot win.

Stop over at :
Blogs I am Following, to see many questions people ask on all sorts of subjects about Blogging, Websites, How to get Free Downloads, and more ...
There is a new posting January 5, 2010-
Click on the LINK:
Blogs I am Following


Thanks for visiting.
Next Posting Tip, Trick, Hint, HTML Codes, JavaScript, and Cool Fun Stuff coming soon.

1/2/10

Google Blogging Tip # 96: Updating How to Use Your Google Blog

Q/ - I am getting a lot of SPAM in my Google blogspot Blog Comments. How do I stop this?

A/ - I got many emails recently on this subject. One follower here said he got nearly 100 spam adult sites on his Blog.
Spammers are getting smarter. They are using automated robots to search Google Blogs that have open comment settings.
See the reference below:
Reference: Google Blogging Tip # 14 from The Blog Guy,
Link:
Google Blogging Tip # 14

As a result you should change your settings to use :
Show Word Verification on Comments.
This will stop automated spam.
See the pictures below for NEW recommended settings on your Settings, Comments - from The Blog Guy.
I still do not recommend anyone using 'Comment Moderation.'
Email Inquiries: 14

Optimum Settings Update for your Google Blog:
Sign into your Blog, you should be at the Dashboard.
Select 'Settings.'
Select 'Comments.'
I have broken this page down into 3 parts.
On this page, set each of your settings as follows for optimum performance-
Make sure the settings are set as follows:


Hello, Happy New Year, and yes I am back.
Took some private time off.
I will be catching up with all my Followers, Twitter Pages, and posting many new Blog and Website Tips, Tricks, Hints, Fun Stuff, HTML Codes, and JavaScripts.
Lots of Free New things coming for use on your Blog and Website.

Support my efforts to bring you FREE stuff, please Follow my Google Blog.

Don't forget to follow me on Twitter.

I noticed not many people are voting for the Google Blog Award this week. Check it out, vote today, voting for this weeks winner closes at 11:00pm tonight East Coast, USA, time. Vote for yourself, or vote for your favorite Blog or Site. If you don't vote you cannot win.

Stop over at :
Blogs I am Following, to see many questions people ask on all sorts of subjects about Blogging, Websites, How to get Free Downloads, and more ...
There is a new posting today-
Click on the LINK:
Blogs I am Following


The Google Blog Award Winner for Week Ending (w/e) January 02, 2010, for the best Blog or Website was...
Click on the LINK below to see the Award Winner
We Wont Take It Anymore


The Google Blog Award Winner for Week Ending (w/e) December 26, 2009, for the best Blog or Website was...
Click on the LINK below to see the Award Winner
Political Voodoo Doll

Thanks for visiting.
Next Posting Tip, Trick, Hint, HTML Codes, JavaScript, and Cool Fun Stuff will be posted on: Wednesday January 06, 2010.

12/16/09

Google Blogging Tip # 95: How to Schedule an Automatic Post for your Google Blog in advance

Q) Please tell me how I can schedule a POST for my Google Blog in advance?

A) On Google blogspot Blogs, this is very easy to do, just follow the 4-steps below shown in the pictures.
Email Inquiries: 26

Step # 1 -
Sign-in to your Google Blog.
Go to Posting, New Post.
Under 'Post Options' click and the full box opens.
See Picture Below:


Step # 2 -
Once the box opens, simply 'CHANGE' the Date and Time to when you want your POST to be published. Yes you can select the post for later the same day; or for a different day and time.
See Picture Below:


Step # 3 -
After completing your POST: Picture, Text, Video, etc. just click on 'Publish Post.'
Note - Don't forget to give your Post a 'Title.'
Also, if you are using 'Labels' insert them now.
See Picture Below:


Step # 4 -
After you have completed the posting open up 'Edit Post' and make sure your Scheduled Post appears.
It should look like the picture below.
Then sign out of your Google Blog and on the date and time you set your scheduled post will automatically be posted to your blog without any additional effort or requirements by you.


12/7/09

Google Blogging Tip # 94: Resolving Google Blog Issues with Post Editor

Q) Google Blog has two Post Edits found under 'Settings'; one is the 'Old' format and the other is 'New' format. Can you tell me how to upload movies from my desktop or computer file folder using the NEW Post Edit Format?

A) Explanation for Problem-
If you have a Google blogspot Blog and it is more than year a old you probably haven't even noticed that Google offers two settings for the Post Edit function (Adding a New Post to your Google Blog). New Blog owners will notice because some templates default to the 'New' format shown as Updated Editor, under Settings, at 'Select Post Editor.' Anyone can update their Blog to the new setting.
The problem with the 'New' Post Editor the functions are more like something you find in a Word Text file such as Microsoft Word. They do have a place to upload pictures, same as the old format. The problem is they have omitted the Icon Function to upload a movie / video. You can still copy and paste online videos such as YouTube, LiveLeak, etc. You can also link to a video post online and the video will function, but if the link is removed or lost the video on your blog is gone.
Google is still developing this New Format, but they have to be aware that the Icon for uploading a Video is not there.
My guess is that they omitted it on purpose. There can be several reasons for this, among them are:
1) Google doesn't want to be involved with someone uploading property that belongs to someone else, even though videos usually embed their owner's name and URL Address so credit s given.
2) Bandwith and data storage are the main reasons I am sure. Videos take up a lot of storage space and with millions of Google Bloggers all over the world, this becomes very costly. Remember your Blog is Free!
3) Google owns YouTube and wants t promote its use.

Solving the Problem-
In the interim, use the old editor (original) Post Edit Format if you upload videos from your computer. You can switch back and forth for now between editor formats.
If your video/movie is an original, then upload it to YouTube or another service similar to YouTube like LiveLeak.
Eventually Google will have to make a determination to either add a video icon for uploads or not, but the new Post Editor Format will become the norm with no option.
For long term, if you do not want to create a YouTube like video, then you may have to use another Blog or Social Network that allows video uploads.
See pictures below for further clarification.
Email Inquires: 4

The New Post Editor Format-


The Original Post Editor Format-


Thanks for visiting.
Please support this Blog, Follow me - and, I will Follow you!

Look for the next Posting Tip, Trick, Hint, HTML Codes, JavaScript, and Cool Fun Stuff coming soon.
I am still working out of the Phoenix/Scottsdale Arizona Office this week.

The Google Blog Award Winner for last week was:
Click on the Winners LINK-
Bad Santa Claus

12/4/09

Google Blogging Tip # 93: Adding a Rating System to Your Blog

Blogging Tip # 93 is No Longer Recommended.

Click Here for NEW Rating System Widget for Blogs:
Google Blogging Tip # 102


Click on the LINK to CHANGE your Colors:
HTML Color Chart for Blogs and Websites

Thanks for visiting.
Please support this Blog, Follow me - and, I will Follow you!


12/1/09

Google Blogging Tip # 92: Adding a Social Community to Your Blog or Website

Q) Is there an alternate for Google Friends Connect that I can add to my Blog or Website?

A) I have added The BlogFrog as an additional social community to one of my Google Blogs. Try this as one option, it's easy to install and use. It seems to work well as a supplement to Google Friends Connect. You can have more than one Social Community Network on a Blog or Website.
Click on the LINK to start the installation of The BlogFrog:
The BlogFrog

When you go to The BlogFrog Website you get a page that looks like this.
Just select 'Sign Up.'


Once you click on 'Sign Up' this pop-up window appears. Here add a valid email address, your name (no spaces) - I used 'theblogguy', then create a password (write in down, you will need it later on).
Then just click 'Done.'


Next - you get a new pop-up window that looks like this.
At this Step, you ADD whatever Blog or Website URL Address you want BlogFrog to be installed on.
If you have Twitter and Facebook you can add them as well.
I chose only to use my Google blogspot address: http://blogsiamfollowing.blogspot.com/


Another new pop-up window appears....
When you get here, your almost done setting up BlogFrog. Just continue to the install.


At this step, you may want to use the default codes, you can change these later.
There are two ways to install BlogFrog, I chose the one on the left. I would copy and paste both codes into a word text file so you can opt out of one and replace it with another later if you would like.


Now Copy and Paste the code into your Blog or Website.
For Google Blogs, Follow these steps:
1. Sign-in to your Google Blog.
2. Go to 'Layout.'
3. Select 'Add a Gadget.'
4. Select 'HTML / JavaScript.'
5. Copy and Paste the BlogFrog Code.
6. Save, view your Blog. Then go back to Gadgets and move your BlogFrog Community to the desired location on your Blog sidebar.

For Websites, Copy and Paste the JavaScript Code from BlogFrog and place it where you want your new community to appear on your web page. This goes between the BODY and /BODY.


After you install BlogFrog, and move it to the desired location on your Blog sidebar or within your Website, this is how it will look. You can then invite others to join your community or they cam add you to theirs.


Here is an example of of how it should look on a Google Blog when you are done.
Look at the sidebar, at the bottom of my Blog, Blogs I am Following.
Click on the LINK:
Blogs I am Following

Sorry for the delay in posting this new Blogging / Website Tip.
I just got into Phoenix too late last night.

Next Blogging Tip, Trick, Hint, HTML Codes, JavaScript, and Cool Stuff will be posted on: Friday December 4, 2009.

11/23/09

Google Blogging Tip # 91: Another Type of Scrolling Marquee

Q) I noticed a cool scrolling marquee on your other blog, Blogs I am Following, but I didn't see it in your Archived Blog and Website Tips. Could you be so kind as to furnish the code?

A) Absolutely, to obtain the Flash Installation Code from The Blog Guy's Website. Just follow the instructions and Link below.

Click on the LINK:
to get Flash Code from The Blog Guy for your Blog or Website:

Another Type of Scrolling Marquee

How to install the Marquee...
It's simple, just:
Copy and paste the code as instructed.
See how it works, there are two examples on the Web Page....

Installing the Code on a Google blogspot Blog Sidebar (column):
Steps:
1/ - Sign-in to your Blog.
2/ - Go to 'Layouts.'
3/ - Click on 'Add Gadgets.'
4/ - Select 'HTML / JavaScript.'
5/ - Copy and Paste the Flash Code from The Blog Guy's Web Page.
6/ - Save, View Blog, Refresh Screen, Move to desired location, sign-out.

Installing the Code on a Web Page:
1/ - Copy and Paste the Flash Code from The Blog Guy's Web Page into the desired location between BODY and /BODY.
2/ - Save, View Web Page, Move as desired or needed.

Do you have a Blogging Question?
Please email me or just post it to my latest comment section on any Blogging Tip. I read all my comments.
Note - I will get to all the requests both by emails and comments people have submitted. I take them in order.

The Blog Guy's next Blogging Tip, Trick, Hint, HTML Codes, and JavaScript will be posted on Tuesday December 1, 2009. Also I will be in Phoenix/Scottsdale Arizona that entire week on business.


Please Follow this Blog and I will Follow You!
Also, please Follow Me on Twitter, go to the bottom of this Blogs sidebar and click on my Twitter Page, sign-in to your Twitter Account and start Following Me. I will in return Follow you.
Thanks,
The Blog Guy

11/11/09

Google Blogging Tip # 88: Add U.S. Debt Counter Gadget to Your Blog or Website

Q) I have looked all over for a good U.S. National Debt Clock Gadget, but they don't seem to work the way I want. Can you provide one that works?

A) Yes, obtain the Flash Installation Code from The Blog Guy's Website. Just follow the instructions and Link below.

Click on the LINK:
to get Flash Code from The Blog Guy for your Blog or Website:

Adding the U.S. National Debt Clock Widget

How to install the Gadget ?
It's simple, just:
Copy and paste the code as instructed.
See how it works, there are two examples on the Web Page....

Installing the Code on a Google blogspot Blog Sidebar (column):
Steps:
1/ - Sign-in to your Blog.
2/ - Go to 'Layouts.'
3/ - Click on 'Add Gadgets.'
4/ - Select 'HTML / JavaScript.'
5/ - Copy and Paste the Code from The Blog Guy's Web Page.
6/ - Save, View Blog, Refresh Screen, Move to desired location, sign-out.

Installing the Code on a Web Page:
1/ - Copy and Paste the Code from The Blog Guy's Web Page into the desired location between BODY and /BODY.
2/ - Save, View Web Page, Move as desired or needed.


Do you have a Blogging Question?
Please email me or just post it to my latest comment section on any Blogging Tip. I read all my comments.


The Blog Guy's next Blogging Tip, Trick, Hint, HTML Codes, and JavaScript will be posted on Saturday, November 14, 2009.


Please Follow this Blog and I will Follow You!
Also, please Follow Me on Twitter, go to the bottom of this Blogs sidebar and click on my Twitter Page, sign-in to your Twitter Account and start Following Me. I will in return Follow you.
Thanks,
The Blog Guy

11/2/09

Google Blogging Tip # 86: Adding Teletype Scrolling Text to Your Blog or Website

Q) I like your Blog and Website Tips. The vertical scrolling text described in Tip # 82 is appreciated but it takes up more space on my sidebar than I would like. So, can you please provide a more condensed Text Message like a digital printout (teletype)?
Reference : Google Blogging Tip # 82: Adding Vertical Scrolling Text to Your Blog or Website
Installing Vertical Scrolling Text

A) There is a Teletype Scrolling Text that may provide you with what you are looking for.
Email Inquiries: 6
Click on the LINK:
to get The Blog Guy's JavaScript Code for your Blog or Website:

Scrolling Teletype Text

Note: There are two different JavaScript Codes with a sample of how these look and work.
Choose the one that applies to your specific needs – WHITE (light colored backgrounds) -or- BLACK (dark colored backgrounds).
Then copy and paste the code as instructed.

Installing the Code on a Google blogspot Blog Sidebar (column):
Steps:
1/ - Sign-in to your Blog.
2/ - Go to 'Layouts.'
3/ - Click on 'Add Gadgets.'
4/ - Select 'HTML / JavaScript.'
5/ - Copy and Paste the Code from The Blog Guy's Web Page.
5/ - Save, View Blog, Refresh Screen, Move to desired location, sign-out.

Installing the Code on a Web Page:
1/ - Copy and Paste the JavaScript Code from The Blog Guy's Web Page in the desired location between BODY and /BODY.
2/ - Save, View Web Page, Move as desired or needed.


Do you have a Blogging Question?
Please email or just post it to my latest comment section on any Blogging Tip. I read all my comments.


Next Blogging Tip, Trick, Hint, HTML Codes, and JavaScript will be posted on: Friday, November 6, 2009.


Please Follow this Blog and I will Follow You!
Also, please Follow Me on Twitter, go to the bottom of this Blogs sidebar and click on my Twitter Page, sign-in to your Twitter Account and start Following Me. I will in return Follow you.

10/31/09

Google Blogging Tip # 85: Utilizing Website Adult Content Warning Pop-up Screen

Q) Can you provide me an Adult Content Warning Label that will pop-up before loading my Web Page that has Adult Content?

A) Yes-
Click on the LINK:
to get The Blog Guy's JavaScript Code for your Website or Web Pages:

HTML Codes for Adult Content Warning

This JavaScript loads before the page.
You have to then type in your age (older than 18) to access your site.
If someone types 14 instead of 24 it will redirect them to a safe site of non adult content.
If they type any age older than 18, it will allow them access.
Please do NOT alter the JavaScript Code.

Note: This JavaScript works on all Browsers.

Have a great weekend.
Next Blogging Tip, Trick, Hint, HTML Codes, and JavaScript will be posted on: Monday, November 2, 2009.

Do you have a Blogging Question, ask me.

Please Follow this Blog and I will Follow You!

10/9/09

Google Blogging Tip # 81: Removing The Navbar From Your Google Blog

Q) - How do I get rid of that annoying Bar at the Top of my Google Blog?

A) - You have to change your Blog's HTML Code to get rid of the Google Navigation (Nav) Bar. It is quite simple to do, but make very sure you follow the instructions carefully.
Email Inquiries: 31

Removing The Navbar From Your Google Blog


Steps:
1) Sign-in to your Google Blog Account.
2) Select 'Layout.'
3) Select 'Edit HTML.'
4) This takes you to a new page. Near the top you will see, Backup / Restore Template.
Select 'Download Full Template.' This will copy your HTML Code to your dashboard. Keep this if something happens, you will need this to restore all your original settings.
5) Page down till you find /HEAD.
6) Click on the LINK to The Blog Guy's Web Page. Copy and Paste the code directly above /HEAD.
7) Go to the bottom of the page. Save Template.
8) Preview.
9) If correct, close out 'Preview.'
10) Go to your main Blog page. Refresh the page.
11) The Google Top Bar should be gone.

Copy and Paste the code as instructed on The Blog Guy's Website Link:
Click on the LINK-
Removing the Bar on Top of Google Blogs

I did this on four of my own Blogs with 3 different templates.
Below is some pictures for further clarification and help.

Here on Google Blog Awards, you can see the Bar before the HTML Changes.

Making the changes explained above, and backing up my old files in case an error occurs.


Here are the changes on my Google Blog Awards Blog. Notice after following the steps the BAR is gone.

Here I made the change on a different type of Google template on Blogs By Google. You can see the bar before the changes and the Blog after the changes without the bar.


Here I made the change on my Blog - Alternate for Craigslist.

Finally you can see my main Blog - Blogs Follow Me - before the change with the bar; and after the change without the bar.


Please Support My Efforts, Follow This Blog.
Right now I am following over 500 Blogs but only 210 are following me. Help me out....
Thanks - The Blog Guy

Next Google Blogging Tip, Trick, Hint, HTML Code, or JavaScript will be on Monday, October 12, 2009.

10/7/09

Google Blogging Tip # 80: How to Install The Blog Guy's Free Animation Files on either Blogs or Web Pages

Q) I read your Google Tip on adding animation files, but how do you ADD Animation Files from your FREE website storage to either a Google Blog or a Web Page?

A) In Google Tip # 40, this refers to a third party such as Photobucket. At the time I wrote that Blog and Website Tip I did not offer FREE Online Storage of Animation Files (.gif), Flash Files (.swf), Midi Sound Files (.mid), and Wav Files (wav). The code you need to use is on The Blog Guy's Web Page. I have now included an explanation below how to use the code to install an 'Animation (.gif) File on either your Google Blog or any Website (Web Page).
Email Inquires: 7
Reference: Google Blogging Tip # 40

Copy and Paste the code as instructed on The Blog Guy's Website Link:
Click on the LINK-
Free Animation Files

Important Note: This Web Page includes the two HTML Codes you need to install an Animation File. See below which one to use and how.


The First three pictures below show how to install an 'Animation (.gif) File' on a Google Blog Sidebar (column) using Gadgets, HTML / JavaScript ; -or- within a NEW Post of ANY Blog ; -or- on any Website or Web Page.
Steps-
1) Open the Blog Guy's Animation Web Page.
2) In a NEW Window or different Browser, sign-in to your Google Blog.

For Google Sidebar -
1) Select 'Layout.'
2) Select 'Add Gadget.'
3) Select 'HTML / JavaScript.'
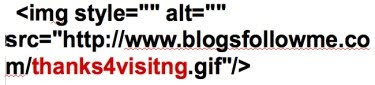
4) Copy and Paste from The Blog Guy's Web Page the following HTML Code shown in the third picture.
5) From The Blog Guy's FREE Animation Files, select the image you want. Change the code in RED to that .gif file name.
6) Save, View Blog, Move Gadget to desired location within Blog.

For ANY Blog Post including Google -
1) Copy and Paste from The Blog Guy's Web Page the following HTML Code shown in the third picture.
2) From The Blog Guy's FREE Animation Files, select the image you want. Change the code in RED to that .gif file name.
3) Save, View Your Blog Post.

For ANY Website or Web Page -
1) Copy and Paste from The Blog Guy's Web Page the following HTML Code shown in the third picture. Place this is the desired location of the Website (Page) between BODY and /BODY
2) From The Blog Guy's FREE Animation Files, select the image you want. Change the code in RED to that .gif file name.
3) Save, View Your Website or Page.
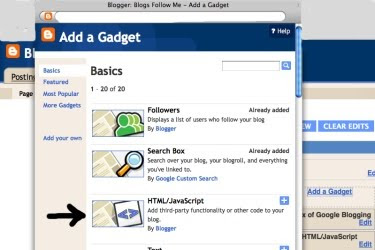
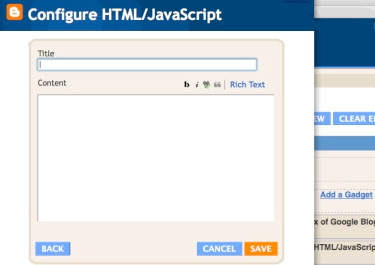


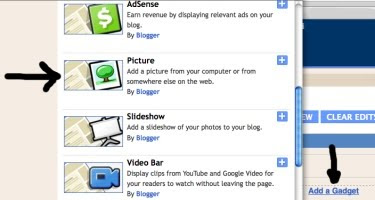
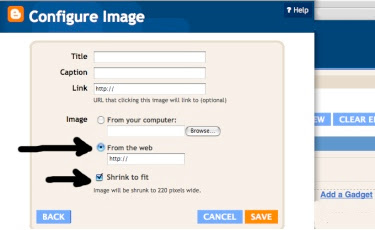
The NEXT two pictures below show how to install an 'Animation (.gif) File' on a Google Blog Sidebar (column) using 'Picture.'
Steps-
1) Open the Blog Guy's Animation Web Page.
2) In a NEW Window or different Browser, sign-in to your Google Blog.
3) Select 'Layout.'
4) Select 'Add Gadget.'
5) Select 'Picture.'
6) Select 'From the Web.'
7) Select 'Shrink to Fit.'
8) Copy and Paste from The Blog Guy's Web Page the following HTML Code shown in the third picture.
9) From The Blog Guy's FREE Animation Files, select the image you want. Change the code in RED to that .gif file name.
10) Save, View Blog, Move Gadget to desired location within Blog.


Do you have an animation file you want to use that is not in The Blog Guy's List? Then submit it to me by email. The File storage is free.
Email Your File to The Blog Guy at:
alternate4craigslist@yahoo.com

Next Google Blogging Tip, Trick, Hint, HTML Code, or JavaScript will be on Friday, October 9, 2009.
How to get rid of the Google Blog Bar at the top of the page.

Please support my efforts, Follow This Blog.
Thanks - The Blog Guy
<title">http://blogsfollowme.blogspot.com, Blogs Follow Me<title/>
<meta name="location" content="url-http://blogsfollowme.blogspot.com/">