Q) Please tell me how I can schedule a POST for my Google Blog in advance?
A) On Google blogspot Blogs, this is very easy to do, just follow the 4-steps below shown in the pictures.
Email Inquiries: 26
Step # 1 -
Sign-in to your Google Blog.
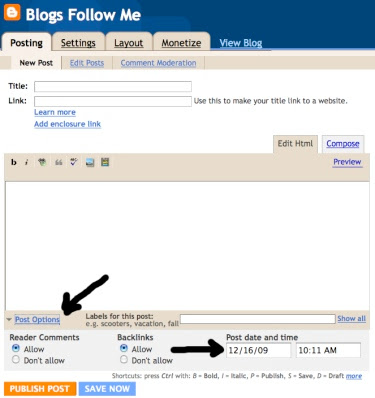
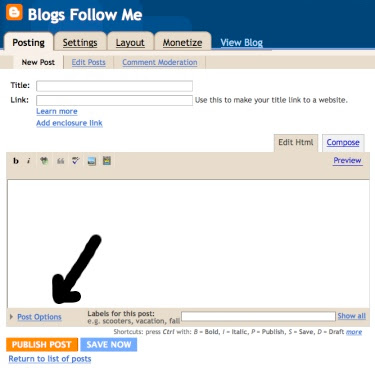
Go to Posting, New Post.
Under 'Post Options' click and the full box opens.
See Picture Below:
Step # 2 -
Once the box opens, simply 'CHANGE' the Date and Time to when you want your POST to be published. Yes you can select the post for later the same day; or for a different day and time.
See Picture Below:
Step # 3 -
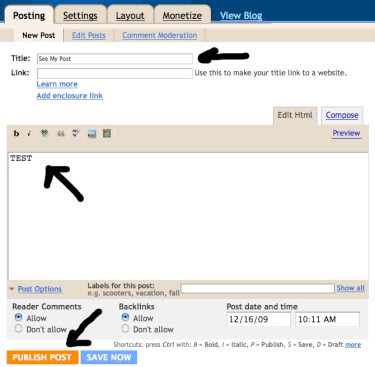
After completing your POST: Picture, Text, Video, etc. just click on 'Publish Post.'
Note - Don't forget to give your Post a 'Title.'
Also, if you are using 'Labels' insert them now.
See Picture Below:
Step # 4 -
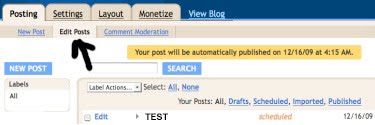
After you have completed the posting open up 'Edit Post' and make sure your Scheduled Post appears.
It should look like the picture below.
Then sign out of your Google Blog and on the date and time you set your scheduled post will automatically be posted to your blog without any additional effort or requirements by you.
12/16/09
12/13/09
This Weeks Google Blog Award Winner from - The Blog Guy
The Google Blog Award Winner for Week Ending (w/e) December 12, 2009, for the best Blog or Website is...
Click on the LINK below to see the Award Winner
Armed Babes
An Award will be issued Weekly.
Voting is now open for Next Weeks Winner.
Remember, you decide who wins, you can even vote for yourself.
Vote for your favorite now....at:
Click here to VOTE:
Vote for Your Favorite Now
Get over an VOTE for your favorite BLOG or Site, people have all ready starting voting for next weeks winner. Get your friends to vote. Make sure you and your friends are following this Blog first to eligible.
Next Posting Tip, Trick, Hint, HTML Codes, JavaScript, and Cool Fun Stuff will be posted on: Wednesday December 16, 2009.
See you soon, thanks for visiting.
Please FOLLOW me -
On this Blog, Blogs Follow Me (http://blogsfollowme.blogspot.com)
On Twitter, blogsfollowme (http://twitter.com/blogsfollowme)
12/7/09
Google Blogging Tip # 94: Resolving Google Blog Issues with Post Editor
Q) Google Blog has two Post Edits found under 'Settings'; one is the 'Old' format and the other is 'New' format. Can you tell me how to upload movies from my desktop or computer file folder using the NEW Post Edit Format?
A) Explanation for Problem-
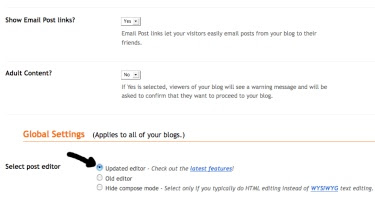
If you have a Google blogspot Blog and it is more than year a old you probably haven't even noticed that Google offers two settings for the Post Edit function (Adding a New Post to your Google Blog). New Blog owners will notice because some templates default to the 'New' format shown as Updated Editor, under Settings, at 'Select Post Editor.' Anyone can update their Blog to the new setting.
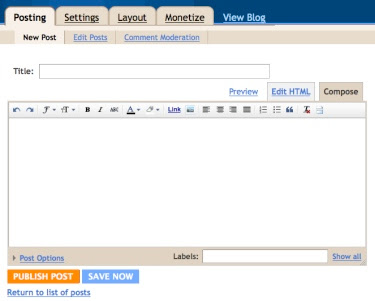
The problem with the 'New' Post Editor the functions are more like something you find in a Word Text file such as Microsoft Word. They do have a place to upload pictures, same as the old format. The problem is they have omitted the Icon Function to upload a movie / video. You can still copy and paste online videos such as YouTube, LiveLeak, etc. You can also link to a video post online and the video will function, but if the link is removed or lost the video on your blog is gone.
Google is still developing this New Format, but they have to be aware that the Icon for uploading a Video is not there.
My guess is that they omitted it on purpose. There can be several reasons for this, among them are:
1) Google doesn't want to be involved with someone uploading property that belongs to someone else, even though videos usually embed their owner's name and URL Address so credit s given.
2) Bandwith and data storage are the main reasons I am sure. Videos take up a lot of storage space and with millions of Google Bloggers all over the world, this becomes very costly. Remember your Blog is Free!
3) Google owns YouTube and wants t promote its use.
Solving the Problem-
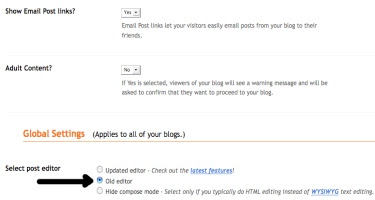
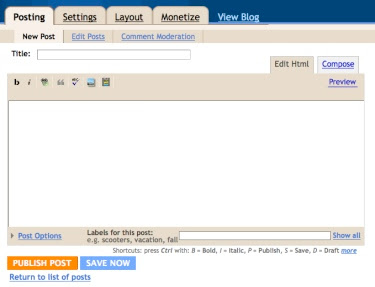
In the interim, use the old editor (original) Post Edit Format if you upload videos from your computer. You can switch back and forth for now between editor formats.
If your video/movie is an original, then upload it to YouTube or another service similar to YouTube like LiveLeak.
Eventually Google will have to make a determination to either add a video icon for uploads or not, but the new Post Editor Format will become the norm with no option.
For long term, if you do not want to create a YouTube like video, then you may have to use another Blog or Social Network that allows video uploads.
See pictures below for further clarification.
Email Inquires: 4
The New Post Editor Format-
The Original Post Editor Format-
Thanks for visiting.
Please support this Blog, Follow me - and, I will Follow you!
Look for the next Posting Tip, Trick, Hint, HTML Codes, JavaScript, and Cool Fun Stuff coming soon.
I am still working out of the Phoenix/Scottsdale Arizona Office this week.
The Google Blog Award Winner for last week was:
Click on the Winners LINK-
Bad Santa Claus
12/4/09
Google Blogging Tip # 93: Adding a Rating System to Your Blog
Blogging Tip # 93 is No Longer Recommended.
Click Here for NEW Rating System Widget for Blogs:
Google Blogging Tip # 102
Click on the LINK to CHANGE your Colors:
HTML Color Chart for Blogs and Websites
Thanks for visiting.
Please support this Blog, Follow me - and, I will Follow you!
Click Here for NEW Rating System Widget for Blogs:
Google Blogging Tip # 102
Click on the LINK to CHANGE your Colors:
HTML Color Chart for Blogs and Websites
Thanks for visiting.
Please support this Blog, Follow me - and, I will Follow you!
12/1/09
Google Blogging Tip # 92: Adding a Social Community to Your Blog or Website
Q) Is there an alternate for Google Friends Connect that I can add to my Blog or Website?
A) I have added The BlogFrog as an additional social community to one of my Google Blogs. Try this as one option, it's easy to install and use. It seems to work well as a supplement to Google Friends Connect. You can have more than one Social Community Network on a Blog or Website.
Click on the LINK to start the installation of The BlogFrog:
The BlogFrog
When you go to The BlogFrog Website you get a page that looks like this.
Just select 'Sign Up.'
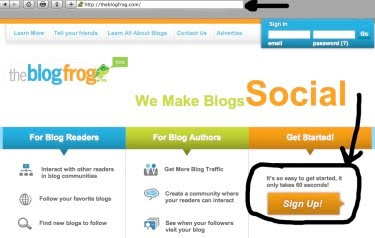
Once you click on 'Sign Up' this pop-up window appears. Here add a valid email address, your name (no spaces) - I used 'theblogguy', then create a password (write in down, you will need it later on).
Then just click 'Done.'
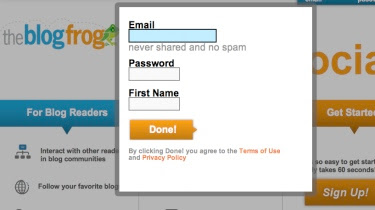
Next - you get a new pop-up window that looks like this.
At this Step, you ADD whatever Blog or Website URL Address you want BlogFrog to be installed on.
If you have Twitter and Facebook you can add them as well.
I chose only to use my Google blogspot address: http://blogsiamfollowing.blogspot.com/
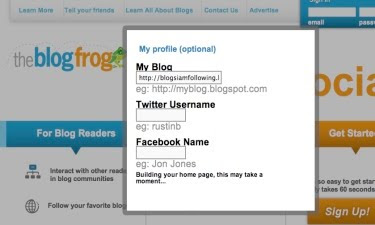
Another new pop-up window appears....
When you get here, your almost done setting up BlogFrog. Just continue to the install.
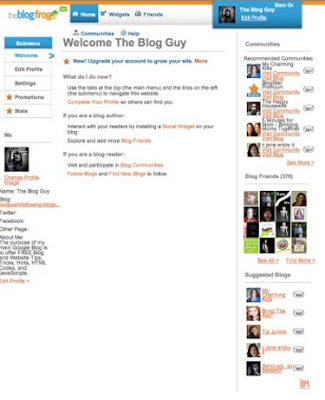
At this step, you may want to use the default codes, you can change these later.
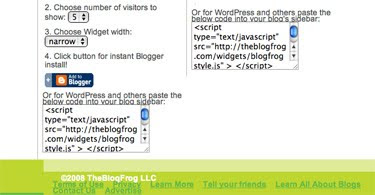
There are two ways to install BlogFrog, I chose the one on the left. I would copy and paste both codes into a word text file so you can opt out of one and replace it with another later if you would like.
Now Copy and Paste the code into your Blog or Website.
For Google Blogs, Follow these steps:
1. Sign-in to your Google Blog.
2. Go to 'Layout.'
3. Select 'Add a Gadget.'
4. Select 'HTML / JavaScript.'
5. Copy and Paste the BlogFrog Code.
6. Save, view your Blog. Then go back to Gadgets and move your BlogFrog Community to the desired location on your Blog sidebar.
For Websites, Copy and Paste the JavaScript Code from BlogFrog and place it where you want your new community to appear on your web page. This goes between the BODY and /BODY.
After you install BlogFrog, and move it to the desired location on your Blog sidebar or within your Website, this is how it will look. You can then invite others to join your community or they cam add you to theirs.
Here is an example of of how it should look on a Google Blog when you are done.
Look at the sidebar, at the bottom of my Blog, Blogs I am Following.
Click on the LINK:
Blogs I am Following
Sorry for the delay in posting this new Blogging / Website Tip.
I just got into Phoenix too late last night.
Next Blogging Tip, Trick, Hint, HTML Codes, JavaScript, and Cool Stuff will be posted on: Friday December 4, 2009.
A) I have added The BlogFrog as an additional social community to one of my Google Blogs. Try this as one option, it's easy to install and use. It seems to work well as a supplement to Google Friends Connect. You can have more than one Social Community Network on a Blog or Website.
Click on the LINK to start the installation of The BlogFrog:
The BlogFrog
When you go to The BlogFrog Website you get a page that looks like this.
Just select 'Sign Up.'
Once you click on 'Sign Up' this pop-up window appears. Here add a valid email address, your name (no spaces) - I used 'theblogguy', then create a password (write in down, you will need it later on).
Then just click 'Done.'
Next - you get a new pop-up window that looks like this.
At this Step, you ADD whatever Blog or Website URL Address you want BlogFrog to be installed on.
If you have Twitter and Facebook you can add them as well.
I chose only to use my Google blogspot address: http://blogsiamfollowing.blogspot.com/
Another new pop-up window appears....
When you get here, your almost done setting up BlogFrog. Just continue to the install.
At this step, you may want to use the default codes, you can change these later.
There are two ways to install BlogFrog, I chose the one on the left. I would copy and paste both codes into a word text file so you can opt out of one and replace it with another later if you would like.
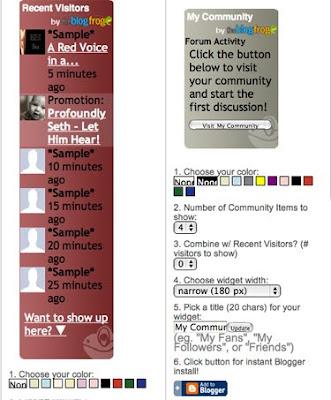
Now Copy and Paste the code into your Blog or Website.
For Google Blogs, Follow these steps:
1. Sign-in to your Google Blog.
2. Go to 'Layout.'
3. Select 'Add a Gadget.'
4. Select 'HTML / JavaScript.'
5. Copy and Paste the BlogFrog Code.
6. Save, view your Blog. Then go back to Gadgets and move your BlogFrog Community to the desired location on your Blog sidebar.
For Websites, Copy and Paste the JavaScript Code from BlogFrog and place it where you want your new community to appear on your web page. This goes between the BODY and /BODY.
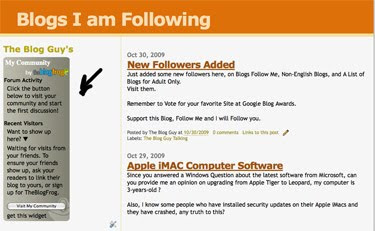
After you install BlogFrog, and move it to the desired location on your Blog sidebar or within your Website, this is how it will look. You can then invite others to join your community or they cam add you to theirs.
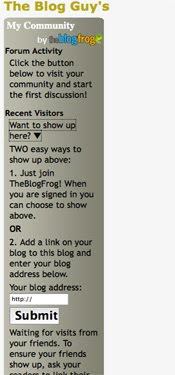
Here is an example of of how it should look on a Google Blog when you are done.
Look at the sidebar, at the bottom of my Blog, Blogs I am Following.
Click on the LINK:
Blogs I am Following
Sorry for the delay in posting this new Blogging / Website Tip.
I just got into Phoenix too late last night.
Next Blogging Tip, Trick, Hint, HTML Codes, JavaScript, and Cool Stuff will be posted on: Friday December 4, 2009.
Subscribe to:
Posts (Atom)